
8(903)201-21-74
ООО "ЧетыреДатчика"
|
Оператор: 8(903)201-21-74 ООО "ЧетыреДатчика" |
|
Оператор: 8(903)201-21-74 ООО "ЧетыреДатчика" |
Главная страница Standalone-dvr users manual 1 ... 5 6 7 8 9 10 7 WEB CLIENT OPERATION Please note, all the operation here in chapter seven is using 16-ch DVR as an example. There might be slightly difference in the interface due to different series. 7.1 Network connection Before web client operation, please check the following items: Network connection is right DVR and PC network setup is right. Please refer to network setup(main menu->setting->network) Use order ping ***.***.***.***(* dvr IP address) to check connection is OK or not. Usually the return TTL value should be less than 255. 7.2 Login and logout Open IE and input DVR address in the address column. For example, if your DVR IP is 10.1.27.200, then please input http: 10.1.27.200 in IE address column. System pops up warning information to ask you whether install webrec.cab control or not. Please click yes button. If you cant download the ActiveX file, please modify your settings as follows. See Figure 7-1. Security Settings - Internet Zone 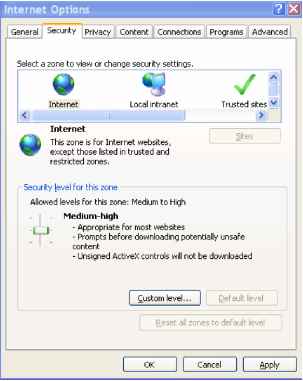 Setting; c) Disable 0 Enable Download signed ActiveX controls (not secure) О Disable ® Enable (not secure) О Prompt (recommended) 1 Download unsigned ActiveX controls (not secure) О Disable (recommended) © Enable (not secure) О Prompt Щ\ Initialize and script ActiveX controls not marked as safe for si О Disable (recommended) © Enable (not secure) О Prompt Run ActiveX controls and plug-ins < Nil Ш dj *Takes effect after you restart Internet Explorer Reset custom settings Reset to Medium-high (default) Reset.. Cancel Figure 7-1 After installation, the interface is shown as below. See Figure 7-2. 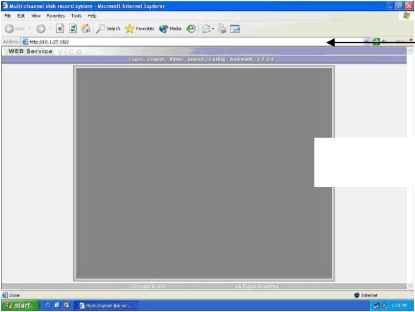 Input your IP address here.
Figure 7-2 There are six function keys: login, logout, video, search, configuration and assistant. See Figure 7-3. Login I Logout №deo Searcfi Confrg [ A STSTant Figure 7-3 Click login the following interface will pop up. See Figure 7-4. Please input your user name and password. Default factory name is admin and password is admin. Note: For security reasons, please modify your password after you first login. 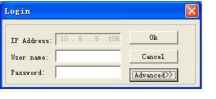 Figure 7-4 7.3 Go to Real-time Monitor Mode There are three ways for you to go to real-time monitor mode. Select the channel number besides function key. See Figure 7-5. f2345e7SSf(Iff12f3 141516 Figure 7-5 In Figure 7-5, click video button then select real-time monitor, click the channel number you want to view. In the main window, right click mouse, select the channel you want to view from real-time monitor. 7.4 Video (Right Mouse Menu Operation) After login, click video button or right click mouse, the interface is shown as below. See Figure 7-6. Real-time monitor: choose the channel you want to view. Start dialogue: click here to begin audio talk. Multi-camera preview: System supports various video preview modes. Decode quality: there are totally four levels: general, good, better and best. Playback control bar: here is for you to control playback. PTZ control: Here is for you to control PTZ movement. Before operate, please make sure you have selected right pan-title protocol for DVR Volume adjustment: here is for you to adjust PC audio volume. Alarm setting: here is for you to set alarm input and alarm output. Network data flux: here is for you to view current data flux Full screen: enter into full screen display mode. Video zoom: there are four options:20%,40%,60%,80%,100% Video windows: Support 1/2/4 window display mode.  Figure 7-6 7.4.1 Real time Monitor Here is for you to select the channel you wan to implement real-time monitor. 7.4.2 Multi-camera Preview Here is for you to select view modes: 1/2/3/4/9/16. 7.4.3 Start Dialog Click this button to enable audio talk function. 7.4.4 Decode Quality Here is for you to select decode quality. There are totally four levels: general, good, better and best. 7.4.5 Playback Control Bar Here is the playback bar when you are viewing video file. See Figure 7-7.  Record Stop Snapshoot Full-screen Close Figure 7-7 7.4.6 PTZ Control Please click the corresponding direction arrow to adjust zoom, focus and iris. See Figure 7-8. Note: before you operate this function, please make sure you have properly set PTZ protocol (Main menu->Setting->Pan-tilt Zoom). 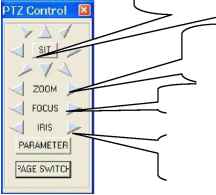 SIT is 3D positioning button. Around SIT are eight PTZ directions keys. Left key: zoom out. Right key: zoom in. Left key: zoom in. Right key: zoom out Left key: turn dark. Right key: turn bright. Figure 7-8 Click parameter button in Figure 7-8. The interface is shown as below. See Figure 7-9. 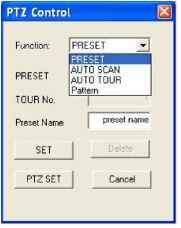 Figure 7-9 Here is for you to control direction operation. There are eight levels ranging from 1 to 8. Level 8 is the fastest speed. In Figure 7-9, click PTZ set button. You can see the following dialogue box. See Figure 7-10. You can select in the dropdown list.  Figure 7-10 7.4.7 Volume Adjustment Please drag volume bar to adjust audio level. You can draw a V before Mute to turn off audio. See Figure 7-11. Adjust Volume Figure 7-11 7.4.8 Alarm Setting Click alarm setting, you can set alarm input and output. See Figure 7-12. 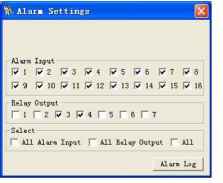 Figure 7-12 7.4.9 Network Data Flux Here is to display the statistics of the network transmission data flux. See Figure 7-13. NetTork Data Figure 7-13 7.4.10 Full Screen There are two ways to view full screen monitor: One is to double click on the current monitor window directly; the other is to select Full screen in the right click menu items. During multi-window state, choose one of the windows and double click for full screen display. 7.4.11 Resize Video There are four display ratios for you to choose: 40%, 60%, 80% and 100%. See Figure 7-14.  Figure 7-14 7.4.12 Video Windows Here is for you to choose display mode. See Figure 7-15. 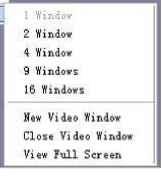 Figure 7-15 7.5 Search Here you can select video type, channel number and time to search the file you want. Click search button, the interface is shown as below. See Figure 7-16 Please use page up/down key to view the search results. Double click file name, you can view the file and system will automatically backup the image in you installation directory. 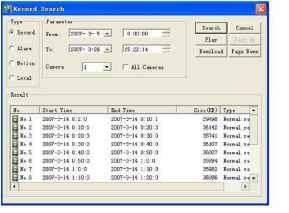 In the search result interface, you can select one or more files to download to your local PC. The playback bar is shown as below. See Figure 7-17. 1: Save 2: Stop 3: Snapshoot 4: Fast Backward 5: Play 6: Pause 7: Fast play 8: Hide 9. Full-screen 10. Close 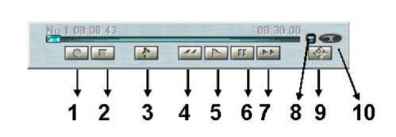 Figure 7-17 7.5.1 Download You can select one or more files you want to download and then click down load button. System pops up a dialogue box asking you specify directory. See Figure 7-18. 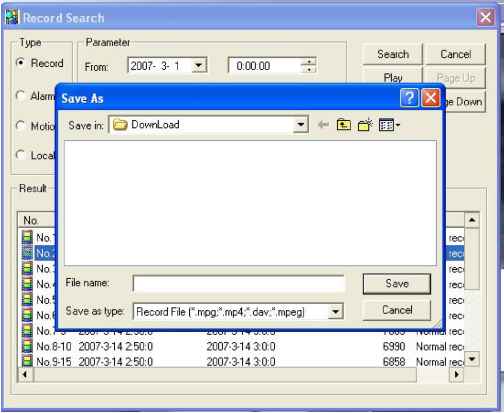 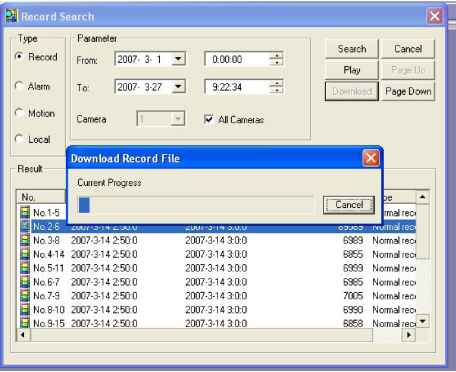 Figure 7-19 Download file name is usually made up of: file name +Channel N +date +time. File extension name is .dav. For example: file name a-0120021205071028.mp4 means: 01: channel 1 20021205: 5th December,2002 071028 :7 oclock 10 minutes 28 seconds. 7.6 Configure Click configure button, there are totally seven function keys. See Figure 7-20. Image Alarm Motion detection Network Video parameter General Schedule Then you can input file name and click save to backup file in your local pc. During the download process, there is a process bar for you reference. See Figure 7-19. 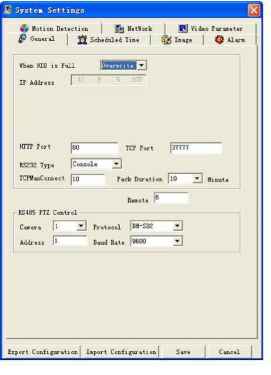 Figure 7-20 7.6.1 Load and Save Configuration 7.6.1.1 Save configuration Click export configuration button in Figure 7-20.You can save current configuration to a directory. The file extension name is CFG. See Figure 7-21. 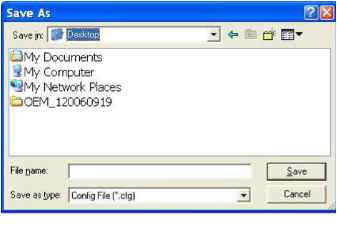 Figure 7-21 7.6.1.2 Load configuration Click import configuration button in Figure 7-20.You can draw a V before checkbox to load you previously backup file. See Figure 7-22.Click Ok button and then select file of extension name .CFG. Now you have updated system setup. 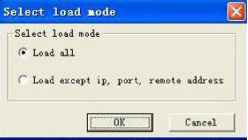 Figure 7-22 7.6.2 General Click general button, the interface is shown as below. See Figure 7-23. Here you can select file length, and choose overwrite the previous file or stop recording when disk is full. You can select channel number, protocol, address and baud rate to control the lens or PTZ. 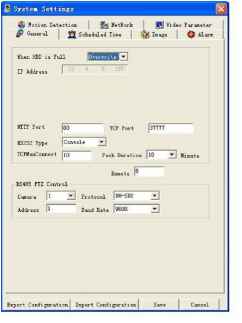 Figure 7-23 7.6.3 Schedule Click schedule button, the interface is shown as in Figure 7-24. Here you can draw a V before Sunday to Saturday. And then set various time periods (from 0 to 24 oclock). You can draw a V to enable record type: record/motion/alarm. 1 ... 5 6 7 8 9 10 |