
8(903)201-21-74
ООО "ЧетыреДатчика"
|
Оператор: 8(903)201-21-74 ООО "ЧетыреДатчика" |
|
Оператор: 8(903)201-21-74 ООО "ЧетыреДатчика" |
Главная страница Dvr features and function 1 ... 4 5 6 7 8 9 10 ... 14 DDNS Type CN99 DDNS R Server IP Го . 0 o Domain Name Host Name Password Figure 5-17 5.3.5.8 Alarm Server You can set alarm in accordance with different alarm protocols. System can inform the alarm server when alarm occurs. See Figure 5-18. ALARM SERVER xl Protocol Type [Private Server IP Ro ~ .0.2 Figure 5-18 5.3.5.9 FTP You need to download or buy FTP service tool (such as Ser-U FTP SERVER) to establish FTP service. Please install Ser-U FTP SERVER first. From start -> program -> Serv-U FTP Server -> Serv-U Administator. Now you can set user password and FTP folder. Please note you need to grant write right to FTP upload user. See Figure 5-19. 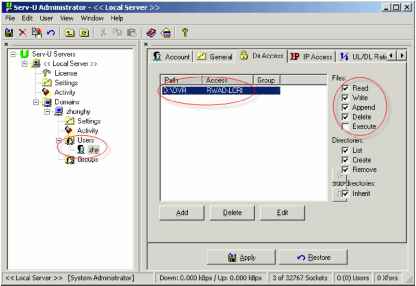 You can use a PC or FTP login tool to test setup is right or not. For example, you can login user ZHY to FTP: 10.10.7.7 and then test it can modify or delete folder or not. See Figure 5-20. 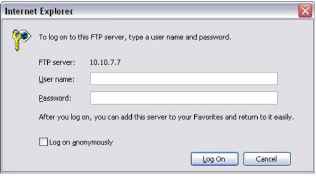 Figure 5-20 System also supports upload multiple DVRs to one FTP server. You can create multiple folders under this FTP. In Figure 5-10, select FTP and then double click mouse. You can see the following interface. See Figure 5-21. Record FTP - Port И024 Alternate IP Rennote Directory Upload Time Q IQO :00 ] Q Anonymous ] File Length o -24 :00 I □ ШЖ Weekday Time Period 1 Time Period 2 Alarm Motion General □ □ □ □ □ □ Figure 5-21 Please highlight the icon in front of Enable to activate FTP function. Now FTP can upload alarm video and motion detection video. Please note, when you are using this function, please make sure current upload channel is in motion detection or alarm record status and there is video available. Here you can input FTP server address, port and etc. 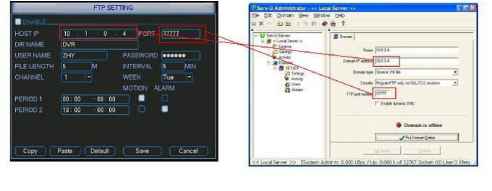 Figure 5-22 File length: upload file length. When setup is larger than the actual file length, system will upload the whole file. When setup here is smaller than the actual file length, system only uploads the set length and auto ignore the left section. When interval value is 0, system uploads all corresponding files. Period 1 and period 2: you can set two periods for one each channel. System file name is shown as in Figure 5-23. 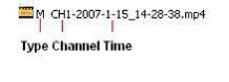 Figure 5-23 5.3.6 Alarm Please refer to chapter 4.6 Alarm Setup and Activation. 5.3.7 Detect Please refer to chapter 4.5 Detect. 5.3.8 Pan/Tilt/Zoom The pan/tilt/zoom setup includes the following items. Please select channel first. See Figure 5-24. Protocol: select corresponding PTZ protocol such as PELCOD. Address: input corresponding PTZ address. Baud rate: select baud rate. Data bit: select data bit. Stop bit: select stop bit. Parity: there are three choices: none/odd/even. After completing all the setups please click save button, system goes back to the previous menu. For detailed setup, please refer to chapter 4.9 preset/patrol/pattern/scan. PANH-ILT/ZOOM Channel 1 Protocol [PELCOD Address l Baudrate [115200 Data Bits [8 Stop Bits [1 Parity [None Default Cancel Figure 5-24 5.3.9 Display Display setup interface is shown as below. See Figure 5-25. Transparency: Here is for you to adjust transparency. The value ranges from 128 to 255. Channel name: Here is for you to modify channel name. Please note all your modification here only applies to DVR local end. You need to open web or client end to refresh channel name. Time display: You can select to display time or not when system is playback. Channel display: You can select to channel name or not when system is playback. Overlay information: System displays some information in the screen for your reference. Display mode: you can select from the dropdown list: self-adaptive/VGA/TV. Enable tour: activate tour function. Interval: Input proper interval value here. The value ranges from 5-200 seconds. In tour process, you can use mouse or click Shift to turn on window switch function. S Stands for opening switch function, Ш stands for closing switch function. Motion tour type: System support 1/8 window tour. Alarm tour type: System support 1/8 window tour. Please highlight icon S to select the corresponding function. After completing all the setups please click save button, system goes back to the previous menu. Transparency Time Display Overlay Info Display Mode Channel Name Channel Display isplay Mode [Self-adaptive - Enable Tour Interval 5 View 1 аввавввоЕ11ЁШ1[ЁШ[ЁШ View4 DBBQ ew8 ПВВаВВВОЕНЁШЕЁЕЕЕЁШ lew 9 a В lew 16 Ц otion Tour Type [View 1 p Alarm Tour Type [View 1 View 9 View 16 Figure 5-25 In Figure 5-25, click modify button after channel. You can see an interface is shown as in Figure 5-26. Please note all your modification here applies to local end only. You need to refresh web or client-end to get the latest channel name. System max support 25-digital character. Channel Name CAMS CAM 5 CAM 7 CAM 9 CAM 11 CAM 13 CAM 15 [cam 11 cam 13 icamis CAM 2 CAM 4 CAM 6 CAM 10 CAM 12 CAM 14 CAM 16 [CAM 10 CAM 12 CAM 14 ICAM 16 Cancel Figure 5-26 In tour mode, you can see the following interface. On the right corner, right click mouse or click shift button, you can control the tour. There are two icons: stands for enabling window switch and О stands for enabling window function. See Figure 5-27.  CAM 1 CAM 2 CAM3 КЛМ4 CAMS KAMI CAM3 CAMS CAM 10 CAM 11 CAM 12  CAM и CAM 14 CAM 15 CAM 16 Figure 5-27 5.3.10 Default Click default icon, system pops up a dialogue box. You can highlight H to restore default factory setup. See Figure 5-28. Select all General Encode Schedule RS232 Network Alarm Detect Pan/tilt/zoom Display Channel name Please highlight icon Я to select the corresponding function. After all the setups please click save button, system goes back to the previous menu. Warning! System menu color, language, time display mode, video format, IP address, user account will not maintain previous setup after default operation! Please select setting entries that you want to restore default SCHEDULE NETWORK PAN/TILT/ZOOIVI Channel Name Figure 5-28 5.4 Search Please refer to chapter 4.3 Search. 5.5 Advanced Double click advanced icon in the main window, the interface is shown as below. See Figure 5-29. There are total seven function keys: HDD management, alarm output, abnormity, manual record, account, auto maintain, and TV adjust. 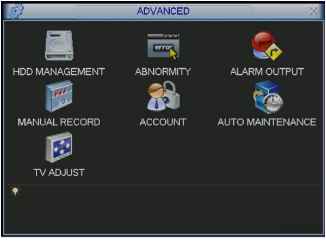 Figure 5-29 5.5.1 HDD Management Here is for you to view and implement hard disk management. See Figure 5-30. You can set proper mode for each hard disk from the dropdown list. When you use redundant backup function, you can set one or more redundant HDD(s). Please note you need to set at least one read-write disk, otherwise system will not record video. For detailed information you can refer to chapter 4.4 Schedule. After all the setups please click save button, system needs to reboot to get all the modification activated. HDD MANAGEMENT 1 2 3 4 5 6 7 0 0 0- - - Alarm Set ] Alarm Release HDD No. Type Read/Write Status Normal Capacity 79.99 GB Record time 00-00-00 00:00:00 / 00-0 *) Setto I Read/Write -[Read/Write Read only Redundant Format .nn / nn nn Recover Execute Figure 5-30 Click alarm set button, the interface is shown as below. See Figure 5-31(This interface is just like the abnormity setup). Please highlight icon = to select the corresponding function. You can enable one or more alarm setups. The lower limit ranges from 1% to 99%. Alarm channel number ranges from 1 to 6. Delay value is from 0 to 240 seconds. Please note when HDD capacity is not full system only alarms once! After all the setups please click OK button, system goes back to the previous menu Ш 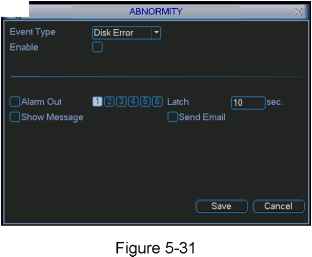 5.5.2 Abnormity Abnormity interface is shown as in Figure 5-32. Event type: There are several options for you such as disk error, no disk and etc. Alarm output: alarm activation output port (multiple choices), among which is controllable 12V output. Latch: here you can set corresponding delaying time. The value ranges from 10s-300s. System automatically delays specified seconds in turning off alarm and activated output after external alarm cancelled. Show message: system can pop up the message in the local screen to alert you when alarm occurs. Send email: System can send out email to alert you when alarm occurs. 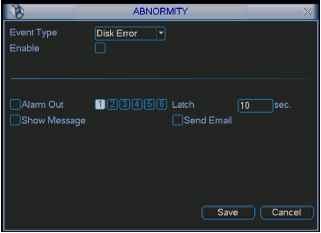 Figure 5-32 5.5.3 Alarm Output Here is for you to set proper alarm output. Please highlight icon = to select the corresponding alarm output. After all the setups please click OK button, system goes back to the previous menu. See Figure 5-33. 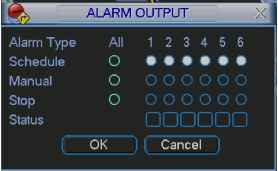 Figure 5-33 5.5.4 Manual Record Please refer to chapter 4.2.2 manual record. 5.5.5 Account Here is for you to implement account management. See Figure 5-34. Here you can: Add new user Modify user Add group Modify group Modify password. For account management please note: System account adopts two-level management: group and user. No limit to group or user amount. For group or user management, there are two levels: admin and user. The user name and group name can consist of eight bytes. One name can only be used once. There are four default users: admin/888888/666666 and hidden user default . Except user 6666, other users have administrator right. Hidden user default is for system interior use only and can not be deleted. When there is no login user, hidden user default automatically login. You can set some rights such as monitor for this user so that you can view some channel view without login. One user should belong to one group. User right can not exceed group right. About reusable function: this function allows multiple users use the same account to login. After all the setups please click save button, system goes back to the previous menu. 4 User 1 888888 2 666666 3 admin 4 default Status Login Local Normal Normal Default User Add Group IVIodifyUser IVIodify Group IVIodity Password Figure 5-34 5.5.6 Auto Maintain Here you can set auto-reboot time and auto-delete old files setup. See Figure 5-35. You can select proper setup from dropdown list. After all the setups please click save button, system goes back to the previous menu. AUTO MAINTENANCE Auto-Reboot System. at 00:00 Auto-Delete Old Files. Never  1 ... 4 5 6 7 8 9 10 ... 14 |