
8(903)201-21-74
ООО "ЧетыреДатчика"
|
Оператор: 8(903)201-21-74 ООО "ЧетыреДатчика" |
|
Оператор: 8(903)201-21-74 ООО "ЧетыреДатчика" |
Главная страница The nuuo central Management System (NCS) 1 2 3 4 5 ... 9 InstallatIon Uninstalling NCS System To uninstall SQL Server: In the Control Panel, open Add or Remove Programs, select and click on Remove button to uninstall four SQL objects (Microsoft SQL Sever 2005, Native Client, Setup Support Files, VSS Writer). 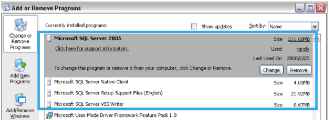 To uninstall the NCS system: In the Start menu, point to All programs, point to NUUO Central Management Server/Client/Matrix, and then click Uninstall NCS System. Transfer all license connections and then transfer license base before you uninstall the NCS System.  Getting Started with the NCS System Getting Started with the NCS System Main Console Configuration To configure the Main Console: 1. Run MainConsole.exe. 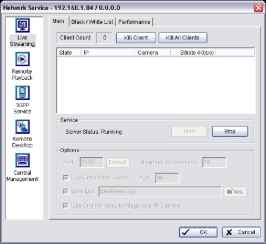 2. In Config, select Network Service, and set up the following services: Live Streaming and Central Management. These services are essential to run the NCS system. Please start these two services. Remote Playback. This service enables recorded video viewing and remote playback. This service is also responsible for providing data for client backup. Ensure this service works, please also Start Recording Schedule to record video. Remote Desktop. This service enables remote configuration of the main console. 3. Select Guard. 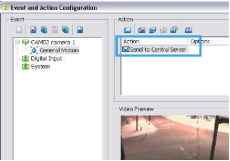 4. In the Event and Action Configuration window, configure alarm events and insert the action Send to Central Server for events that you want to appear on the NCS system. 5. Click OK to return to the main console. 6. In the Start Menu, select Start Smart Guard System to start detecting events. SQL Server To configure SQL Server: 1. In the Start menu, point to All programs, point to Microsoft SQL Server 2005, point to Configuration Tools, and then select SQL Server Configuration Manager. Getting Started with the NCS System 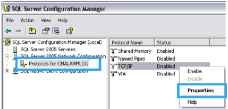 2. In the SQL Server Configuration Manager window, select Protocols for CMALARMLOG, right-click TCP/IP and then select Enable to enable TCP/IP protocol.  3. Double-click TCP/IP, then in the TCP/IP Properties window select the IP Addresses tab. 4. Enter 1433 as the TCP port in IP1, IP2, and IPAll, and then click OK. 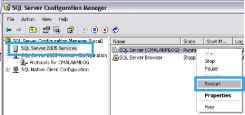 5. In the SQL Server Configuration Manager window, select SQL Server 2005 Services, right-click SQL Server (CMALARMLOG), and then select Restart. 6. Ensure that any firewall allows access through port 1433. NCS Alarm Server To configure NCS Server: 1. In the Start menu, point to All programs, point to NUUO Central Management Server, and then select NCS Server. 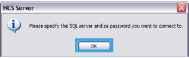 2. In the NCS Server dialog box, click OK. This is only required the first time you start NCS server. Getting Started with the NCS System 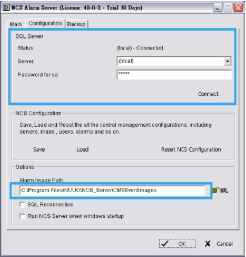 3. The configuration of NCS Alarm Server. In the Configuration tab of Central Server window, enter the IP address of the SQL Server, and then enter and confirm the password set when installing SQL Server. (see page 10) Specify a URL at which to store all alarm images. Select Run NCS Server when Windows starts up if you want NCS Server to startup automatically at Windows startup 4. In the Main table of this window, check the server has been Start and click OK. О The NCS Server must be executed before the NCS Client can be executed. NCS Client To configure and execute the NCS Client: 1. In the Start menu, point to All Programs, point to NUUO Central Management Client, and then select NCS Client. 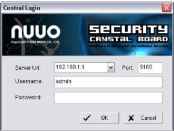 2. In the Central Login window, enter the IP address and port of the NCS Server PC. The default port is 5180. 3. Enter a user name and, if required, a password. The default user name is admin and the default password is empty. 4. Click OK. To activate software license key(s) 1. Open License Manager Tool in Help menu. 2. Select Activate tab, check the NCS system in On line network environment. 3. Insert the SN, SN file or dongle to activate license. 4. After software license is activated successfully, please restart NCS Client. Please refer to page 55 for advanced settings.  Getting Started with the NCS System To start up NCS Client automatically: 1. In the Edit menu, select NCS Client Setting.  2. In the NCS Client Setting window, select Enable Auto Startup and Enable Auto Login 3. Enter a user account and, if required, a password. 4. Click OK. О Please refer to page 24 for advanced settings. NCS Matrix To execute a single matrix display: 1. In the Start menu, point to All Programs, then point to NUUO Central Management Client or NUUO Central Management Matrix, and click NCS Matrix. To configure the first matrix in a multiple matrix system: 2. Ensure that the PC is configured to use multiple monitors. 3. In the Start menu, point to All Programs, then point to NUUO Central Management Client or NUUO Central Management Matrix, and click NCS Matrix. 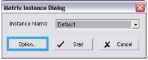 4. Click on Option to open Matrix Instance Dialog. 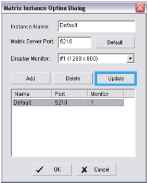 5. In the Matrix Instance Option Dialog window, select Default from list table. 6. Enter a matrix name, for example Monitor 1, in the Instance Name text box, leave the port at the default setting of 5210, select the #1 monitor from drop-down list, and then click Update to update modification. To configure the second and subsequent matrixes in a multiple matrix system: 1. In the Matrix Instance Option Dialog window, enter a matrix name, for example monitor 2 in the Instance Name text box. 2. Enter port number 5220. 3. Select the #2 monitor from drop-down list, and then click Update to update modification. Getting Started with the NCS System 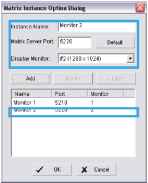 4. To configure a third and a fourth monitor, repeat steps 1-3 naming the matrix instances as appropriate (for example monitors, monitor4), entering the port number (5230 for a third monitor and 5240 for a fourth), and selecting the appropriate monitor. 5. Click OK to save all configuration of Matrix. To execute a matrix in a multiple matrix system: 1. Ensure that the matrixes have been configured as described above. 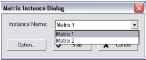 2. In the Matrix Instance Dialog window, choose the matrix you want in the drop-down list, and then click Start to start Matrix view. 3. Repeat steps 1 and 2 to execute each monitor. NCS System Overview NCS System Overview NCS Server Window Introduction The NCS Server features four main tab windows, including : The Main window controls the start/stop NCS server as well as the client connection through kill client/kill client all options. Under the Configuration window you may setup the connection between SQL Server and NCS Server,.  Restoring NCS Configuration will not clear the setting of SQL Server. NCS Server enables backing up alarm records at a local hard drive or to FTP servers. Define a storage location for video backups under the Backup window. You may select between two storage locations. Choose Disk Storage for local hard drives or DAS, or choose FTP to backup to FTP servers. The License Status window displays current available licenses in the system. 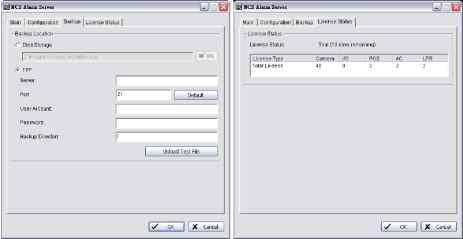  NCS System Overview By double clicking on the server icon MI from the Taskbar you can access NCS Server settings directly. You can also check the version of your system or stop the service by right clicking on the icon and clicking About or Exit. 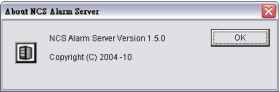 NCS Client Window Introduction The default NCS Client window placement is as the following figure, including three main windows, four toolbars, and six menus. iS NCS Client [admin] [Trial] 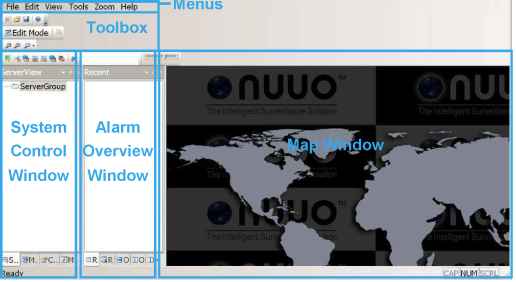 Three Main Windows are: System Control window: This window includes the Server List, Map List, Configuration, Matrix List and View Group List sub-windows. Administrators can configure the NCS system in this window when the system is in Edit Mode. (See Part 2: Administrator Functions (Setting Up the NCS System) 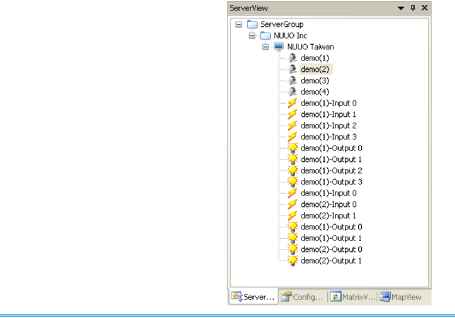 NCS System Overview Map window: This window shows all maps and device indicators. For administrator setup, see page 30. For day to day use, user can view the video, show device information, query and manage alarms from the indicators (please refer page 70). 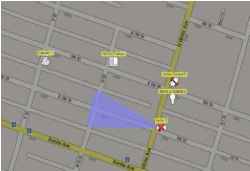 Alarm Overview window: The default Alarm Overview window contains the Recent, Real-Time, Output, Output 2, and Message Log tabs, which allow users to manage alarms (see page 61).  Six menus are: The File menu: This menu has functions use to commit to NCS Server, save/load NCS Client Configuration, and Logout/Exit NCS system. The Edit menu: It allows administrator add New Object to configuration sub-window of System Control Window, Import Indicator Image, setup Server configuration (refer Central Server Configuration Window section of page 42) on Edit mode; and allows all user to setup Map Display setting of Map windows, Alarm Log setting of alarm overview windows, and setup Joystick to control Matrix. The View menu: This menu has options to setup the appearance of NCS Client window. The Tools menu: This menu has five tools to help user easy to get information for Main Console, manage alarms, and view live and record videos. The Zoom menu: User can control and adjust map appearance (see page 70). The Help menu: The menu provides the version information of NUUO NCS Client. toolbars are: The Standard toolbar: The functions accessed by this toolbar are: toggle Edit Mode/Operate Mode (see page 26), committing configuration changes to the server (see page 26), importing/exporting NCS Client software configuration (see page 54), and displaying version information (see page 92). The Map toolbar: The functions accessed by this toolbar are used to adjust map appearance (see page 70). The Operate toolbar: The functions accessed by this toolbar help users in day to day use of the NCS Client. For more information, see page 60. The Status toolbar: Quick links to SQL Server Status and Central Backup Status can be found here. The Search toolbar: The functions accessed by this toolbar include functions involved in searching (see page 71).  Standard Operate Status Search NCS System Overview NCS Client Setting You are able to configure functions including auto startup, auto login, auto reconnection, instant playback and client recording under this window. Go to the Edit menu - NCS Client Setting. 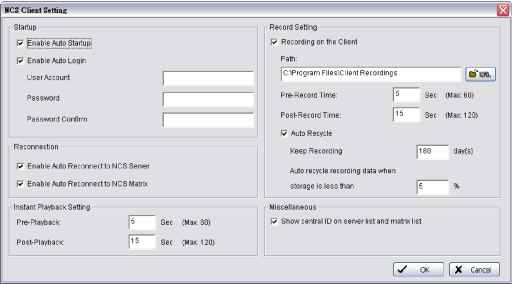 Startup: Check to enable auto startup or auto login. Reconnection: Check to enable auto reconnection to NCS Server / NCS Matrix when connection is lost. Record Setting: Check to enable alarm triggered local recording on NCS client. You may customize pre/post record time and auto recycle settings. Instant Playback Setting: Configure pre/post playback length under instant playback windows. Miscellaneous: Check Show central ID on server list and matrix list to display server / device / matrix ID number on server and matrix lists. This is mainly for Joystick control. For details, please refer to p. 87. To enable Recording on NCS Client or instant playback you MUST also start recording from Main Console. NCS cannot access playback if Main Console has not recorded video. Customizing Client Appearance The appearance of the NCS Client is customizable. The System Control and Alarm Overview windows and their nine associated tab display windows can be moved or removed to four appearance types: Floating: A floating window can be moved to any position on the screen. Docking: A docking window is aligned with one of the four edges of the application window. Auto Hide: Docking windows can be set to AutoHide. The window then displays only when you point to the area of the screen where the window is docked. Hide: Hide the windows can be removed from screen. Toolbars also can be moved or removed. The outlook of the client can also be changed to various preset styles. To restore appearance back to default, please go to View menu and click on Reset Window Placement.   1 2 3 4 5 ... 9 |