
8(903)201-21-74
ООО "ЧетыреДатчика"
|
Оператор: 8(903)201-21-74 ООО "ЧетыреДатчика" |
|
Оператор: 8(903)201-21-74 ООО "ЧетыреДатчика" |
Главная страница The nuuo central Management System (NCS) 1 2 3 4 5 6 ... 9 NCS System Overview To move a main window: Click the title bar at the top of the window and drag it to the position you want. If you want it to dock at one of the edges of the NCS Client window, drag it to one of the direction arrow buttons. There are three direction arrow buttons groups of different windows (refer next page): The Central group of Map Window, it allow move window to four edge of Map window. The Outside group of NCS Client Window, it allow move window to four edge of Map window. The Attached group of individual window, it allow move window to four edge of individual window and move to be an associated tab display windows. To move an individual tab display window: Right-click on a tab and select Floating, or click directly on the tab and drag the window to the position you want. If you want it to dock at one of the edges of the NCS Client window, drag it to one of the blue direction arrow buttons. The Auto Hide function can now be applied to that tab window individually. To move an individual tab display window to a main window: Right-click on a tab and select Docking, or click directly on the tab and drag it to a tab bar in a main window. Ш NCS Client [admin] : File Edit View I00I5 loom helo iel - < ШМ Configuratidf 13-Outside Group Attached MatHHView E35.,., e .pV...*Cc  These direction arrow buttons groups only appear when NCS Client preset style set as Office 2003 / Visual Studio.NET 2005 / Office 2007 To Auto Hide a window (only available when window is docked): Either: Right-click in the window and select Auto Hide. In the title bar for the window, click the Auto Hide toggle button . The Auto Hide function applies to all tab windows in a main window. If one of the tab windows in a main window is set to Auto Hide, all the other tabs will also Auto Hide.  NCS System Overview To close an individual tab display window: Right-click on a tab and select Hide or click directly on the Close Window button x on the top right corner of the window. To display the window again, go to the View menu, point to Toolbars, and then check the window you want to show. Another way to close a window is to uncheck a box in the Toolbars menu. To move a toolbar: Click on the double line on the left side of a toolbar and drag it to the position you want. To hide or display a toolbar Go to the View menu, point to Toolbars, and then uncheck or check the toolbar you want to hide or show. And if user drag to as an individual menu in window, simply click the x button on the top right corner of the menu to close it. To change the look of the NCS Client to a preset style: In the View menu, point to Application Look, and choose one of the following preset application looks: Office 2000 / Office XP / Office 2003 / Visual Studio.NET 2005 / Windows XP / Office 2007 System Operate Mode/Edit Mode To carry out most administrator functions, you need to be in Edit Mode. Press the Edit Mode toggle button [Edit Mode to enter Edit Mode, and press it again to exit Edit Mode. When in Edit Mode, the NCS Client will not receive alarms. A flashing indicator reminds you that you are in Edit Mode. Any changes made to the system must be saved with the Commit HoniTiit button. When administrators click the Commit button to save changes, other users will be disconnected from the NCS server and will need to log in again. NCS Matrix Window Introduction icon would auto appear. User can edit/exit the Matrix, further option Move Mouse to right-down area, the please see page 51. SQL Server Introduction NCS system is use SQL Server 2005 Express of Microsoft free application software as database. NUUO recommend user to use Microsoft SQL Server Management Studio Express to backup SQL Server. Please refer the web site of Microsoft http: technet.microsoft.com/en-us/library/ms365247.aspx .    Part 2: Administrator Functions (Setting Up the NCS System) This section describes functions and operations of the administrator to set up the NCS Client software system while in Edit Mode. Please follow this section to setup Servers/Devices, Maps, Servers/Devices on Map, User Groups and Users, Coverage, Alarms, and Matrix system.
The NCS Client provides the ability to monitor unlimited cameras and input/output devices through unlimited Main Console servers. For convenience, Main Console servers and their related devices are organized into groups. The default top-level group is called ServerGroup. Child groups can be added to this in a hierarchical structure. To carry out the functions described below, you need to be in Edit mode and Commit after setup (see page 26). The license of the software should be registered first before operating the formal version of NCS System. Execute the License Management Tool in Help>License Manager to activate the license from a dongle or serial number allocated with the NCS software package, or de-activate the license then use it on another PC to activate it again. Please refer to page 55 for details on how to configure the License Management Tool. Adding/Editing/Removing Server Groups To add a server group: 1. Ensure that the client is in Edit Mode and that the ServerView tab is selected. 2. Riglit-clicl< on tlie ServerGroup icon J at tlie top of tlie window, tlien clicl< Add Group. 3. Enter the group name, then click OK. 4. The group you added appears in the tree structure of the ServerView window. To edit a server group name: 1. Riglit-clicl< on tlie server group icon j for tlie group you want to edit. 2. Select Settings. 3. Enter the name you want, then click OK. To remove a server group: 1. Riglit-clicl< on tlie server group icon i j for tlie server group you want to remove. 2. Select Delete and click Yes at the confirmation prompt. Adding/Editing/Removing Servers Servers can be added to any server group. When a server is added, the devices on it must be synchronized with the NCS Client (See page 29). This procedure ensures that the cameras, input/output devices, and metadata devices on the server are available for monitoring. To add a server: 1. Ensure that the client is in Edit Mode and that the ServerView tab is selected. 2. Riglit-clicl< on a server group icon CHi, tlien clicl< Add Server. 3. Enter the server details, then click OK. The Central Management Port should be the same as setup in Main Console server. 4. The server you added should appear in the tree structure of the ServerView window. To edit settings of an existing server: 1. Go to server view under Edit Mode. 2. Right-click on an existing server and choose Settings 3. Click OK after configuration is done.   Servers/Devices 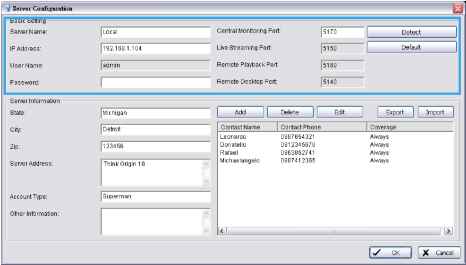 Licenses for all servers and devices (cameras, I/O devices and metadata devices) need to be activated via NCS Client. (See Page 56) If you enter the Central Management port and click Detect, the NCS system will auto-detect the ports for Live Streaming, Remote Playback and Remote Desktop. Click the Server Info button to open a Server Information window, and the Server Information will be displayed on the Alarm detail window when an alarm is active. To add contacts to the server: 1. Click on Add under Server Configuration. 2. Complete the required info and click OK. To synchronize server devices: Right-click on a server icon - , then click Synchronize Device. Then, all cameras, metadata and input/output devices of Main Console server will appear and be available for monitoring. 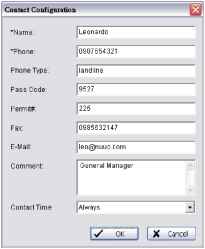 You must have enough licenses for the devices, otherwise the devices without licenses will show disable icon. In the Tool menu, select Server Summary to check the license status. To edit server settings: 1. Right-click on a server icon Щ, then click Settings. 2. Enter the required settings, then click OK. To remove a server: 1. Right-click on a server icon I. 2. Select Delete and click Yes at the confirmation prompt. You may sort servers under server groups or devices under servers according to name or type. To do this right click on any server group or server under Edit mode and choose Sort by Name or Type. You may also drag and drop icons to rearrange order manually.      Maps Maps The Map window displays indicator icons representing the devices and servers that the NCS client monitors. They are shown against map backgrounds. This enables quick and easy control and monitoring of devices according to their location. Multiple maps of different locations and at different scales can be used, as described below. To change the size, pan settings and brightness of map graphics, see page 70. To carry out the functions described below, you need to be in Edit Mode and Commit after setup (see page 26). Map Hierarchy Maps can be layered in a hierarchical structure. Typically, the top-level (parent) map is at a large enough scale to cover the geographical areas of all the lower-level (child) maps. Each child map is assigned an icon on the parent map. Clicking a child map icon shows the child map in the Map window. Multiple levels of child maps can be defined. Q Щ Taiwan i- NUUO Taipei The default top level map is provided by NUUO. To change this, see the section To edit map settings below. Adding/Editing/Removing Maps To add a child map to a parent map: 1. Ensure that the client is in Edit Mode and that the MapView window is selected. 2. Riglit-clicl< on tlie icon for tlie parent map ®, tlien clicl< Add Map. 3. Enter the required details. 4. If you do not want to use the default indicator image, please manual import another image and set to default (For information on importing indicator images, see page 31.). 5. Click OK. The map you added appears in the tree structure of the MapView window. 6. The map indicator appears on the parent map. Drag it to the position you want. To edit map settings: 1. Riglit-clicl< on a map icon Ш, tlien clicl< Settings. 2. Enter the required settings, then click OK. To remove a map: 1. Riglit-clicl< on a map icon 2. Select Delete and click Yes at the confirmation prompt. You may sort maps and devices on the map list according to name or type. To do this right click on any map under Edit mode and choose Sort by Name or Type. You may also drag and drop icons to rearrange order manually.    Servers/Devices on Map Servers/Devices on Map Each Main Console server or device can be assigned to a map. An indicator for the Main Console server or device is displayed on the map at the position you choose. This allows quick and easy control and monitoring. You can control the orientation of indicators as well as the appearance of accompanying text and the information it shows. The NCS Client software comes with default indicator images, but you can also import your own. To carry out the functions described below, you need to be in Edit Mode and Commit after setup (see page 26). Importing Indicator Images To import an indicator image: 1. In the Edit menu, select Import Indicator Image. 2. From the drop-down list, select the type of indicator image you want to import.  3. Click Import, browse to the required image file, and open it. 4. Click OK. If you want to set a specific image as the default for a file type, select the image, then select the Default checkbox. Adding/Removing Device Indicators There are two ways to add device indicators to a map: MapView display and ServerView. To add device indicators to a map in MapView: 1. Ensure that the client is in Edit Mode and that the MapView window is selected. 2. Click on the map icon ЩК for the map you want to add an indicator to. This displays the map. 3. Right-click on the map icon. 4. Click Add Server Indicator, Add Camera Indicator, Add Metadata Indicator or Add I/O Indicator, as required. 5. From the drop-down list, select a device. 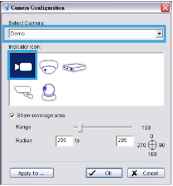  Servers/Devices on Map 6. Choose an indicator. 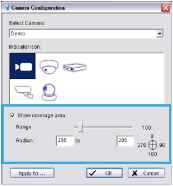 7. When the device is a camera select Show Coverage Area to set the Range and Radian. 8. Click Apply to if you need to apply settings to other camera indicators. 9. Click OK. 10. The device indicator will appear on the map. Drag it to the required location. To drag a device indicator to a map from ServerView: 1. Ensure that the map you want is displayed. 2. Click on the ServerView window. 3. Directly drag a device to the desired location on the map. If you are in MapView and click on a device which has already been added to a map, the map for that device will be displayed. To remove a device indicator from a map: 1. Right-click the indicator. 2. Click Delete. 3. Click Yes in the confirmation window. Edit Device Indicators An indicator image can be rotated, mirrored, or changed. The image can also be set to refer to a different device than the one originally chosen. To rotate a device indicator to a preset angle: Once a device indicator has been added or dragged to a map, the indicator image can be rotated. This is useful to show which direction a camera is pointing.  1. Right-click the indicator or right-click the device from MapView. 2. Click Rotate and choose an angle (preset angle 0, 45, 90, 135, 180, 225, 270, or 315 degrees). The radian, range, color and area of Camera Indicator can be set to show camera coverage.  Servers/Devices on Map To rotate a device indicator to an arbitrary angle: 1. Right-click the indicator or right-click the device form MapView, or click icon from Edit toolbar. 2. Click Rotate Arbitrary. 3. Use the rotation handle to rotate the indicator to the desired angle, then click to fix the angle. 4. Click Rotate Arbitrary again to close this option. To mirror a device indicator: Indicator images can be mirrored (flipped horizontally) so that a mirror image is displayed. One use would be to show in which direction a camera is pointing. For example, a default image may show a camera pointing left. 1. Right-click the indicator or right-click the device form MapView. 2. Click Mirror. 3. Mirroring would then have it facing right. I demo 2 И^даШ 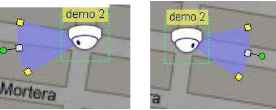 The mirror command is a toggle. To un-mirror a previously mirrored indicator, follow steps 1 and 2 again. To change a device indicator image: 1. Right-click the indicator or right-click the device form MapView. 2. Click Settings. 3. Select the indicator image you want, then click OK. To import a new indicator image, see page 31. To remove a device indicator from a map: 1. Right-click the indicator or right-click the device form MapView. 2. Click Delete. 3. Click Yes in the confirmation window.  Coverage Coverage Coverage is a defined period or periods of time. This is used for the following purposes: To define the times a user can log in to the system and use the NCS client. This coverage is applied according to the local time of the NCS Client. To define the times that an alarm is active. This coverage is applied according to the local time of the source Main Console server. О To carry out the functions described below, you need to be in Edit Mode and Commit after setup (see page 26). Adding/Editing/Removing Coverage To add a coverage: 1. Ensure that the client is in Edit Mode and the Configuration window is selected. 2. Right-click on the Coverage folder icon CD Coverage , then click Add Coverage. 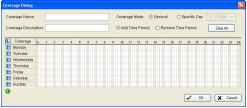 3. In the Coverage Dialog window, enter a coverage name and, if you want, a coverage description. Choose a coverage mode: General is for regular coverage periods. Specific Day means that this coverage applies to a specific date only. Choose the date from the drop-down list. Select the time periods you want for this coverage. Drag over the time periods you want. Selected periods appear in blue. To remove periods, select Remove Time Period and drag over the periods you want to remove. To clear all selected periods, click the Clear All button. Click OK. The coverage you added appears in the tree structure of the Configuration window. О You can also add a coverage from the Edit menu by pointing to New Object, clicking on Coverage then following steps 3 - 6 above. To edit a coverage: 1. Right-click on the coverage icon Ф for the coverage you want to edit. 2. Select Edit Coverage. 3. Edit the settings as required. 4. Click OK. To remove a coverage: 1. Right-click on the coverage icon Ф for the coverage you wrant to remove. 2. Select Delete Coverage and click Yes at the confirmation prompt. 1 2 3 4 5 6 ... 9 |