
8(903)201-21-74
ООО "ЧетыреДатчика"
|
Оператор: 8(903)201-21-74 ООО "ЧетыреДатчика" |
|
Оператор: 8(903)201-21-74 ООО "ЧетыреДатчика" |
Главная страница The nuuo central Management System (NCS) 1 2 3 4 5 6 7 ... 9 User Groups and Users User Groups and Users System administrators can control who can use the NCS client, when they use it, their ability to perform various functions, and which devices they can access. Privileges are assigned via user groups. For each user group, an administrator can define permitted functions as well as which devices the users in that group can access. Password control, permitted access times (see page 34), and a matrix profile (see page 47) are configured in the settings for each user. To carry out the functions described below, you need to be in Edit Mode and Commit after setup (see page 26). Adding/Editing/Removing User Groups To add a user group: 1. Ensure that the client is in Edit Mode and that the Configuration window is selected. 2. Right-click on the User Group folder icon J UserGroup , then click Add User Group. 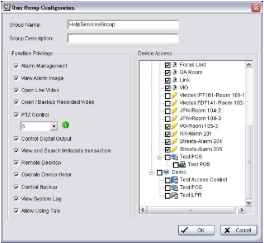 3. In the User Group Configuration window, enter a group name and a group description if required. 4. In the Function Privilege area, select the privileges for members of this User Group: Alarm Management - allows users to change alarm status on the Alarm Management window (see page 61). Alarm Image -\ 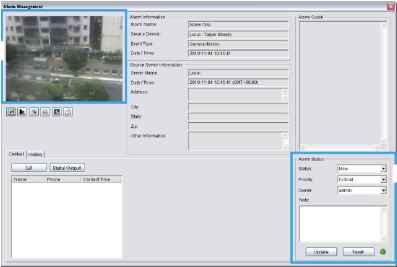 Alarm Management View Alarm Image - allows users to see a snapshot from the camera as an icon in the Recent display (see page 61) and view snapshot on Alarm detail Window.  User Groups and Users Open Live Video - allows users to open a live video window to view image of the camera and related devices from the Alarm Detail window or by right-clicking on a camera indicator. Open/Backup Recorded Video - allows users to open or back up recorded video of the camera and related devices from the Alarm Detail Window or by right-clicking on a camera indicator. PTZ Control - allows users to control the PTZ (pan, tilt, zoom) settings of compatible cameras. This option only works when users also have Open Live Video authority. Priority of PTZ control of the user group is defined by numbers 1-10, with 1 for the highest priority. Users with higher priority can obtain PTZ control from other users. Control Digital Output - allows users to control digital outputs such as alarms. This option only works when setting IO devices as related devices in Alarm setting (see page 40 ). View and Search Metadata transaction - allows users with authorization to search metadata transactions. Remote Desktop - allows users to open a remote desktop. 5. In the Device Access area, choose the devices which members of this User Group will be able to access. If the devices have not been enabled in Device Access table, users still dont have allow to use above functions. 6. Click OK. The user group you added appears in the tree structure of the Configuration window. You can also add a user group from the Edit menu by pointing to New Object, clicking on User Group then following steps 4 - 6 above. For quick add a new User Group, please use Insert Copy option by right-click on the User Group which you want to copy. To edit a user group: 1. Right-click on the User Group icon for the user group you want to edit. 2. Select Edit User Group. 3. Edit the settings as required. 4. Click OK. To remove a user group: 1. Right-click on the User Group icon for the user group you want to remove. 2. Select Delete Group and click Yes at the confirmation prompt. Adding/Editing/Removing Users Add new users and modify or remove existing users. You may choose to add Central Users directly in the system or import users from MS Active Directory (MSAD) as Windows Users. To add a Central User: 1. Ensure that the client is in Edit Mode and the Configuration window is selected. 2. Right-click on the User folder icon i j User, then click Add Central User. The User Configuration window appears.   User Groups and Users 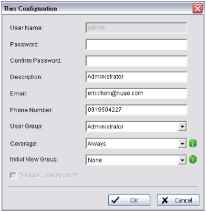 3. In the User Configuration window, enter a user name. 4. If password access is required for this user, enter and confirm a password. 5. Enter a description if needed. 6. If you want this user to receive auto alarm notifications by email or SMS, enter the email address and/or Cellphone number. 7. Choose a user group, a coverage (see page 34), and a matrix initial view group (see page 47) from the drop-down lists. The coverage here is based on the NCS Clients local time. 8. Click OK. The user you added appears in the tree structure of the Configuration window. You can also add a Central user from the Edit menu by pointing to New Object, clicking on User then following steps 3 - 8 above. To edit a Central user: 1. Right-click on the user icon for the user you want to edit. 2. Select Edit User. 3. Edit the settings as required. 4. Click OK. To remove a Central user: 1. Right-click on the user icon for the user you want to remove. 2. Select Delete User and click Yes at the confirmation prompt. Enable Disable User Account option on User Configuration window also can reject this user account to login NCS system. You may sort users and user groups on the configuration window according to name. To do this right click on User or User Group under Edit mode and choose Sort by Name. You may also drag and drop icons to rearrange order manually.  User Groups and Users To add / remove / synchronize a Windows User: 1. Right-click on the User folder icon i j User, then click Add/Remove/Sync. Windows User. The Select Group / Select User window appears. 2. Check users or folders under Select Active Directory user(s) and click OK to add Windows Users. 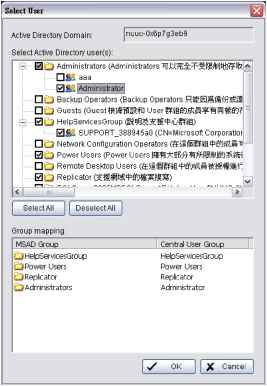 Click Select All to check all available users and folders, or click Deselect All to uncheck all users. Group Mapping: Selected Windows users will be grouped according to default mapping: MSAD Group Central User Group Administrator Administrator No Group Default User Other Groups Automatically add a new user group with the same name You may further modify group setting for each user manually. Please refer to edit a Central User on page 37 for details. Editable columns for Windows Users include Email, Phone Number, User Group, Coverage, Initial View Group and Disable User Account. 3. Synchronization results will be displayed for confirmation. Please refer to the default solution for all conflicts:
   User Groups and Users
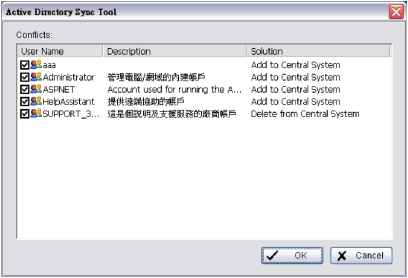 4. Uncheck items to skip applying solution to NCS Client user account settings. For example, if you uncheck an Add to Central System solution, the new account will not be added to NCS Clients user account list. Instead of manually adding and updating Windows users, you may also configure the system to automatically synchronize all Windows users at a specific period. To configure automatic synchronization on Windows Users: 1. Right-click on the User folder icon -til User, then click Auto. Sync. Windows User Setting. The Automatically Synchronized Setting window appears. 2. Check Automatically synchronize Windows users. 3. Configure synchronized period to start every days. 4. Define synchronized time to decide what time the synchronization should start. 5. Click OK. 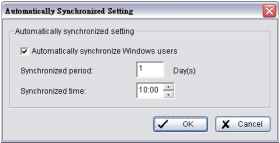 Auto synchronization will apply all default solutions to conflicts.   Alarms Alarms The alarm functions of the NCS Client can be configured to monitor many different events triggered by cameras, input devices, output devices, and servers. To carry out the functions described below, you need to be in Edit Mode and Commit after setup (see page 26). Adding/Copying/Editing/Removing Alarms To add an alarm: 1. Ensure that the client is in Edit Mode and the Configuration window is selected. 2. Right-click on the Alarm folder icon О Alarm , then click Add Alarm. 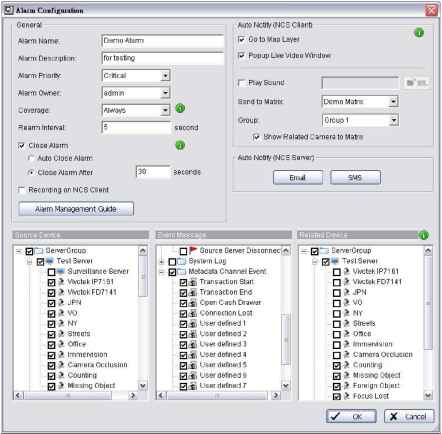 3. In the Alarm Configuration window, enter an alarm name and alarm description. 4. Choose an alarm priority and an alarm owner from the drop-down lists. 5. Choose from the following settings: Choose a coverage (default coverage is Always). The coverage here is based on the alarm source devices local time. Enter a rearm interval. If the rearm interval is too short (default interval is 5 sec.), multiple alarms may be triggered by certain events such as motion. You can pick from two Close Alarm options. If you want the alarm to close automatically when the triggering event ends, check Auto Close Alarm. You can also set a timer for the alarm to close automatically after a couple seconds. If you want to record video locally whenever this alarm is triggered, check Recording on NCS Client. Alarms To enable recording on NCS Client, you must check Recording on the Client under Edit - NCS Client Setting - Record Setting. See page 24 for details. If you do not want to put the alarm into effect straight away, check Disable Alarm. If you want, click Alarm Management Guide and enter text. This text appears in the alarm detail window (see page 64). The text also appears when users point to a device for which the alarm is active. 6. Select options in the Auto Notify (NCS Client) area: If you want the map window to automatically display the map for the alarms source device, select Go to Map Layer. User can click on Ъ icon to stop this function when day to day use. For a camera alarm event, if you want a live video window from that camera to pop up, select Popup Live Video Window. Up to three live video windows can be open at a time. User can click on icon to stop this function when day to day use. If you do not want to send the video of an alarm source camera and a related camera to matrixes, check Disable to Matrix button o . If you do not want alarm events to replace old events on the Matrix if the Matrix is full and users do not close old events, check the Disable Matrix Popup button NCS system will auto filter the same alarm of one camera, it cant allow one alarm of a camera to use more than one popup live video windows. If you want a sound to play when the alarm is triggered, check the Play Sound box, then click the URL button and browse to a sound file. For a camera alarm event, if you want the cameras video feed automatically sent to a matrix, choose a matrix from the Send to Matrix drop-down list and a Group. If a related camera is selected, you can also choose to Show Related Camera to Matrix by checking that box.  The options of this section, Go to Map Layer, Popup Live Video Window, Play Sound, Send to Matrix, and Show Related Camera on Matrix settings apply only to one computer. If users run the NCS Client on another computer, they will have to configure the settings for that computer. To use Send to Matrix and Show Related Camera on Matrix, a matrix must be configured (see page 45), and that matrix must be set to Allow Show Video on Event (see page 85). 7. Select options in the Auto Notify (NCS Server) area: If you want the server to send an automatic email to users when an alarm event happens, click the Email button and then select users. If you want the server to send an automatic SMS message to users when an alarm event happens, click the SMS button. The text of the message is [Alarm Name] on [Date/Time]. To configure the servers GSM modem and email settings (including email content), see page 42. 8. In the Source Device area, select the device/s which will trigger this alarm. 9. In the Event Message area, select the event/s which will trigger this alarm. 10. In the Related Device area, select devices which you want to relate to this alarm. For example, an input device event can automatically trigger a live video popup from a related camera. 11. Click OK. The alarm you added appears in the tree structure of the Configuration window. You can also add an alarm from the Edit menu by pointing to New Object, clicking on Alarm then following steps 3 - 11 above.    Alarms To copy an alarm: 1. Right-click on the icon ! for the alarm you want to copy. 2. Select Insert Copy. 3. Configure the alarm as described above. 4. Click OK. The alarm you added appears in the tree structure of the Configuration window. To edit an alarm: 1. Right-click on the icon ! for the alarm you want to edit. 2. Select Edit Alarm. 3. Edit the settings as required. 4. Click OK. To remove an alarm: 1. Right-click on the icon ! for the alarm you want to remove. 2. Select Delete Alarm and click Yes at the confirmation prompt. Central Server Configuration Window The Central Server Configuration window controls how the server keeps alarm records, and also GSM and E-Mail server settings for auto notification of alarms to users. Go to Edit - Server Configuration under edit mode for this window. If necessary, consult with your IT administrator for details on these settings. 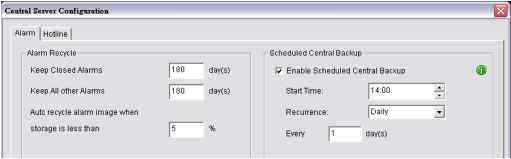 To configure server alarm records: 1. In the Edit menu, click Server Configuration. 2. In the Alarm Recycle area of the Central Server Configuration window, enter the number of days to keep closed alarms and all other alarms. 3. Set a storage limit for alarm images on percentage. Recycling will be triggered under the desired remaining percentage of storage space. The default period of Keep Closed Alarms is 180 days. The NCS system will remove all closed alarms three days old by 12:00 PM every day. The default period of Keep All Other Alarms is 180 days. The NCS system will remove all closed alarms thirty days old by 12:00 PM every day. The default limit for Auto Recycle is 5%. The NCS system will start recycling the oldest images when there is less than 5% storage space left. To setup scheduled alarm backup: 1. In the Scheduled Central Backup area of the Central Server Configuration window, check Enable. 2. Define Start Time and Recurrence of schedule backup.    Alarms This backup refers to alarm records and does not include video. For video backup please refer to page For manual alarm backup: 1. Go to Central Backup under Tools. 2. Choose Full Schedule Backup or Partial Schedule Backup. 3. Check Backup Alarm Image if you would like the snapshots saved as well. 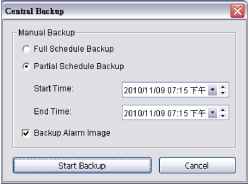 4. Click Start Backup to start. This backup refers to alarm records and does not include video. For video backup please refer to page 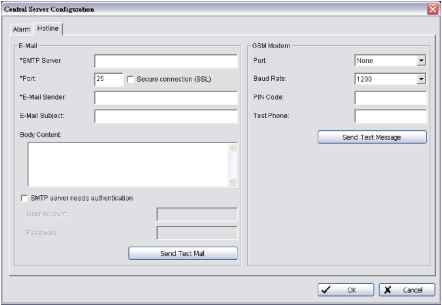 To configure system auto notification via email: 1. In the Edit menu, click Server Configuration. Select the Hotline tab. 2. In the E-Mail area of the Central Server Configuration window, enter an SMTP server, port and select Secure connection (SSL) 3. Enter an email sender, an email subject, and the body content of the email. 4. If the SMTP server requires authentication, check the box and enter the user account name and password. 5. If you want to send a test email, click Send Test Mail.   Alarms To configure system auto notification via SMS: 1. In the GSM Modem area of the Central Server Configuration window, select a port and a baud rate from the drop-down lists. 2. Enter a PIN code if required. 3. If you want to send a test message, enter the destination phone number and click Send Test Message. NCS system will auto filter the SMS for the same alarm, one alarm cant trigger another SMS before one SMS send out.  1 2 3 4 5 6 7 ... 9 |