
8(903)201-21-74
ООО "ЧетыреДатчика"
|
Оператор: 8(903)201-21-74 ООО "ЧетыреДатчика" |
|
Оператор: 8(903)201-21-74 ООО "ЧетыреДатчика" |
Главная страница The nuuo central Management System (NCS) 1 2 3 4 5 6 7 8 9 Matrix System Matrix System The NCS Client provides feeds over the Internet to multiple video matrixes. Each matrix can display images from up to 64 cameras, along with text above each image including information about the camera and server. О To carry out the functions described below, you need to be in Edit Mode and Commit after setup (see page 26). Adding/Editing/Removing Matrixes To add a matrix: 1. Ensure that the NCS Matrix system is running, either on the same computer as the NCS Client, or on another computer. 2. Ensure that the client is in Edit Mode and the Configuration window is selected. 3. Right-click on the Matrix folder icon О Matrix , then click Add Matrix. X Matrix Setting General OSD Metadata -Configuration- MatriKName Бёгпо Matrix IP Address l 92 168 1 68 P rt I Test Matrix I pRendering Option- p Fix Matrix Grid Ratio 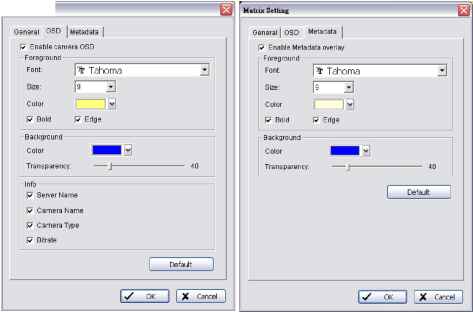 To choose the rate at which camera images are updated on the matrix, enter a camera tour interval. 5. Under OSD in the Matrix Setting window For text displayed on the matrix, select a font, a font size, and font styles. Choose what information is included in on-matrix text, by checking Info: Server Name, Camera Name, Camera Type and Bitrate boxes as required. 6. Under Metadata in the Matrix Setting window Select enable or disable Metadata overlay For Metadata information displayed on the matrix, select a font, a font size, and font color. You can also add a matrix from the Edit menu by pointing to New Object, clicking on Matrix then following steps 4-7 above. To edit a matrix: 1. Right-click on the icon for the matrix you want to edit.  Matrix System 2. Select Edit Matrix. 3. Edit the settings as required. 4. Click OK. To remove a matrix: 1. Right-click on the icon for the matrix you want to remove. 2. Select Delete Matrix and click yes at the confirmation prompt. To configure the NCS Client for a multiple matrix system: Follow steps 1-7 of the procedure described above, entering the matrix name and port as appropriate for each matrix. 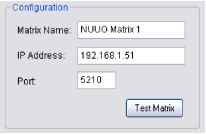 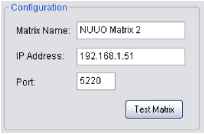 You may sort matrixes on the configuration window according to name. To do this right click on the Matrix icon from Configuration under Edit mode and choose Sort by Name. You may also drag and drop icons to rearrange order manually.  View Group Management View Group Management A View Group (Matrix Profile) stores the Matrix grids, stream profiles and camera positions for one or more Matrixes. (For information on configuring Matrix grids and camera positions, see page 85). All users can load View Groups, but only administrators can save and edit them. For information on how to setup a Matrix, please refer to page 85. Before proceeding to View Group Management, please carefully differentiate the terms below: View Tour: A set of predefined Views grouped to display one after another. Each View is independently configured and can include different Matrix grid layouts and different video channels. Camera Tour: A single View that contains more video channels than the chosen Matrix grid layout. All channels will be displayed in carousel under the same Matrix grid layout. Grid Tour: A single video grid that contains more than one video channel. The video channel will be displayed one after another in the grid. Alarm Tour: You may reserve specific grids in each view for alarm video display. These grids are marked with a colored corner. When incoming alarm videos exceed the number of reserved grids, the rule for displaying alarm video is called Alarm Tour. You may choose from two modes, Simple and Salvo. View Groups can be managed under the View Group List under the System Control Window. 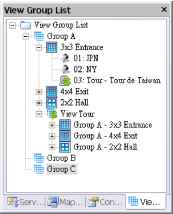 To add a new View Group: Right click on tlJVi*OюupLiя and select Add View Group. To add a new View: Right click on any View Group (Jwup and select Add View. You will see the View Configuration window. 2. Insert a name for the View in View Name. 3. All licensed cameras will be under Available Cameras. Select the cameras you want to add to the View and I Press EF press [ 4. Use the buttons to remove selected cameras. to adjust sequence of cameras. 5. Right click on any camera to choose a suitable stream profile. 6. Click USizJ to switch between different matrix grids.  View Group Management 7. Click I J to assign alarm video channels to show video on event. You are able to define up to 16 different groups indicated with 16 different colors under Group Setting. 
8. Set Camera Tour Interval.  When the number of cameras exceeds the number of Matrix grids, Camera Tour will be activated. Camera Tour does not involve changes of Matrix grids. For example, if you assign 12 cameras into a 3x3, 9 camera grid and set Camera Tour Interval at 2 seconds, the first 9 cameras will be shown for 2 seconds, then the remaining 3 cameras for another 2 seconds. The circulation continues until manually stopped. 9. Set Alarm Tour Mode: Simple or Salvo Alarm Tour takes effect when grids assigned as alarm video channels are all occupied, and new alarm associated video is ready for display. Under Simple Mode, old alarm associated channels will be replaced by new ones. Under Salvo Mode, alarm associated channels will go into carousel and be displayed continuously until the alarm is closed. Camera Tour of a view will be stopped when Alarm Tour starts. 10. Click OK to save settings. View groups can also be saved directly from the Matrix List. Click the Save view group button to do this. Refer to p.85 for more Matrix settings. To add a new Grid Tour:   View Group Management 1. Right click on any View Group Ш and select Add Grid Tour. You will see the Grid Tour Configuration window. 2. Insert a name for the Grid Tour in Grid Tour Name. 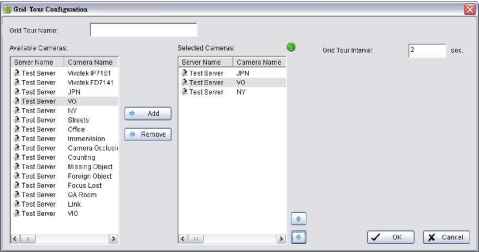 3. All licensed cameras will be under Available Cameras. Select the cameras you want to add to the Grid Tour and Press I - press to remove selected cameras. 4. Use the buttons Hand И to adjust sequence of cameras. 5. Right click on any camera to choose a suitable stream profile. 6. Set Grid Tour Interval. 7. Click OK to save settings. After defining a Grid Tour, you will be able to include it in the View. It will be displayed with other cameras under the Selected Cameras List. To add a new View Tour: 1. Right click on t) VijvfOioupbisl and select Add View Tour. You will see the View Tour Configuration window. 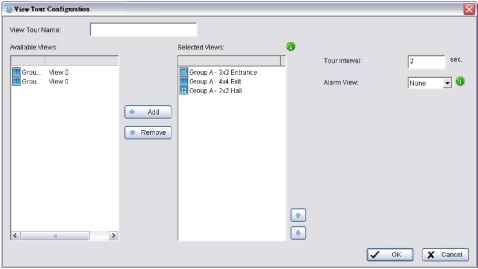 2. Insert a name for the View Tour in View Tour Name. 3. All Views will be under Available Views. Select the Views you want to add to the View Tour and press Press to remove selected Views. 4. Use the buttons [3 and to adjust sequence of Views  View Group Management 5. Set Carousel Interval. 6. Select an Alarm View. When alarms are triggered and alarm related video is ready to be displayed on reserved grids, View Tour will stop on the selected Alarm View to display the video. For more information, please refer to p. 48 on assigning alarm video channels to show video on event. 7. Click OK to save settings. To load a View Group / View / View Tour: 1. Go to Operate Mode. 2. Go to the View Group List t) VwOwupbisl under the System Control Window. 3. To display all Views of a View Group, right click on any of the Groups and choose Load on Matrixes. 4. To display one specific View or View Tour, right click on the View / View Tour and choose Show on Matrix. 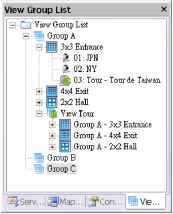 To assign users to an initial matrix view group upon startup: 1. Go to Edit Mode. 2. Right click on a specific user under Configuration under the System Control Window. 3. Click on Edit user. 4. Under User Configuration, choose a view group from the drop down list under Initial View Group. This View group will be started automatically when this user logs in. 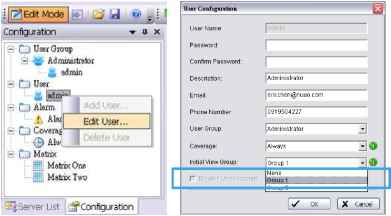 To rename a View / Grid Tour / View Group / View Tour: 1. Right click on the icon and label under Edit Mode. 2. Click on Rename. To remove a View / Grid Tour / View Group / View Tour: 1. Right click on the icon and label under Edit Mode. 2. Click on Delete. To edit a View / Grid Tour / View Group / View Tour: 1. Right click on the icon and label under Edit Mode. 2. Click on Settings Under Edit Mode, drag and drop to change sequence of Views, View Groups, View Tours, Cameras and Grid Tours.  Network Management Network Management NCS Server Management On the NCS Server Window, administrators can Kill Client, change port of connect, and limit the maximum client connections. To kill a connected client: 1. Double click on the NCS Server Ш icon to open the NCS Server Window. 2. Choose a client IP and click Kill Client. To change connect port and maximum connections: 1. Click Stop to cut all connections. 2. Change port of connection and maximum connections. 3. Click on Start to allow connections. 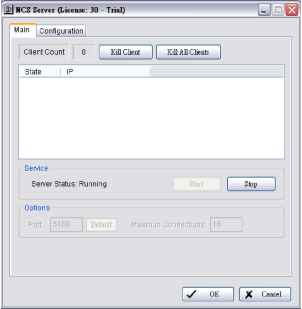 To change the NCS Server password: The default password of admin account is empty. Modify the password from the client software and commit it to the server as follows: 1. Open NCS Client Software and log in with the admin account. 2. In Edit Mode, select the Configuration Window. 3. Right-click on the user icon A а*!! for the admin account and select Edit User. 4. Enter a new password, and then click OK. 5. Click on the Commit button В ommtt to commit the modification to the server. Matrix Management To edit the Allow Hosts list: 1. In the Start menu, point to All Programs, point to NUUO Central Management Client, and then select NCS Matrix to start the matrix. 2. Point to the bottom-right corner of the screen, and then click on the General Setting icon (Ж 3. Click OK to open the Matrix Configuration window. Network Management 4. Click the Allow List button. 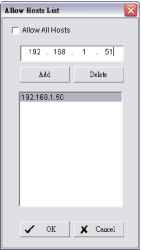 5. In the Allow Hosts List window, deselect Allow All Hosts, and then choose from the following actions: To add a host, enter the host IP address, and then click Add. To remove an IP address from the allow list, choose the IP from the table and then click Delete. 6. Click OK to save the configuration. To set a matrix password: 1. In the Start menu, point to All Programs, point to NUUO Central Management Client, and then select NCS Matrix to start the matrix. 2. Point to tlie bottom-riglit corner of tlie screen, clicl< on tlie General Setting icon and then click OK. 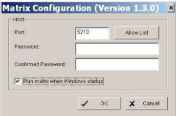 3. In the Matrix Configuration window, enter and confirm the password. 4. Click OK. To start up NCS Matrix automatically: 1. In the Start menu, point to All Programs, point to NUUO Central Management Client, and then select NCS Matrix to start the matrix. 2. Point to the bottom-right corner of the screen, and then click on the General Setting icon [S. 3. Click OK to open the Matrix Configuration window.  4. In the Matrix Configuration window, select Run Matrix when Windows startup 5. Click OK. Importing/Exporting NCS Client Configuration Importing/Exporting NCS Client Configuration The NCS Client configuration can be saved to the local PC and loaded back again. The configuration includes: Map display settings Alarm log Settings Matrix Settings MatrixView configuration To save or load other settings such as server settings or map settings, see Loading/Saving NCS Server Configuration on page 54. To import or export NCS Client configuration: NCS Client [admin] [Tiial] 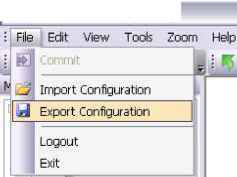 In the File menu, select Import Configuration or Export Configuration. Loading/Saving NCS Server Configuration Loading/Saving NCS Server Configuration The NCS Server configuration can be saved to the NCS Server PC and loaded back again. It can also be reset to default status. The configuration includes: Server settings Map settings Device settings on maps User group settings User settings Alarm settings Coverage settings Indication import settings Server configuration Address and password of SQL Server To save, load, or reset NCS Server configuration: 1. Click the Ml icon from Taskbar and enter the password. 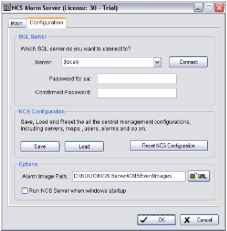 2. In the Central Server window, click Save, Load, or Reset NCS Configuration. Restore NCS Configuration will not clear the setting of SQL Server.  1 2 3 4 5 6 7 8 9 |
||||||||||||||||||||||