
8(903)201-21-74
ООО "ЧетыреДатчика"
|
Оператор: 8(903)201-21-74 ООО "ЧетыреДатчика" |
|
Оператор: 8(903)201-21-74 ООО "ЧетыреДатчика" |
Главная страница The nuuo central Management System (NCS) 1 ... 3 4 5 6 7 8 9 License Management Tool License Management Tool The license of the software should be registered first when upgrading to NCS V1.3.0 or later versions. Execute the License Management Tool to activate the license from a dongle or serial number allocated with the software package, or de-activate the license and then use it on another PC to activate it again. Both On line and Off line status of PC environment could execute the tool to activate or transfer the license. Below list 5 types of license management process: To activate the license with an NCS System connected to the network, follow the Activation Online process. To activate the license with an NCS System not connected to the network, follow the Activation Offline process. To activate the license from a dongle either with an NCS System connected or not connected to the network, follow the Activation from dongle process. To de-activate/transfer the license with an NCS System connected to the network, follow the Transfer Online process. To de-activate/transfer the license with an NCS System not connected to the network, follow the Transfer Offline process. Please refer to the chapter below for detailed steps of each process. License Management Tool Overview Execute License Management Tool 1. Execute License Management Tool in Help of NCS Client. 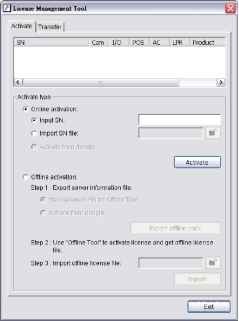 2. The License Management Tool will appear. Please refer to the tool overview below. License Management Tool License Management Tool Overview Activate Activate tab SN status - Online activation -h Offline activation Transfer Transfer tab SN status Transfer type -U 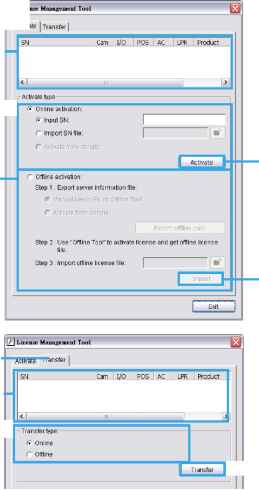 Activate Import tnr Transfer Activate/Transfer License Activate License Activation Online 1. Open License Manager Tool. 2. Select On line as Activate type. 3. Input the SN (Serial number) or Import SN file, and then click on the Activate button. 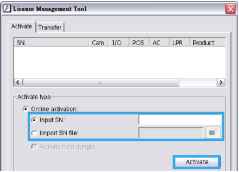 4. Restart NCS-Client if activated successfully. License Management Tool Activation Offline 1. Open License Manager Tool. 2. Select Offline as Activate type. 3. Select Manual key-in SN on Offline Tool or Activate from dongle, then click Export offline pack. 4. Save Request file, and then take it to another PC connected to Internet. 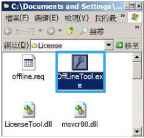 5. Execute OffLineTool.exe on another PC, Input SN or SN file or insert dongle, then click Activate to send request file to license server. 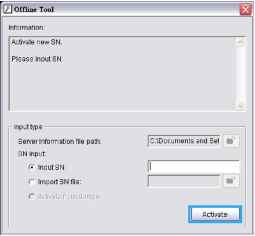 6. Save License file, and then take it to the original NCS Client of the NCS System. 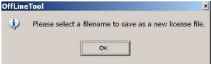 7. Open License Manager Tool from NCS Client again, select Import license file, and then click the Import button to activate. 8. Restart NCS-Client if activated successfully. Transfer License Transfer Online 1. Open License Manager Tool. 2. Select Transfer Tab, and then check Online as Transfer type. 3. Select SN and click on Transfer button. License Management Tool 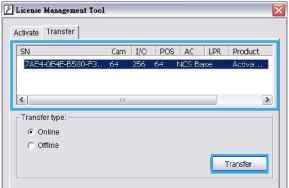 4. Restart NCS-Client if transferred successfully. Transfer Offline 1. Open License Manager Tool. 2. Select Transfer Tab, and then check Offline as Transfer type. 3. Select SN, and then click Transfer button to transfer SN. icewHanagement Tool 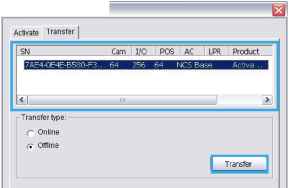 4. Save Request file. Copy request file to another PC connected to internet. 5. Execute OffLineTool.exe on another PC, check Transfer SN and click Transfer to send request file to license server. 6. Check Transfer Completed. User must copy the request file to another PC and send it to the license server, otherwise the SN cannot be reactivated!! NCS Server cannot connect to SQL Server without NCS Base License.   Part 3: User Functions (Day to Day Use) This section describes function and operations of the client in day to day use, including alarm management and view live video on NCS Matrix. The commands which a user can access are governed by the user group privileges assigned by the administrator. For this reason, some of the commands described in the section may not be available to each user. Page - 59 
The Operate toolbar controls common functions connected with map view, display and control of actions triggered by alarms. ii jEii gij О ша It includes seven buttons: The Disable Go to Map button b . When selected, alarm events cannot change the map view. The Disable Popup button . When selected, alarm events cannot trigger a live video popup. The Disable Link between Map and Matrix button When selected, links between Map and Matrix View devices cannot be displayed on the NCS Client. If users enable Link between Map and Matrix, selected cameras on the map can be highlighted on the Matrix View and vice versa. The Disable to Matrix button J. When selected, alarm events cannot send alarm source camera and related camera video feed to matrixes. The Disable Matrix Popup button . When selected, video of new alarm events cannot replace old events on the Matrix if the Matrix is full and users do not close old events. The Close Sound button . When selected, alarm events cannot trigger a sound. The Lock System button Click to minimize system to taskbar. Please note to unlock the system you must input username and password.  Alarm Overview Window Alarm Overview Window The Alarm Overview window shows recent alarm events in various formats, and is also used to show alarm query results and log messages. For any alarm displayed in this window, an Alarm Detail window can be opened. This enables easy management of alarms. There are five tabs in the window: Recent, Real Time, Message Log, Output and Output2. The first three tabs show recent real-time alarm information, and the remaining two tabs show query and search results. The function and use of these tabs is described below. Recent Tab 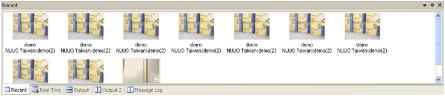 The Recent tab gives a display of recent alarm events in icon format. When the alarm event is triggered by a camera, the icon normally shows a snapshot of the video feed from that camera at the time the alarm was triggered. However, when the camera signal is lost or the user does not have authority to view snapshots from that camera, or when the event is triggered by another device, other icons are displayed. The various icons and their meanings are shown below.
To control the number and size of icons, see page 64. Alarm Overview Window Real-Time Tab 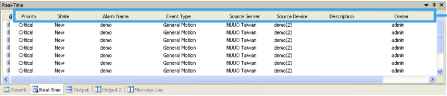 Click on tab to filter alarms. The Real-Time tab gives a list of alarm events as they come in to the client. For client configurations where a lot of devices are being monitored, a great many alarm events may be received. To display only relevant events the user can filter by Priority, State, Alarm Name, Event Type, Source Server, Source Device, Owner, and Time. In addition, the number of displayed alarm events can be controlled (see page 64). To filter by priority: Click the Priority button. From the list, select the priorities for alarms you want to display. To filter by state: Click the State button. From the list, select the states for alarms you want to display. To filter by alarm name: 1. Click the Alarm Name button.  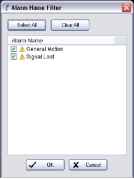 2. In the Alarm Name Filter window, select the alarm names for the alarms you want to display. To filter by event type: 1. Click the Event Type button. 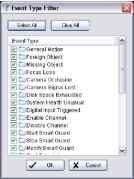 2. In the Event Type Filter window, select the alarm names for the alarms you want to display. To filter by source server or source device: 1. Click either the Source Server or the Source Device button. Alarm Overview Window 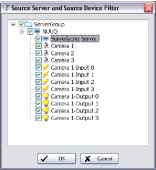 2. In the Source Server and Source Device Filter window, select the server/s, the camera/s, I/O device/s or metadata device/s for the alarms you want to display. To filter by alarm owner: 1. Click the Owner button. 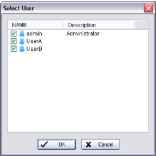 2. In the Select User window, select the owners for the alarms you want to display. To filter by time: Click the Time button. From the list, select the period (1 Hour, 1 Day, 1 Week, or 1 Month) for alarms you want to display. The above filter options can also be accessed by going to the Tools menu, pointing to Real-Time Alarm Filter, and clicking on the filter option you want. 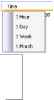 Output Tab and Output 2 Tab The Output and Output 2 tabs show lists of alarm event query results (see page 74) or alarm event search results from the Advance Alarm Search tool (see page 83). The lists can be ordered according to Priority, State, Alarm Name, Event Type, Source Server, Source Device, Description, Owner, or Time. 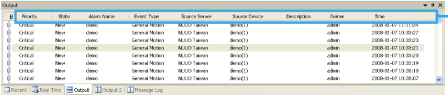 Click on tab to order lists. To order lists in Output and Output 2 tabs: Click the button at the top of the column you want to order by. For example, if you want to order by time, click the Time button. To reverse the order, click the button again. Message Log Tab This tab displays messages from the server. The displayed messages are as follows: Alarm Overview Window NCS server failed to execute SQL command The disk space of NCS server is low The license of NCS server is missing Failed to connect to matrix [matrix name] Failed to connect live video on matrix [matrix name] Alarm Log Settings The Alarm Log Setting window features controls for the Recent and the Real-Time displays. It also includes the option to display the local time of the source Main Console server for alarm events. To configure alarm log settings: 1. In the Edit menu, click Alarm Log Setting. 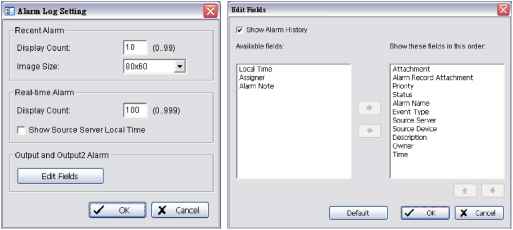 2. In the Alarm Log Setting window, configure the following options: In the Recent Alarm area, enter a display count in the range 0 to 99. This controls how many icons can be viewed at one time when the Recent tab is selected. In the Recent Alarm area, select the Image Size from drop-down list. This controls the size of icons viewed when the Recent tab is selected. There are four image size, 80x60,160x120, 240x180, 320x240. In the Real-Time Alarm area, enter a display count in the range 0 to 999. This controls how many alarm events can be viewed at one time when the Real-Time tab is selected. If you want to view alarm event times in the local time at the source server, check Show Source Server Local Time. To customize desired output fields in the Output and Output2 windows, click Edit Fields. 3. In the Edit Fields window you may customize on which fields to display in the Output and Output2 windows. Check Show Alarm History to include Alarm Note in available fields. Click on to add new fields into display or click on to remove them. Click on * or to adjust order. Click on Default to reset to default settings. Alarm Management Window and Batch Alarm Management For any alarm displayed in the Alarm Overview window, an Alarm Management window can be opened. This gives detailed information about the alarm. Depending on the privileges assigned to users, it can also include basic information options to view live or recorded video feeds, to trigger digital output devices (for example an audible alarm signal), and to print alarm details. You may also update or reset the state, priority, and owner of the alarm under this window. To view alarm information in the Alarm Management window: Right-click on any alarm event in the Alarm Overview window, and then click Alarm Management. 1 ... 3 4 5 6 7 8 9 |