
8(903)201-21-74
ООО "ЧетыреДатчика"
|
Оператор: 8(903)201-21-74 ООО "ЧетыреДатчика" |
|
Оператор: 8(903)201-21-74 ООО "ЧетыреДатчика" |
Главная страница The nuuo central Management System (NCS) 1 ... 4 5 6 7 8 9 Alarm Overview Window Source Serifer Information -Sen/er Name 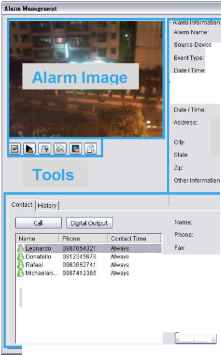 Alarm Information 2010-11-OS 19:04:04 2010-11-OS 19:04:04 (i3MT+0S:0O) Source Server Information Contact / History Email: Contact Time: Password Permit* Comment: Start Calling General Manager Ready to call Leonardo (0987654321) 1 Call 1209 for securitif. 2. Enable alarm recording in section В 3 Lock gates from pier 47 to 9B. Alarm Guide
Alarm Status The Alarm Management window gives details of four sections: Alarm Image: The snapshot or icon image of the alarm. Tools: Direct access to live video, recorded video, send channel to Matrix, show related devices, enable / disable metadata display and print report. Alarm information: Includes Alarm Name, Source Device, Event Type and Date /Time (client local time) Source Server information: Includes Server Name, Date /Time (source server local time) and other contact details. For more info on how to configure these settings please refer to page 28. Contact / History: A quick link to contact key personnel / A time based log to track status and process of current alarm. For more info on how to configure these settings please refer to page 28. Alarm Guide: The guide for how to deal with this alarm. Alarm Status: Interface to Update or Reset alarm status of State, Priority, Owner and Alarm Note (to note how users deal with the alarm) To view live video from the alarm source camera: 1. Right-click on any alarm event in the Alarm Overview window, then click Alarm Management. 2. Click Live Video The Live Video Window for the camera is displayed. 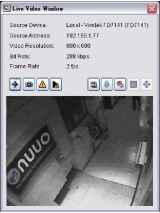 Alarm Overview Window 3. If you want to adjust the video to original video resolution, check Adjust to original video resolution 4. Click Snapshot button I I. The snapshot is displayed and users can save the image or copy it to the clipboard. 5. Click on Alarm Management i±±J to go to the alarm management window. 6. Click on Alarm Playback to view alarm playback video if available. 7. Select Streaming profile button Ш to choose different video quality. Options include Original/Main, Recorded, High, Normal, Low and Minimum. 8. For cameras with two-way audio support, you may click and hold the Talk button for this function. Talking will end when you release the button. Please note alarm live view pop-ups will be temporarily disabled when using the Talk function. 9. If the camera is equipped with Audio function, the Audio button will appear. Click L 5Li to enable audio stream. riii will appear. Click the button to disable 10. If the camera is associated to metadata devices, the Metadata button I metadata display. 11. To use PTZ control in a live video window: Click the PTZ button Щ for the following PTZ controls: Enable Digital PTZ: Check to switch between digital / physical PTZ Preset Point: Choose if available from the drop-down list to stop Patrol or AutoPan: Choose if available from the drop-down list, click ii to start and I Direction controls: Up, Down, Left, Right and Home Zoom out (-) and zoom in (+) controls Focus far (-) and focus near (+) controls Speed Dome Menu: If supported, this button enables the Setup Menu of Speed Dome cameras. The menu will be displayed directly on the video channel. Use the PTZ controls to navigate down the menu. Other assigned keys with functions will be displayed on the screen, for example the Focus button for Select .  [line itlVf [nniun I rat 1(л Roliip ti ugnos t ttl ritHf/! rU:  If the camera supports ImmerVision Lens and was correctly configured in Main Console, an additional button Switch to ImmerVision will appear above the PTZ Control panel. Click on the arrow to select between Original / Quad Mode / PTZ Mode / Parameter Mode. Alarm Overview Window To view recorded video from the alarm source camera: Right-click on any alarm event in the Alarm Overview window, then click Alarm Management. 1. 2. Click Recorded Video The Remote Playback Window has full playback controls. 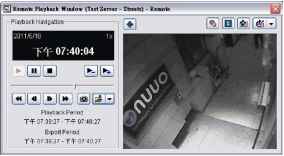 3. 4. 5. 6. 7. 8. 9. Click Snapshot button I I. The snapshot is displayed and users can save the image or copy it to the clipboard. Click Export Video button to save recorded video. Set up the cue in and cue out points; the cue in and cue out time will show on the information window. Click Export Video button, choose the folder where you want to save the file at, enter the file name and click SAVE. Set the Export Format as ASF or AVI (ASF recommend) and set the Use Profile. Select to export (i.e. save) the record video with Audio, OSD and metadata display, or export video only. Click OK to save the video. If you want to fix the window size at the original resolution, check Fix original video resolution If the camera is equipped with Audio function, the Audio button will appear. Click I to enable audio stream. If the camera is associated to metadata devices, the Metadata button I metadata display. will appear. Click the button to disable Click on the Digital PTZ button Pan / Tilt. J to enable Digital PTZ. Zoom in and out with your mouse wheel and drag to If the camera supports ImmerVision Lens and was correctly configured in Main Console, the Switch to ImmerVision button / Parameter Mode. ) will appear. Click on the arrow to select between Original / Quad Mode / PTZ Mode The default alarm playback period is 20 seconds, including 5 seconds prior to the event and 15 seconds after. This can be modified in Edit - NCS Client Setting - Instant Playback Setting. Alternatively you can use Remote Playback system which has full playback controls. Go to Remote Playback under Tools. Alarm Overview Window To send Video to Matrix: 1. Right-click on any alarm event in the Alarm Overview window, then click Alarm Management. 2. Click Send to Matrix sent to Matrix. and select previously set Matrix / Group (see Matrix System, page 45). The video is To view Metadata display: 1. Right-click on any alarm event in the Alarm Overview window, then click Alarm Management. 2. If the alarm has Metadata display, the Metadata button lJwill appear. Click to disable/enable display. The Metadata transaction data is displayed on the right. To view live video from a camera related to the alarm source I/O device or metadata device: 1. Right-click on any alarm event in the Alarm Overview window, then click Alarm Management. 2. Click Related Device LiU, then point to Open Live Window, and click the camera you want. The Live Video Window for the camera is displayed. 3. If you want to fix the window size at the original resolution, check Fix original video resolution. To view recorded video from a camera related to the alarm source I/O device or metadata device: 1. Right-click on any alarm event in the Alarm Overview window, then click Alarm Management. 2. Click Related Device LiU, then point to Open Playback Window. 3. If you want to fix the window size at the original resolution, check Fix original video resolution. To trigger a digital output device: 1. Right-click on any alarm event in the Alarm Overview window, then click Alarm Management. 2. Click Related Device then point to Trigger Digital Output, and choose the output device you want to trigger. To report/print alarm details: 1. Right-click on any alarm event in the Alarm Overview window, then click Alarm Management. 2. Click Report/Print Alarm then select the printer options you want and click OK. To set the alarm state, priority, owner and Note: There are two ways to manage alarm state, priority, and owner. One is in the Alarm Management Window, and the other is in the Batch Alarm Management Window, which is opened directly from the alarm event in the Alarm Overview window. In the Alarm Detail window 1. Right-click on any alarm event in the Alarm Overview window, then click Alarm Management. 2. In the Alarm Status area, select the State, Priority, owner and Note from the drop-down lists. If you want to reset these options to the settings when you opened the window, click Reset. 3. Click Update to manage this alarm. In the Batch Alarm Management window: 1. Right-click on any alarm event in the Alarm Overview window, then click Batch Alarm Management. 2. In the Batch Alarm Management window, select the State, Priority, owner and Note from the drop-down lists. Click OK. 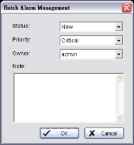 Alarm Overview Window Exporting Alarm Data to an Excel File Alarm data can be exported to an Excel file. You can do this for a single selected alarm, or for all alarms in the Alarm Overview window. The columns in the exported file are including AlarmName, Priority, State, EventType, SourceDevice, Owner, AlarmTime.  To export a single alarm event to Excel: Right-click on any alarm event in the Alarm Overview window, then click Export Selected to Excel. To export all alarm events in the Alarm Overview window to Excel: Right-click on any alarm event in the Alarm Overview window, then click Export All to Excel. Clearing Alarms All alarm events can be cleared from the Alarm Overview window. To clear all alarm events: Right-click on any alarm event in the Alarm Overview window, and then click Clear All.
Adjusting Map Appearance The display of map graphics in the Map window can be controlled. The size of the map can be selected, and the map moved in the window to show the required area. The brightness of the map graphic can also be changed without affecting the brightness of device indicators on the map. To control the size of a map: Use the zoom in / zoom out > buttons or with the mouse wheel to adjust map size, or click the magnify button and select one of the following options: Full Size Fit Image Fit Width Fit Height To enable area zoom: Click the magnify button and then select Area Zoom. Click and drag with your mouse to draw a rectangle on the map. This area will be magnified to fit the screen. Click again to turn Area Zoom off. When Area Zoom is enabled, click on the map to center it. Drag the minimized icon on the lower right corner to move the map around. To lock the map size: Click the magnify button and then select Zoom Lock. This prevents the accidental changing of the map size. To turn Zoom Lock off, click it again. To pan when the map size is larger than the Map window: Click and drag the map to the position you want. To lock the map pan setting: Click the magnify P button and then select Pan Lock. This prevents accidental panning of the map. To turn Pan Lock off, click it again. The controls above can also be accessed on the Zoom menu. To adjust map brightness: Move the brightness slider for the brightness you want. Navigating Between Map and Servers/ Devices It is easy to navigate between different layers of maps, and to show the maps for devices in various locations. There are two ways of doing this: clicking icons in MapView, and using indicators on the map. To navigate in MapView: Ensure that the MapView window is selected. Then either: Click the icon for the map you want to display. or Click a device icon. The map which the device indicator is on will display.  Map Window To navigate with indicators: Ensure that the MapView window is selected. Then click on a map indicator lid to see the underlying (child) map. Click the Go to Parent Map button to go to the parent map. Searching for devices on the server list or on map Users can search for devices, servers or map indicators on the server list or on maps by using the Search function. To use the search function: 1. On the Search toolbar, click the Search icon L. 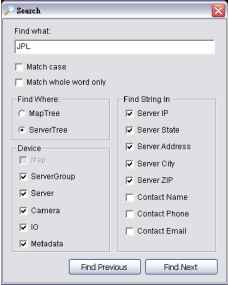 2. In the Search window, enter the full name or part of the name of the indicator you want to search for. Select from the following options: Match case - searches for names where the case matches the letters you entered. Match whole word only - searches for the term you entered as a whole word. If the term you entered forms only part of an indicators name, that indicator will not be found. Device - check to select which kinds of devices you want to include in the search. Find Where - MapTree / ServerTree - Click to define search range, either from the MapTree or ServerTree. Fing String In - Specify string location for more accurate results. Click Find Next to search for the indicator name. If an indicator is found, the map it is on will be displayed and the indicator will be highlighted. The corresponding icon in the MapView window will also be highlighted. If you want to search through multiple indicator names which include the same term, click Find Next until the indicator you want is found. Click Find Previous to go back to the previous found indicator. You can also search for indicators by entering a string in the Search box and pressing Enter. Map Indicators Indicators on a map provide a graphical representation of the connection and alarm states of the devices or servers they represent, or for map indicators the alarm state of devices on their child maps. The meaning of the various graphics is given below. lO. Camera is connected and has no alarm  Map Window        о     Input device is connected and has no alarm Camera is disconnected and has no alarm Camera is connected and has New alarm Camera is connected and has Assigned, In Progress or Later alarm Server is connected and has no alarm Server is disconnected and has no alarm Server is connected and has New alarm Server is connected and has Assigned, In Progress or Later alarm POS is connected and has no alarm POS is disconnected and has no alarm POS is connected and has New alarm POS is connected and has Assigned, In Progress or Later alarm Access Control is connected and has no alarm Access Control is disconnected and has no alarm Access Control is connected and has New alarm Access Control is connected and has Assigned, In Progress or Later alarm License Plate Recognition is connected and has no alarm License Plate Recognition is disconnected and has no alarm License Plate Recognition is connected and has New alarm License Plate Recognition is connected and has Assigned, In Progress or Later alarm Input device is disconnected and has no alarm      Map Window  Input device is triggered and has no alarm Input device is triggered and has New alarm Input device is triggered and has Assigned, In Progress or Later alarm Output device is connected but not triggered Output device is disconnected    Output device is connected and triggered There is no alarm on underlying map There are New alarms on underlying map There are Assigned, In Progress or Later alarms on underlying map Map Display Settings You can control the appearance of text which accompanies device indicators, and the information it shows. To change the map display settings: In the Edit Menu, click Map Display Setting, and choose the desired configuration: For text displayed above device indicators, select the font, font size, font color and any font effects desired. If you want the server name displayed alongside the device name, select Show Server Name. Select the background color, background transparency and camera coverage color for device indicator text. 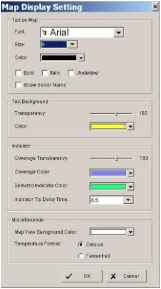  Device Alarm Menus Device Alarm Menus When a user right-clicks on a device indicator on a map, or on a devices icon in the System Control window, a Device Alarm menu is shown. There are some commands which are common functions to all device alarm menus. These are: View Latest Open Alarm - shows the latest open alarm (alarm with New status) for the device. Query Alarm - displays open alarms (alarms with New status), or alarms for any particular date, for the device System Information - gives information about the server. In addition, the Device Alarm menu shows different options depending on what kind of device you right-click on. For a camera, the menu shows the following options: Open Live Video Window - opens a window with live video feed from the camera. Open Playback Window - opens a recorded video playback window. Backup Recorded Video - saves a backup of recorded video from the device, in the directory you specify. For a metadata device, the menu shows the following options: Metadata Search - searches metadata transaction by date, time and keyword Open Live Video Window - opens a window with live video feed from the associated camera. Open Playback Window - opens a recorded video playback window. Backup Recorded Video - saves a backup of recorded video from the device, in the directory you specify. For an output device, the menu shows the following option: Force Output - triggers a digital output device such as an audible alarm signal. For a server, the menu shows the following options: Open Remote Desktop - opens a remote desktop for the server. Backup Record Video - saves a backup of recorded video from any or all of the cameras on the server, in the directory you specify. IVfewUtestOpsn Alarm I Query Alsrri Open live Video Window-Open PlaybatkWiidQw Backup Recortled Videp Stream Profile System IiiforniabQrf View LatEst Open Aiarm Query Alarm Metadata Search Open Uve Video Window Open Playback Wirdow Backup Recorded Video System Infcrjiatior Force Output Systsm Inlbrmation View Latest Oepn Alarm Query Alarm M System Informatfon Open Remoiie Deskteip Backup Record Video The same menu is available by right clicking on icons of cameras / metadata devices / IO devices / recording servers under Operate Mode.     1 ... 4 5 6 7 8 9 |