
8(903)201-21-74
ООО "ЧетыреДатчика"
|
Оператор: 8(903)201-21-74 ООО "ЧетыреДатчика" |
|
Оператор: 8(903)201-21-74 ООО "ЧетыреДатчика" |
Главная страница The nuuo central Management System (NCS) 1 ... 5 6 7 8 9 Device Alarm Menus Common Functions The View Latest Open Alarm, Query Alarm, and System Information commands are common to all device alarm menus. To view the latest open alarm for a device: 1. Right-click on the indicator for the device, or on the devices icon in the MapView display. 2. Click View Latest Open Alarm. 3. The Alarm Detail Window for the latest alarm opens. For information on this window, see page 64. To query alarms for a device: 1. Right-click on the indicator for the device, or on the devices icon in the MapView display. 2. Point to Query Alarm, then choose which alarms you want to see: Open - shows all open alarms. Today - shows alarms from the current day. Custom - specify a range on date and time, then click OK. System administrators set the length of time that alarms are stored on the server (see page 42). If you choose a date for which alarm information is not stored, the No alarm found on the device message is displayed. 3. The query results are displayed in the Output/Output 2 tab. For information on this window, see page 63. To show information about the server: 1. Right-click on the indicator for the device, or on the devices icon in the MapView display. 2. Click System Information. 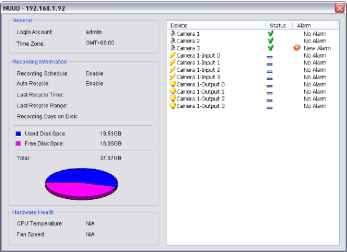  Device Alarm Menus Camera Alarm Menu The Open Live Video Window, Open Playback Window, and Backup Recorded Video commands appear on the device alarm menu for cameras. The first two options are the same as on the Alarm detail Window (see pages 64-68). To open a live video window: 1. Right-click on the indicator for the camera, or on the cameras icon in the MapView display. 2. Click Open Live Video Window. The Live Video Window for the camera is displayed.  3. If you want to adjust the video to original video resolution, check Adjust to original video resolution 4. Click Snapshot button I ). The snapshot is displayed and users can save the image or copy it to the clipboard. 5. Click on Alarm Management LriJ to go to the alarm management window. 6. Click on Alarm Playback Щ to view alarm playback video if available. 7. Select Streaming profile button lEJ to choose different video quality. Options include Original/Main, Recorded, High, Normal, Low and Minimum. 8. For cameras with two-way audio support, you may click and hold the Talk button LiD for this function. Talking will end when you release the button. Please note alarm live view pop-ups will be temporarily disabled when using the Talk function. 9. If the camera is equipped with Audio function, the Audio button will appear. Click У i to enable audio stream. riii will appear. Click the button to disable 10. If the camera is associated to metadata devices, the Metadata button I metadata display. to start and [JiLi to stop 11. Click the PTZ button LZJ for the following PTZ controls: Enable Digital PTZ: Check to switch between digital / physical PTZ Preset Point: Choose if available from the drop-down list Patrol or AutoPan: Choose if available from the drop-down list, click Direction controls: Up, Down, Left, Right and Home Zoom out (-) and zoom in (+) controls Focus far (-) and focus near (+) controls Speed Dome Menu: If supported, this button enables the Setup Menu of Speed Dome cameras. The menu will be displayed directly on the video channel. Use the PTZ controls to navigate down the menu. Other assigned keys with functions will be displayed on the screen, for example the Focus button for Select . Device Alarm Menus 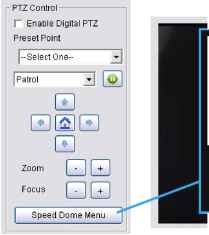 ГвИ. .. [line itlVf [nniun I rat 1(л Roliip ti ugnosIttl  If the camera supports ImmerVision Lens and was correctly configured in Main Console, an additional button Switch to ImmerVision will appear above the PTZ Control panel. Click on the arrow to select between Original / Quad Mode / PTZ Mode / Parameter Mode. To open a recorded playback window: 1. Right-click on the indicator for the camera, or on the cameras icon in the MapView display. 2. Point to Open Playback Window. 3. Select the period which want to display. Last Open Alarm- it would open one minute recording video before last open alarm. Custom Time- it can set Start/End time to define the period of recording video.  One Minute Before- open one minute before. Ten Minutes Before- open ten minutes before. One Hour Before- open one hour before. 4. The Remote Playback Window has full playback controls. 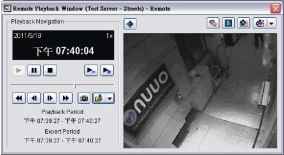 5. Click Snapshot button I ). The snapshot is displayed and users can save the image or copy it to the clipboard. 6. Click Export Video button I to save recorded video. Set up the cue in and cue out points; the cue in and cue out time will show on the information window. Click Export Video button, choose the folder where you want to save the file at, enter the file name and click SAVE. Device Alarm Menus Set the Export Format as ASF or AVI (ASF recommend) and set the Use Profile. Select to export (i.e. save) the record video with Audio, OSD and metadata display, or export video only. Click OK to save the video. 7. If you want to fix the window size at the original resolution, check Fix original video resolution If the camera is equipped with Audio function, the Audio button will appear. Click I to enable audio stream. 9. If the camera is associated to metadata devices, the Metadata button metadata display. 10. Click on the Digital PTZ button Pan / Tilt. will appear. Click the button to disable to enable Digital PTZ. Zoom in and out with your mouse wheel and drag to 11. If the camera supports ImmerVision Lens and was correctly configured in Main Console, the Switch to will appear. Click on the arrow to select between Original / Quad Mode / PTZ Mode ImmerVision button / Parameter Mode. To Backup recorded video: 1. Right-click on the indicator for the camera, or on the cameras icon in the MapView display. 2. Click Backup recorded video. 3. In the Remote Backup Recorded Video window, choose a directory for the backup by pressing the URL button 4. 5. 6. 7. and browsing to the directory you want. Setup the Time Zone and use setting Start/End Time to select a period. Use the checkboxes to select which cameras to back up video for. Check Backup Metadata Transaction to include metadata information in the backup. Click on OK to start backup. 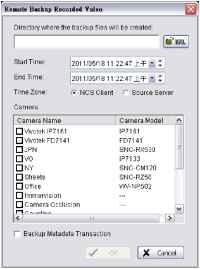 To Set up Stream Profile: 1. Right-click on the indicator for the camera, or on the cameras icon in the MapView display. 2. Click Stream Profile. 3. In the Stream Profile Panel, choose Recorded, Original, High, Normal, Low or Minimum for the stream profile to change video format, frame rate, resolution, quality and bitrate. 4. Click Apply to set up. 5. If you want to apply the Stream Profile setting to other cameras, click Apply to to set up another device.  Device Alarm Menus 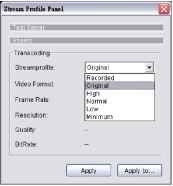 Metadata Alarm Menu The Metadata Search, Open Live Video Window, Open Playback Window, and Backup Recorded Video commands appear on the device alarm menu for Metadata devices. The steps are the same as on the Camera Alarm Menu (see pages 76). 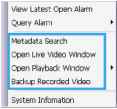 To search metadata transaction: 1. Right-click on a metadata indicator, or on any metadata icon in the MapView display. 2. Click Metadata Search. Metadata Search Dialog will display. 3. Check metadata devices from the device list. 4. Configure the starting and ending time and dates. 5. Enter keyword to search metadata transaction. Check Search within result to filter the result. 6. Choose a result to display metadata transaction and video from associated camera. 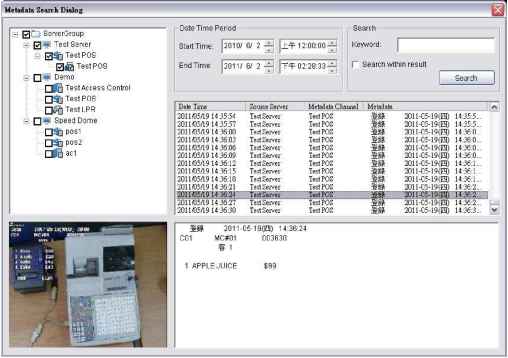 Device Alarm Menus To open a live video window: 1. Right-click on the metadata indicator, or on the metadata icon in the MapView display. 2. Click Open Live Video Window. The Live Video Window for the metadata device is displayed. 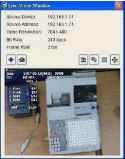 3. If you want to adjust the video to the original video resolution, check Adjust to original video resolution. 4. Click Snapshot button The snapshot is displayed and users can save the image or copy it to the clipboard. 5. Select Streaming profile button to choose different video quality. Options include Original/Main, Recorded, High, Normal, Low and Minimum. 6. If the camera is equipped with Audio function, the Audio button will appear. Click I 7. Click the to enable audio stream. button to disable metadata display. 8. Click the PTZ button to start and LHJ to stop for the following PTZ controls: Enable Digital PTZ: Check to switch between digital / physical PTZ Preset Point: Choose if available from the drop-down list Patrol or AutoPan: Choose if available from the drop-down list, click Direction controls: Up, Down, Left, Right and Home Zoom out (-) and zoom in (+) controls Focus far (-) and focus near (+) controls Speed Dome Menu: If supported, this button enables the Setup Menu of Speed Dome cameras. The menu will be displayed directly on the video channel. Use the PTZ controls to navigate down the menu. Other assigned keys with functions will be displayed on the screen, for example the Focus button for Select . 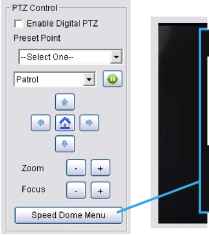 I Kli . }\г Srtaf DlEpitT Silili llniiuhlnliii I nnputjt OiDgnoallt) 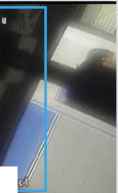 Device Alarm Menus If the camera supports ImmerVision Lens and was correctly configured in Main Console, an additional button Switch to ImmerVision will appear above the PTZ Control panel. Click on the arrow to select between Original / Quad Mode / PTZ Mode / Parameter Mode. To open a recorded playback window: 1. 2. 3. Right-click on the metadata indicator, or on the metadata icon in the MapView display. Point to Open Playback Window. Select the period you want to display. Last Open Alarm- this opens one minute of recording video before the last open alarm. Custom Time- this sets the Start/End time to define the period of recording video. 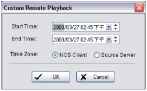 One Minute Before- open one minute before. Ten Minutes Before- open ten minutes before. One Hour Before- open one hour before. The Remote Playback Window has full playback controls. 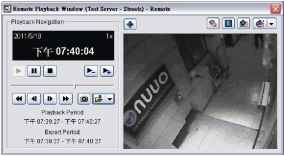 5. Click Snapshot button Ш. The snapshot is displayed and users can save the image or copy it to the clipboard. 6. Click Export Video button i to save recorded video. Set up the cue in and cue out points; the cue in and cue out time will show on the information window. Click Export Video button, choose the folder where you want to save the file at, enter the file name and click SAVE. Set the Export Format as ASF or AVI (ASF recommend) and set the Use Profile. Select to export (i.e. save) the record video with Audio, OSD and metadata display, or export video only. Click OK to save the video. 7. If you want to fix the window size at the original resolution, check Fix original video resolution I to enable audio stream. 8. If the camera is equipped with Audio function, the Audio button will appear. Click I 9. If the camera is associated to metadata devices, the Metadata button I metadata display. will appear. Click the button to disable 10. Click on the Digital PTZ button I Pan / Tilt. to enable Digital PTZ. Zoom in and out with your mouse wheel and drag to Device Alarm Menus 11. If the camera supports ImmerVision Lens and was correctly configured in Main Console, the Switch to ) will appear. Click on the arrow to select between Original / Quad Mode / PTZ Mode ImmerVision button / Parameter Mode. To backup recorded video: 1. Right-click on the metadata indicator, or on the metadata icon in the MapView display. 2. Click Backup recorded video. 3. In the Remote Backup Recorded Video window, choose a directory for the backup by pressing the URL button and browsing to the directory you want. 4. Setup the Time Zone and use setting Start/End Time to select a period. 5. Use the checkboxes to select which cameras to back up video for. 6. Click on OK to start backup. 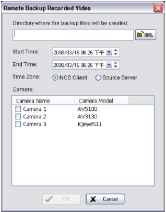 Output Device Alarm Menu The Force Output command appears on the device alarm menu for output devices. To force output: 1. Right-click on the indicator for the output device, or on the output devices icon in the MapView display. 2. Click Force Output. A signal is sent to trigger the output device. Server Alarm Menu The Backup Record Video and Open Remote Desktop commands appear on the device alarm menu for servers. To back up recorded video: 1. Right-click on the indicator for the server, or on the servers icon in the MapView display. 2. Click Backup recorded video. 3. In the Remote Backup Recorded Video window, choose a directory for the backup by pressing the URL button and browsing to the directory you want. 4. Setup the Time Zone and use setting Start/End Time to select a period. 5. Use the checkboxes to select which cameras to back up video for. 6. Click on OK to start backup. To open a remote desktop for the server: 1. Ensure that the source server has enabled the Remote Desktop network server. 2. Right-click on the indicator for the server, or on the servers icon in the MapView display. 3. Click Open Remote Desktop. Device Alarm Menus Advance Alarm Search The Advance Alarm Search window provides a comprehensive set of filters to search for alarm events. The results can be displayed either in the Output window or the Output 2 window. To use Advance Alarm Search: 4. In the Tools menu, click Advance Alarm Search. 5. In the Advance Alarm Search Dialog window, check the box or boxes for the search criteria you want, then choose the desired options (if no options are selected for a given field, it means search for all). 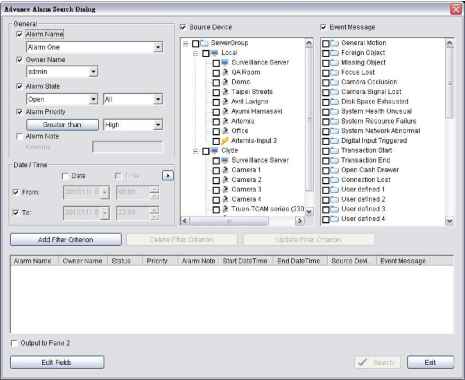 6. Setup the General options for criteria: Alarm Name - choose a name from the drop-down list. Owner Name - choose a name from the drop-down list. Alarm State - choosing Open or Close in the first list reveals different states in the second list: Open - All, New, Assigned, In Progress, or Later in the second list. Close - All, Close, Auto Close, or Ignore in the second list. Alarm Priority - click the button to cycle through Greater than, Equal to, and Less than. In the drop-down list, select a priority. Alarm Note - enter keyword for search 7. Setup the Date/Time for search: Date/Time - check Date and/or Time; and From and/or To, in the checkboxes. Then choose the date/s and time/s you want. To setup one day as the search period, clicl< on the Ш icon next to Time and select 1 day. Or manual enable and set date from 2008/3/16 to 2008/3/17.   Device Alarm Menus 8. Choose the Source Device and Event Message. Source Device - check the box or boxes for the devices you want to search. If only check the Source Device without select any devices from tab, the criteria would search for all devices. Event Message - check the box or boxes for the event messages you want to search. If only check the Event Message box without select any events from tab, the criteria would search for all events. 9. Click Add Filter Criterion. The search criteria you selected appear in the window. 10. You can edit or remove the set of search criteria you have just created, or add another set of search criteria: To edit a set of search criteria, select that set, choose filter options as described above, then click Update Filter Criterion. To remove a set of search criteria, select that set, then click Delete Filter Criterion. To add another set of search criteria, choose filter options as described above, then click Add Filter Criterion, the search result would include each combination of all criteria. 11. By default, search results are displayed in the Output window. If you want the results to be displayed in the Output 2 window, check Output to Pane 2. 12. To customize desired output fields in the Output and Output2 windows, click Edit Fields. For details on Edit Fields please refer to page 64. 13. Click Search. 1 ... 5 6 7 8 9 |