
8(903)201-21-74
ООО "ЧетыреДатчика"
|
Оператор: 8(903)201-21-74 ООО "ЧетыреДатчика" |
|
Оператор: 8(903)201-21-74 ООО "ЧетыреДатчика" |
Главная страница The nuuo central Management System (NCS) 1 ... 6 7 8 9 Matrix View Matrix View The NCS Client provides feeds over the Internet to multiple video matrixes. Each matrix can display images from up to 64 cameras, along with text above each image including information about the camera and server. Matrixes can also be configured to show video from a camera when an alarm event occurs. To display video on a matrix, the NCS client must be logged in to that matrix. Once logged in, the matrix display can be configured and cameras chosen. Matrix View Toolbar The Matrix View Toolbar has the following buttons: Login/Logout matrix - tlie NCS Client must be logged in to a matrix in order for most of the Matrix Toolbar commands to be used. Remove camera on matrix S - when a camera icon on a matrix 3 is selected, clicking this button removes it. Reset matrix О - this button removes all cameras from the selected matrix. Toggle allow show video on event -When selected, you can define matrix grids to display video from cameras when alarms are triggered. Only available under Edit mode. Toggle tour - Enable Camera tour when focused on Views, View Tours when focused on View Tours and Grid Tour when focused on grids. Only available under Operate mode. Open PTZ Control Panel - this opens a window for PTZ controls. When using a camera with ImmerVision support, another button Switch to ImmerVision will appear under the PTZ Control panel. Click to switch between Original / Quad Mode / PTZ Mode / Parameter Mode. Only available under Operate mode. Go to previous view / next view - Switch between Camera Tour views when focused on Views, between views when focused on View Tours, or between cameras when focused on Grid Tours. Only available under Operate mode. Save View Group - this saves the current matrix view group into the View Group List. Only available under Edit mode. The Audio button - this enables camera audio. The Talk button - this enables two-way audio, or talking directly to the chosen camera. The Matrix grid buttons 0Ш]Ш И И 0 - these control the layout of the matrix grid. Showing Video on a Matrix Showing video on a matrix requires that a matrix system be executed, either on the same computer as the one running the NCS Client, or another one. For information on how to execute a matrix system, see page 45. For the NCS Client to show video on a matrix, it must be logged in to that matrix. To login to a matrix: Select the matrix you want to log in to and click the Login matrix button To load a matrix View Group / View / View Tour: 1. After logging in, go to the View Group List under Operate mode. 2. To load a View Group, right click on the icon and choose Load on Matrixes. 3. To load a View or View Tour, right click on the icon on a specific view and choose Show on Matrix. Matrix View Alternatively, drag View Groups, Views and View Tours from the View Group list directly into the matrix list to load them. To do this, the NCS Client must be in Operate mode. To configure a matrix grid layout: 1. Ensure that the NCS Client is logged in to the matrix as described above. 2. Select the matrix you want to configure. 3. Click one of the Matrix grid buttons 0]Ш]Ш И И 0 - 0 The second button from the right £is the Matrix Grid NxN button. Clicking the arrow next to this displays a menu, from which you can select more display grid options. The button on the far right О Matrix Grid 16:9 is a new set of grids dedicated to wide-screen displays. Double click on any channel under multiple channel view to switch to a dedicated single channel view. Double click again to switch back. To add cameras / Grid Tours to a matrix: 1. Ensure that the NCS Client is logged in to the matrix as described above. 2. Select the matrix you want to configure. 3. Drag cameras or Grid Tours directly from the Server List, View Group List or Map to the desired matrix grid. 4. The camera icons appear on the matrix. You can drag them to different positions on the matrix. To see which camera a particular icon represents, point to the icon. A text bubble appears showing the camera name, type, and server. 5. Select Stream Profile of the camera. Choose As NCS Client, Original/Main, Recorded, High, Normal, Low or Minimum. You can disable the Link between the Map and Matrix by clicking the Disable Link between Map and Matrix button . You can disable send video on event to Matrix by clicking the Disable to Matrix button I Video of new alarm events cannot replace old events on the Matrix if the Matrix is full and users do not close old events when you click the Disable Matrix Popup button . To remove a camera from a matrix: 1. Ensure that the NCS Client is logged in to the matrix as described above. 2. Select the matrix you want to configure. 3. Select the camera icon and click the Remove camera on matrix button U The setting of Matrix can only save on NCS client PC. The same user account login server with different PC cant load the original Matrix setting. To reset matrix: 1. Ensure that the NCS Client is logged in to the matrix as described above. 2. Select the matrix you want to configure. 3. Click on the arrow next to the Remove Camera on Matrix button jand click Reset matrix. To toggle allow show video on event: 1. Ensure that the NCS Client is logged in to the matrix as described above. 2. Select the matrix you want to configure.      Matrix View 3. Click the Toggle Allow Show Video on Event button or select Edit Show On Event Mode. Select grids you want to show video on events. Clicking again can disable allow show video on events. 4. Choose Select All to toggle allow all grids show video on events. 5. Choose Clear All to disable allow all grids show video on events. 6. For advanced management, click on Setting You are able to define up to 16 different groups indicated with 16 different colors under Group Setting. To toggle tour: 1. Ensure that the NCS Client is logged in to the matrix as described above. 2. Select the matrix you want to configure. 3. Click Toggle Tour button . 4. Click Toggle Tour button again to disable tour. Joystick Control Matrix system can be controlled by a joystick. Prior to setup, it requires a joystick device connected to NCS Client computer. To setup Joystick Control: 1. Click the Edit button and point to Joystick Setting. 2. In Joystick Setting Window, select the Active Joystick you want to use. 3. Select the function and the parameter from drop-down menu for the button of joystick. The function are as below: N/A - make the button ineffective. Go to Preset Point - go to the preset point of the view on a matrix or a live video. Select the parameter for the preset point. 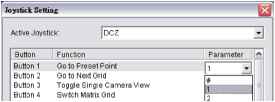 Go to Previous Grid - go to previous grid on a matrix. Go to Next Grid - go to next grid on a matrix. Switch Matrix Grid - switch grids of a matrix. Toggle Single Camera View - toggle select camera to single view. Start/Stop Autoscan -start/stop autoscan on a matrix. Zoom Wide - zoom wide of the view on a matrix. Zoom Tele - zoom tele of the view on a matrix. Switch Active Matrix - switch into different matrix. Go to Matrix View - go to Matrix List Window. Matrix View 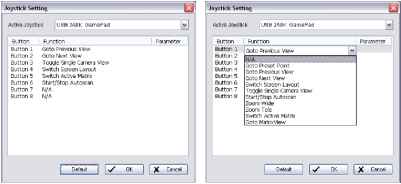 Go to Server View - go to Server List Window. Find Recording Server - Focus to chosen Server on Server List. Must be used with number buttons. Format: Press this button + server number + Enter E.g. To go to server number 8, press Find Recording Server + 8 + Enter. To display server / camera / matrix numbers, go to Edit - NCS Client Setting - Miscellaneous - Show central ID on server list and matrix list. Open Live View - Open Live View window for selected camera. Must be used with number buttons. Format: Press this button + camera number + Enter E.g. To show live video of camera 12 from server 5, press Open Live View + 5012 + Enter. Open Instant Playback - Open Instant Playback for selected camera. Must be used with number buttons. Format: Press this button + camera number + Enter E.g. To show instant playback of camera 6 from server 3, press Open Instant Playback + 3006 + Enter. Show Camera to Matrix - Show selected channel of camera on selected grid of matrix. Format: Press this button + camera number + Enter + matrix and grid number + Enter. E.g. To show live video of camera 3 from server 5, to grid 11 of matrix 15, press Show Camera to Matrix + 5003 + Enter + 15011 + Enter. Switch Stream Profile - Press to switch between different stream profiles of Live View or matrix views. Sequence of stream profiles: NCS Client - Original - Recorded - High - Normal - Low - Minimum Take Snapshot - Press to take a snapshot of current Live View or Playback window. Play Playback - Press to play Playback. Pause Playback - Press to Pause Playback. Stop Playback - Press to Stop Playback. Numbers 0~9 - Assign numbers to input server / camera / matrix numbers. Enter - Confirm commands.       Log Viewer Log Viewer The Central System Log Viewer can be accessed from the Tools menu. You are able to search and export a checklist of events according to source device and time/date. 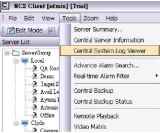 To Search and Export log information: 1. Pick a source device: NCS Server, NCS Client, Recording Server or All. 2. Choose from a list of log types. Default includes all available options, click again to deselect. 3. Choose a Date or specify a time range under Date Time. 4. Click on Search. Log information will be displayed below. 5. Click on Export to to export searched log information to Excel files.  Remote Playback Shortcut Remote Playback Shortcut The Remote Playback command in the Tools menu displays a NUUO NVR/NDVR/DVR control screen from the server. For information about the NUUO NVR/NDVR/DVR software, see its accompanying documentation. To execute the Remote Playback shortcut: 6. In the Tools menu, click Remote Playback. 7. For multiple monitor systems, select which monitor you want the NVR/NDVR/DVR control screen to display on. 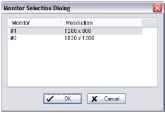 8. Click OK. Server Summary Server Summary The Server Summary window displays summary information about all the source servers connected to the NCS Client. 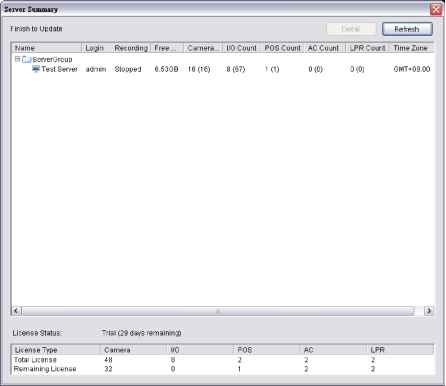 This information consists of: Login - the login name for the recording server. Recording - the video recording status of the recording server. Free Disk Space - remaining recording server disk space. Camera Count - the number of camera licenses connected to the recording server. I/O Count -the number of input and output devices connected to the recording server. POS Count -the number of POS devices connected to the recording server. AC Count -the number of access control devices connected to the recording server. LPR Count -the number of license plate recognition devices connected to the recording server. Time Zone - the time zone of the recording server. License Status - the license status of the NSC system Total License - the total number of licenses, including cameras, metadata and I/O devices. Remaining License - the remaining number of licenses, including cameras, metadata and I/O devices. To use the Server Summary window: 1. In the Tools menu, click Server Summary. 2. Use the El and El buttons beside the server group folders to view server information. 3. To refresh the information in the window, click Refresh. This refreshes Login User, Recording status and Free Disk Space. To refresh number of cameras, IO, and Time Zone, select Synchronize Device while in Edit Mode. To open a window with more detailed server information: In the Server Summary window, select a server, then click Detail. NCS Client Software version NCS Client Software version To view the NCS Client software version: In the Standard Toolbar, click to see version information. Alternatively, in the Help menu, select About Central.  Cross Time Zone Scenario Cross Time Zone Scenario The NCS System is easy to use across multiple time zones. The NCS Server and the SQL database record all alarm times in UTC (Coordinated Universal Time). This enables the NCS Server to put the alarms in order before they are sent to the NCS Client. The NCS Client converts the alarm times to the local time, to enable users to manage alarms efficiently. If required, NCS Client users can access source devices local times in the Alarm Detail window and the Alarm Overview window (see Alarm Log Settings on page 64).  1 ... 6 7 8 9 |