
8(903)201-21-74
ООО "ЧетыреДатчика"
|
Оператор: 8(903)201-21-74 ООО "ЧетыреДатчика" |
|
Оператор: 8(903)201-21-74 ООО "ЧетыреДатчика" |
Главная страница Nvr/dvr/hybrid ndvr 1 ... 7 8 9 10 11 12 13 14 NUUO NVR/DVR/Hybrid NDVR System 7. Log Viewer 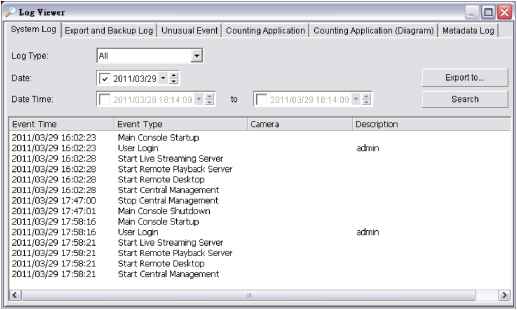 View the history and export reports of unusual events detected by the Smart Guard System. To launch Log Viewer, simply click on Config and select Log Viewer from the menu. 7.1 System Log Step 1 Step 2 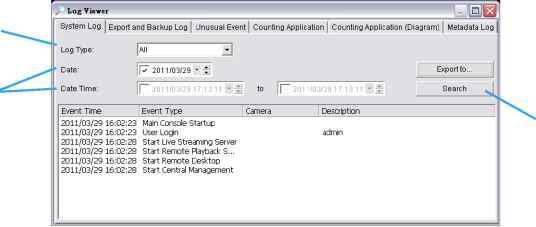 Step 3 Step1: Choose the type of event you want to check or select All from the drop-down menu for all types of events. Select Log Type form the drop-down menu. There are in total 36 types of log types, including:
*Note: Detection of some system logs is not available under NUUO NVR Lite license. Step 2: View the events that happened on a particular date or during a given time period by selecting search period. For a particular date: check the Date box right and indicate the date. For a period: check the DateTime and then enter the date and time. Step 3: Click Search. 7.2 Export and Backup Log View the Export and Backup Log history that had been operated by local or remote user. Step1: Choose the type of event you want to check or select All from the drop-down menu for all types of events. Step 2: View the events that happened on a particular date or during a given time period by selecting search period. For a particular data: check the Date box right and indicate the date. For a period: check the DateTime and then enter the date and time. Step 3: Click Search  7.3 Unusual Event Step1 Step2 Step 3 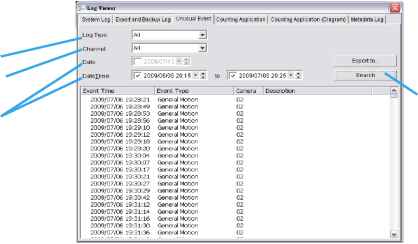 Step 4 Step1: Choose the type of events you wish to view or select All from the drop-down menu to view all. The types of Unusual Events include General Motion, Foreign Object, Missing Object, Focus Lost, Camera Occlusion, Signal Lost, Disk Space Exhausted, System Health Unusual, Digital Input Triggered and General Motion (Device). * Note: Detection of some events is not available under NUUO NVR Lite license. Step 2: Choose the camera channel you wish to view or select All for all channels available. Step 3: View the events that happened on a particular date or during a given time period by defining a search period. For a particular date: check and specify date in the Date box. For a period: check the DateTime and then enter the date and time. Step 4: Click Search. Note: When working with a video record, as default, Log Viewer will search for Unusual Events in the video record in Dote & Time mode, starting from tine beginning to tine end of tine record. A linl< vvill appear next to each event time where video is available. By clicking on the link, an instant playback window will pop up to show recorded video. Note: Instant playback is available under the following Smart Guard events: General Motion, Foreign Object, Missing Object, Focus Lost and Camera Occlusion. 7.4 Counting Application * Note: This function is not available under NUUO NVR Lite license. Display the history of Counting Application during a given time period. Step1: Select the channel you want to check or select All from the drop-down menu for all channels. Step 2: Select search period. View the events that happened on a particular date or during a given time period by selecting search period. For a particular date: check the Date box right and indicate the date. For a period: check the DateTime and then enter the date and time. 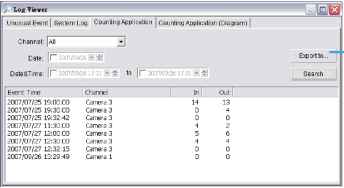 Step 4 Step 3: Click Search. Step 4: Press the button Export to. Step 5: Type the file name and choose the file format (.xls or .txt). 7.5 Counting Application (Diagram) * Note: This function is not available under NUUO NVR Lite license. Display the Counting Application data in diagram format. System Log I Eiiport and Backup Log I Unusual Event I Counting Application counting Application (Diagram) Metadata Log Channel: [Desktop Petioo: I One Da EHportto... Dale, boosillilo search б 7 S 9 10 11 12 13 14 15 ib 17 18 19 20 21 22 23 24 Step 4 Step1: Select the channel you want to check or select All from the drop-down menu for all channels. Step 2: From the drop-down menu, set up how you would like the diagram to be displayed. You have the options of one day, one month, or one year. Step 3: Select a specific date to make it the start point of the diagram. Step 4: Click Search. Step 5: Press the button Export to. Step 6: Type the file name and the file will save as BMP files. 7.6 Metadata Log * Note: This function is not available under NUUO NVR Lite license. View the Metadata Log history detected by the Smart Guard System. Step1: Choose the type of events you wish to view or select All from the drop-down menu to view all types of events. The types of Unusual Event include Transaction Start, Transaction End, Open Cash Register, Connection Lost, and special User defined event. Please refer to the User manual of Metadata plugins for details. Step 2: Choose the camera channel you wish to view or select All for all the channels available. Step 3: View the events that happened on a particular date or during a given time period by selecting search period. For a particular date: check the Date box right and indicate the date. For о period: clnecl< tine DateTime and tinen enter tine date and time. Step 4: Clicl< Search. A linl< vvill appear next to each event time winere video is available. NUUO NVR/DVR/Hybrid NDVR System By clicking on the link, an instant playback window will pop up to show recorded video Step 5: Press the button Export to. Step 6: Type the file name and choose the file format (.xls or .txt). 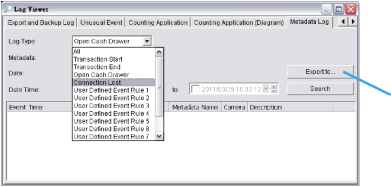 Step 5 7.7 Export After each log search, export needed info to .xls or .txt files. 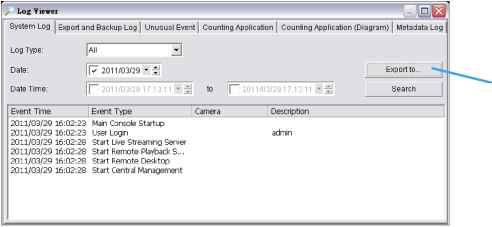 Step 1 Step1: Press the button Export to. Step2: Type the file name and choose the file format (.xls or .txt). 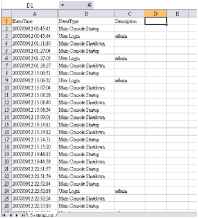 .xls 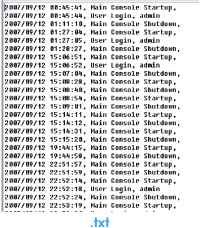 8. Backup 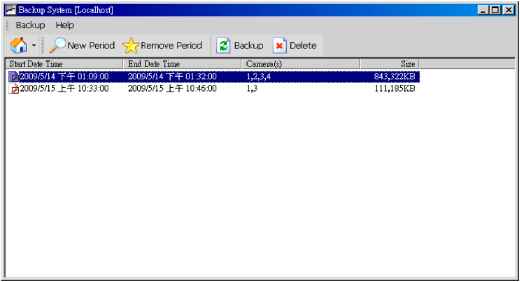 The backup function saves recorded video and other log information. Backup files may be reloaded on any PC with the Playback System installed. Follow the instructions below for more information on obtaining backup files. 8.1 Backup Recorded files Step 1 Step 2 Step 3 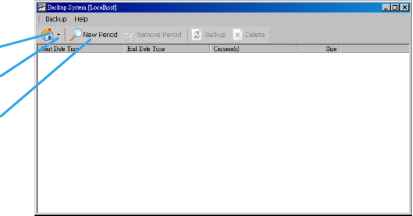 Step 1: Add (Remote) Backup Site: Press tine Remote Server button to go to remote backup site management to add and setup the backup site. Enter the IP address or DNS, Port, Username, and Password. Click Add to add the server. Click OK to exit the Setting panel. Step 2: Access (Remote) Backup Site: Click on the  icon and insert the username/password of the remote server to access the backup Site. Step 3: Click on New Period to obtain the Select Date/Time Period panel. Step 4: Select the data you want to backup by highlighting the time period. Besides the time-table, you may also set up start time and end time in the Date Time Period section. Step 6 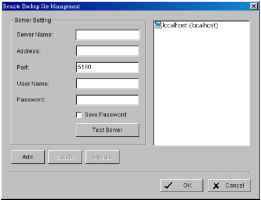 Step 4 Step 5 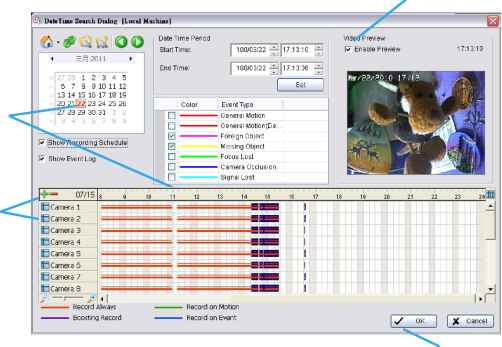 Step 7 Step 5: Click on the camera number icon to add camera(s) or click to add/delete all the channels. Step 6: Check the box of Enable Preview to get the preview of the video you select. Step 7: Click OK when the settings are complete and go back to the Backup System panel. Step 8: If there is any data period not wanted, click Remove Period to remove the data period on the backup list. Step 8 Step 9 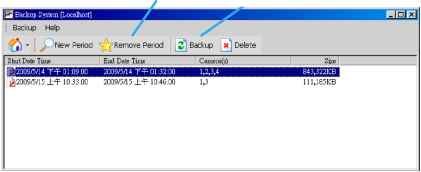 Step 9: Click the Backup icon to obtain Backup panel. Step 10 Step 11 Step 12 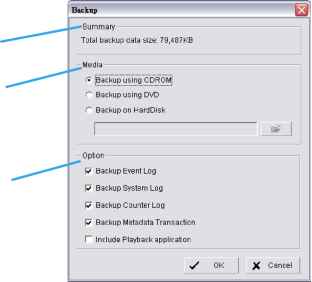 Step 10: Summary: Check the summary section to see the size of the file(s). Step 11: Media: Choose the path you want to save the file or burn the file into a CD (direct CD burning for Windows XP only), DVD or on Hard Disk. Step 12: Option: Select the log information you would like to backup (Event Log, System Log, Counter Log and Metadata Transaction), and then click OK. 8.2 Delete Recorded files Step 1: Click on New Period to obtain the Select Date Time Period panel. Step 1  Step 3 Step 2: Follow steps 3-7 above from the backup section to select data period which you want to delete. Step 3: Click on the Delete icon and delete all the data in the backup list from the database. Note: Deleted video cannot be recovered. 9. Remote Live Viewer  With the Remote Live Viewer console, remote users may watch up to 128 channels real-time video from remote live streaming servers. * Note: Maximum 32 channels under NUUO NVR Lite license. 9.1 Setting Click General Setting to obtain setting dialog. 9.1.1 General Setting  General Setting 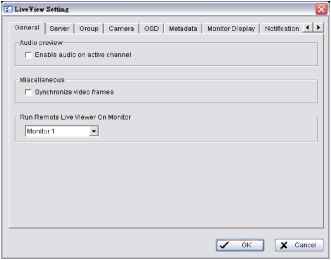 Audio preview: Enable audio on active channel: Select to enable audio streaming on active channel. Miscellaneous: Synchronize video frames: Select to avoid image tearing problems that may occur while CPU loading is increased. 9.1.2 Server setting 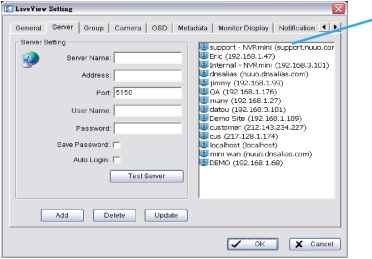 Server List Step 1: Enter the Server Name. Step 2: Enter the Address, Port, User Name, and Password to log in the server. Step 3: Enable Save Password to login without entering the password again. Step 4: Enable Auto Login to login automatically when starting Remote Live Viewer. Step 5: Click on Test Server to check if the server is available. Step 6: Click Add to insert the setting to server list. Note: To change the setting, select a server on server list and click Update after modify setting. To remove the server, select a server on server list and then click Delete . 1 ... 7 8 9 10 11 12 13 14 |