
8(903)201-21-74
ООО "ЧетыреДатчика"
|
Оператор: 8(903)201-21-74 ООО "ЧетыреДатчика" |
|
Оператор: 8(903)201-21-74 ООО "ЧетыреДатчика" |
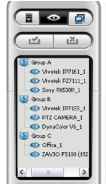
Главная страница Nvr/dvr/hybrid ndvr 1 ... 8 9 10 11 12 13 14 Step 2 Step 4 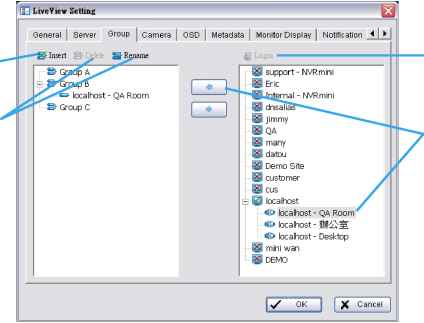 Step 1 Step 3 Step 1: Log in to all the servers that contain the camera(s) you would like to put into the group(s). Step 2: Click Insert to create a new group; name the group for future reference. Step 3: From the window at the right, highlight the camera(s) that you would like to add to a group and then click on the <-- button. Repeat the process until satisfied with the group setting. Step 4: Click on the Delete and Rename button to remove or rename a specific group. Step 5: Repeat Steps 2 to 4 to adjust the group setting until satisfied. Step 6: Click OK. 9.1.4 Camera Setting Select the preferred stream type of each camera as default live view profile. * Note: Some stream profiles are not available under NUUO NVR Lite license. 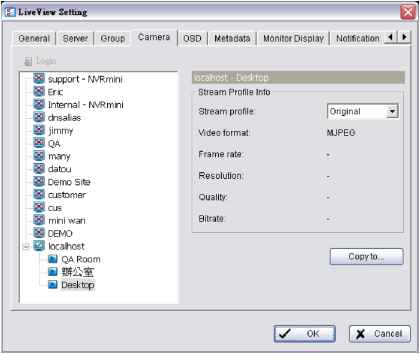 Stream profile: List differs according to different types of video inputs and licenses. Auto: The system will adjust the stream type automatically to fit different screen divisions. 9.1.3 Group Setting Allocate different cameras into each appointed group. * Note: Cameras under NUUO NVR Lite license cannot be included in a group with other servers. NUUO NVR/DVR/Hybrid NDVR System Recoded: The system will follow the stream profile set in Main Console >Schedule > Encoding Options. High / Normal / Low/ Minimum / H.264: The system will follow the stream profile set in Main Console -Setting - Camera - Stream Profile. Original (IP only): The system will display the streaming directly from the IP camera and video server. Copy to: Select in order to copy the preferred stream profile of a channel to all of the listed channels. 9.1.5 OSD Setting Adjust font style of Camera OSD on this panel. 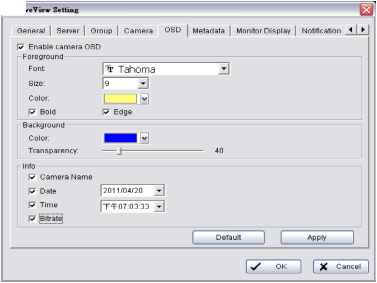 9.1.6 Metadata Setting Adjust font style of Metadata overlay on panel. * Note: This function is not available under NUUO NVR Lite license.  9.1.7 Monitor Display Setting Activate auto scan to rotate the channels/ cameras on screen. Note: For instance, you may select to show only 4 sub-screens on the live viewer while having 16 channels connected to the system. With auto scan function, you will be able to see all 16 channels by turns. Each monitor supports up to an 8x8 layout with auto scan function to show 128 channels. Step 1  Step 2 Step 3 Step 4 Step 5 Step 1: Select the Monitor connected to the system. Step 2: Auto scan group: Select appointed server group to activate auto scan settings. Step 3: Primary channel: Select appointed channel that will always be on the screen when auto scan is activated. Step 4: Secondary channel: Select appointed channel with secondary priority behind primary channel when auto scan is activated. Step 5: Layout: Select the screen division of NxN type in Remote live viewer panel. 9.1.8 Notification Setting 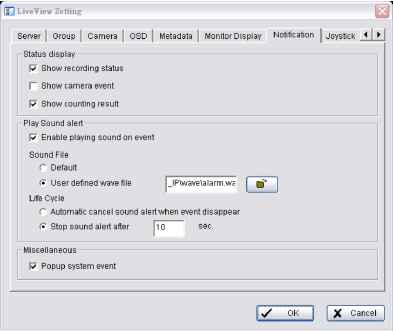 Status display: Show recording status: Check to show the crystal ball with recording status on monitor display. Show camera event: Check to show the smart guard detected event appointed in Main Console on each channel. Note: To execute this function, please configure on screen display as an action of Smart Guard instant response. NUUO NVR/DVR/Hybrid NDVR System Show counting result: Check to show the counting result appointed in Main Console on each channel. * Note: This function is not available under NUUO NVR Lite license. Play Sound Alert: Enable playing sound on event: Check to enable sound alerts on events. Sound File: Choose a sound file to play. You may use the default file or define another. Life Cycle: Choose to allow the sound alert to close when events disappear, or define a timer to close the sound alert automatically after a specific period of time. Note: To execute this function, please configure play sound as an action of Smart Guard instant response. Miscellaneous: Popup system event: Check to allow system events appointed in Main Console to pop up messages as warning. 9.1.9 Joystick Setting Settings are same to Main Console joystick settings. For details please refer to page 75. * Note: This function is not available under NUUO NVR Lite license. 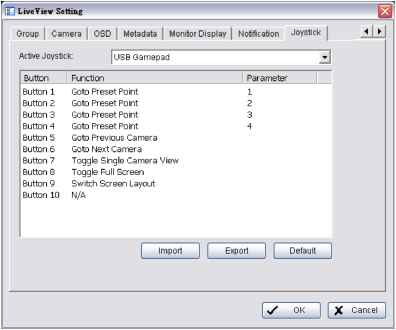 9.2 Server/Group/Camera Display a complete list of the server(s), group(s) and camera(s) that are added to the system. Server View: Cameras are listed according to recording server. Group View: Cameras are listed according to customized grouping. Server View Group View
 9.2.1 login/logout server Option1: Select a server on the list and click on LOG IN/ LOG OUT to access/ logout the server. Option2: On the server list, right click to obtain menu options. Log In/Log Out Server 9.2.2 Connect/Disconnect camera Option!: On the server/camera list, double click on о camera to connect. Option2: On the server/ camera list, right click on a camera to obtain the menu options to connect/ disconnect. Connect/Disconnect Camera Option3: Select a camera from the list, then drag it to where you want it to be displayed. 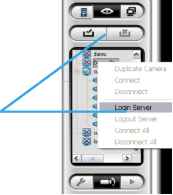 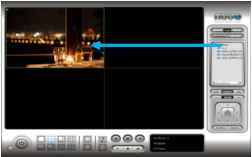 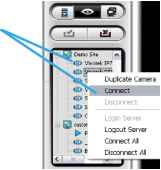 Option4: Play / Stop/ Drop: Select a camera/ video and click on this button to play/stop/disconnect a particular channel. 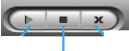 Play Stop Drop 9.2.3 Multiple Views: Step1: On the server/camera list, select a camera and right click on it to obtain the menu options. Step2: Select Duplicate Camera and the duplicate camera with green indicator will display below on camera list. 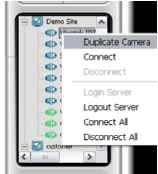 NUUO NVR/DVR/Hybrid NDVR System Step3: Double click on the duplicated camera to connect and display on screen. 9.3 PTZ Control Control the movement of PTZ cameras. With cameras that support PTZ control, you can move, zoom, patrol, adjust the focus, and set preset points of the cameras. 9.3.1 Preset/ Go Adjust the camera view until satisfied. Click on the Set icon to define the current view as preset point 01. Adjust the camera view again to setup preset point 02. Repeat the process until you finish setting up all preset points. Customize preset point names by defining names. Click on the Go icon and view the result of your setting. Note: For the speed settings of PTZ camera, please configure from Main Console - Config - Setting - PTZ Config. 9.3.2 Zoom Click on the + and - signs to zoom in and zoom out the view. 9.3.3 Focus You can select to have the camera focused near or far. To focus near means objects that are closer will be clearer than the objects that are further away. On contrast, to focus far means objects that are further will be clearer than the objects that are closer. Click on the Focus icon and select auto focus if you want the system to decide the focus point for you. 9.3.4 Patrol To control PTZ camera to patrol around pre-defined path of preset points, click on Goto Preset Point - Start Patrol / Stop Patrol. Note: To setup patrol path, please setup on Main Console - Set Preset Point - Set Patrol. 9.4 On Screen Menu Right clicl< on the camera screen for the On Screen Menu, from which you can quickly adjust the setting of camera. 9.4.1 Enable Move / Area Zoom With cameras that support PT function, click the Enable Move function to adjust the current cameras view by clicking on the display screen. To cancel this function, right click on the screen and select Disable Move. With cameras that support Area Zoom function, click the Enable Move/Area Zoom function to adjust the current cameras view by dragging a rectangle on the display screen. To cancel this function, right click on the screen and select Disable Move/Area Zoom. 9.4.2 Enable Talk *This feature is not available under NUUO NVR Lite License. With cameras that support two-way audio, select enable talk to utilize the function. 9.4.3 Enable Audio With cameras that support audio function, click the Enable Audio function to listen to the current cameras audio by clicking on the display screen. To cancel this function, right click on the screen and de-select Enable Audio. 9.4.4 Enable Digital PTZ To enable the PTZ functions of the camera, select the Enable digital PTZ option. Use mouse wheel or click on the + and - signs to zoom in and zoom out on the camera, or drag a rectangle to enlarge the area. The square flashing on the video grid indicate the correspondent view of the camera. 9.4.5 ImmerVision Lens Setting *This feature is not available under NUUO NVR Lite License. With cameras that support ImmerVision Lens. Right click on the display screen and select the mode of lens, 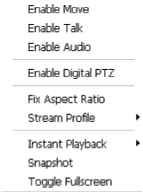 NUUO NVR/DVR/Hybrid NDVR System original, PTZ mode, Quad mode and Perimeter mode. If the lens setting set as Quad, PTZ, or Perimeter mode, the Enable Digital PTZ option would become Enable ImmerVision digital PTZ. 9.4.6 Fix Aspect Ratio For some special camera resolution, user can enable Fix Aspect Ratio to view original ratio video, or disable this option to stretch 3:4 to fit window. 9.4.6 Stream Profile Select different level Stream Profiles to downgrade video quality for bandwidth concerns. * Note: Some stream profiles are not available under NUUO NVR Lite license. 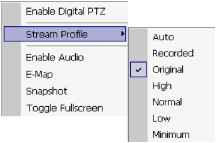 9.4.7 Instant Playback To open the Instant Playback window of the camera, select the Instant Playback option and choose the period. The instant playback window allows the user to browse recorded video, take snapshot images and export video with audio and metadata transaction data. * Note: This function is not available under NUUO NVR Lite license. 9.4.8 Duplicate Camera Right click on any empty channel. You may duplicate cameras from any available servers here. To browse recorded video By simply clicking on the timeline you can view the video. Use the navigation tools below for advanced control. Play / Pause / Stop Speed up/Speed down Fast Forward/reverse frame by frame Play Previous / Next minute video To keep a snapshot of the video clip Pause the video at desired time point and clicl< snapshot button saved or copied to clipboard. To export recorded video Select desired export period and click export buttoni Adjust to original video resolution button Audio button The snapshot is displayed and can be Metadata button Additional options are available when exporting, is the tool to adjust the video to original video resolution. turns the audio on / off. is to enable / disable metadata transaction data overlay. 9.4.8 Snapshot The snapshot function copies and captures a specific video image to the clipboard or to save as a bmp file. The snapshot can be customized with/without OSD, metadata information and selectable range after digital zoom in. 9.4.9 Toggle Full screen Switch to view video with full screen display. To disable the function, right click on screen and de-select - 112 -       option or simply press ESC to go back to original window. 9.5 Start Monitor 9.5.1 Multiple Monitor Select Open Monitor to append monitor to view more live videos on multiple monitors. Each appended monitor has the same list and view control buttons OS the Main monitor, with the exception of the Start, Playback, and Setting buttons. вЛ Start Monitor \z/ \J КУ 9.5.2 E-Map Select Open E-Map to obtain the E-Map window. The GUI map helps to locate devices easily and the information window helps to show the status of each device. 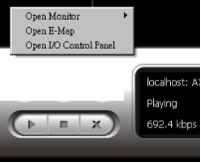 Map Info - Show map name. Camera - Show camera name and connecting status. Digital Input/Output - Shows Digital Input / Output name and status (0 or 1). Ш Access Control/POS/LPR - Shows metadata device name, connection status, first associated camera name and connection status. 9.5.3 I/O Control Select to obtain the I/O control panel. Use the panel to view DI status and control DO devices remotely. Note: Adjust the setting of I/O device in Main console - Config Setting - I/O Device first, the I/O control panel will display the device status based on these settings. 9.6 Playback Select to obtain the Playback panel and view video remotely. 9.6.1 Add Remote Playback Site Press the Remote Sever icon to go to remote playback site management to add and setup a remote playback connection. Step 1: Enter the IP address or DNS, Port, Username, and Password. Step 2: Click Add to add the server. Step 3: Click OK to exit the Setting panel. 9.6.2 Access Remote Playback Site Go to Date/Time Panel and click on the the top of the display window to access the Remote Playback Site 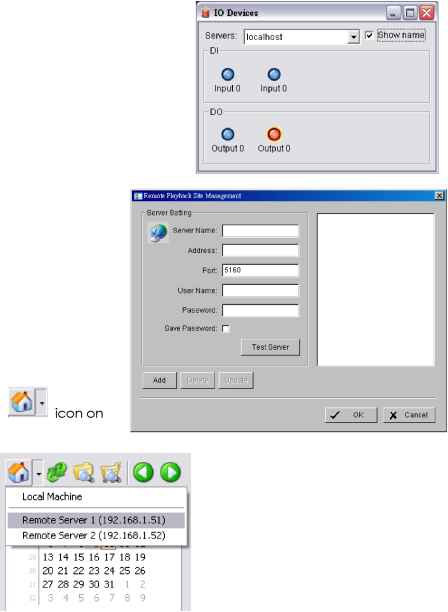 10. Web View Server IP 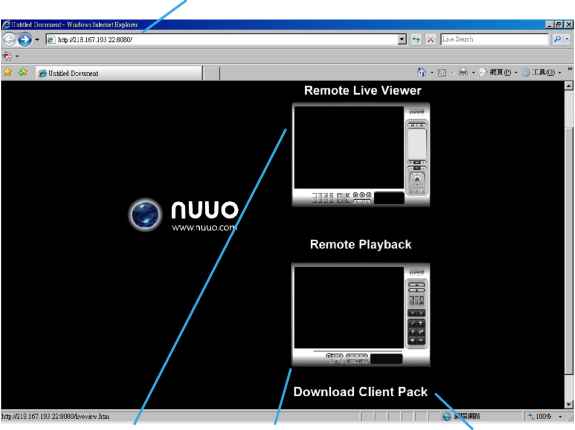 Remote Live Viewer Remote Playback Download Client Pack Note: Make sure the Live Stream Server is enabled. Check 5.14 Network Service for more detail. 10.1 Server IP Start Internet Explorer browser and enter the IP address or DDNS name of the server followed by the connecting port. Example: http: 192.168.1.16:8080/ Note: 192.168.1.16 is the IP address of the server. 8080 is the port specified in Use Default Web Server in Network Service. To connect directly to Remote Live Viewer without additional login, you may input username and password in the URL. Example: http: 192.168.1.16:8080/liveview-htmlskin/LiveView.html?user=admin&password=12345 (Username: admin, password:12345 in this example) 10.2 Remote Live Viewer Press this icon to use Remote Live Viewer which functions are the same as Remote Live Viewer. See page 104 for details. 10.3 Remote Playback Press this icon to use Remote Playback which functions are the same as Playback except remote server and backup functions. See page 30 for details. 10.4 Download Client Pack Press to download client pack to install application based Remote Live Viewer and Remote Playback. NUUO NVR/DVR/Hybrid NDVR System 11. Utilities A. Verification Tool B. License Management Tool C. Resource Management Tool D. DB Tool 1 ... 8 9 10 11 12 13 14 |
||||||||||||||||||||||||||||||||||||||||