
8(903)201-21-74
ООО "ЧетыреДатчика"
|
Оператор: 8(903)201-21-74 ООО "ЧетыреДатчика" |
|
Оператор: 8(903)201-21-74 ООО "ЧетыреДатчика" |
Главная страница Nvr/dvr/hybrid ndvr 1 ... 9 10 11 12 13 14 A. Verification Tool The Verification Tool verifies whether the data created by the system has been tampered with. It is the process by which a digital watermark (a digital signature) is added to each recorded video frame to ensure its authenticity. There are 3 types of data that can be verified by the Verification Tool: 1. File in (.DAT) (.264) format will be displayed as* 2. File in (.AVI) (.ASF) format will be displayed as. 3. File in (.BMP) (.JPG) format will be displayed as. 1.1 Execute Verification Tool Step 1: Execute Verification Tool from program files.  Q Dt.eyeif *ii Q Eat Fiimcen Q OlobeECAPE 1 InfojffeLTfieS Й Intel PROSet Wireless .1 Windows Live (g MBM 5 - 1 MicmsottOttice f3 lUUO ЗшуеШалсе Client Q -fi UnilisMIUUOSyeme НИЗ UaiMuivnl El NUUO Esckup System U NUUODBTools Д NUUO Mein Consob @ NUUO Plsyback System И NUUO Remote Live Viewer Step 1 Step 2: Insert the Administrator Password to log in. Step 3: The Verification Tool appears after login. 1.2 Verification Tool Overview Add File Add Folder Remove File Select All Video Preview 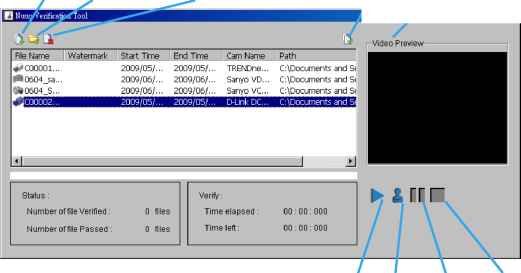 Play Verify Pause Stop Add File: Click to insert the single file to list for verification. Add Folder: Click to choose the folder with multiple files to list for verification. Remove File: Click to remove indicated file(s) from list. Select All: Click to select all files in list for verification. Note: 1. Choose the file type first before selecting files. Only (.dat) (.264) (.avi) (.asf) (.bmp) (.jpg) are supported. 2. User can also drag files directly into the list for verification. Video Preview: Check this column to preview video of selected file. Click on the buttons below the window to play, Pausell and StopH the file. Note: Preview of (.bmp) (.jpg) format is not allowed. 1.3 Verify Image/Video Step 1: Select single or multiple files for verification. Step 2: Click verify to start verification. Step 3: The verification result will show on the watermark column. If a file was tampered with, it will showM. If a file passes verification, it will show. Watermark 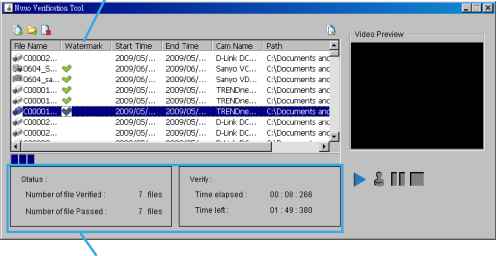 Verification report Step 4: The verification report will indicate the information related to the verification. 1.1 License Management Tool Overview 1.1.1 Execute License Management Tool Step 1: Execute License Manager Tool in config menu or installation folders.   Step 2: The License Management Tool will appear. Please refer below for the tool overview. 112 License Management Tool Overview Activate tab Activate SN status > Activate type Input type Activate Import offline license PI License Management Tool Activate Transfer Chanrnel I Product p Activate type-( Online r Offline p Input type- (? SN: Г SNflle: Г Activate from dorgle Import offline license-File path: Import Exit -1-I w B. License Management Tool The license of the software should be registered before you start using the Intelligent Surveillance System. Additional to essential camera licenses, you may also purchase licenses for the metadata application, including those for POS, LPR and access control. Execute the License Management Tool to activate the license from dongle or serial number included with the software package, or de-activate the license then bring it to another PC to activate it again. Please note different level licenses cannot coexist under one license server. Upgrade licenses will replace lower level licenses into higher level ones. Both Online and Offline status of PC environments are available on executing the tool to activate or transfer the license. The following is a total of 4 types of license management process: - To activate the license with PC connected to network, follow the Activation Online process. - To activate the license with PC not connected to network, follow the Activation Offline process. - To de-activate/transfer the license with PC connected to network, follow the Transfer Online process. - To de-activate/transfer the license with PC not connected to network, follow the Transfer Offline process. Transfer Transfer Tab SN status Transfer type Transfer 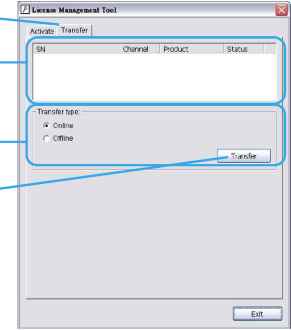 1.2 Activate/Transfer License 1.2.1 Activate License Activation Online! Step 1: Open License Manager Tool. Step 2: Select On line as Activate type. Step 3: Input the SN (Serial number)or Import SN file, and then click on Activate button. -Input type- 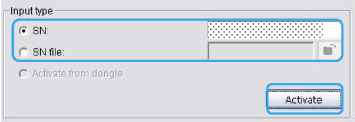 Step 4: Restart Main Console if activation is successful. Activation Offline!  Step 1: Open License Manager Tool. Step 2: Select Offline as Activate type. Step 3: Click on Export offline pock. Please note this license will bind with hardware configurations and it is not recommended to register with removable network devices. 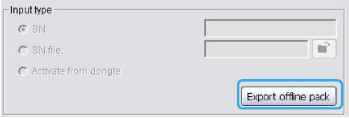 NUUO NVR/DVR/Hybrid NDVR System Step 4: Save Request file, and then take it to another PC that is connected to the Internet.  Step 5: Execute OffLineTooI.exeL click on Activate button. in the other PC. Input the SN (Serial number) or Import SN file, and then 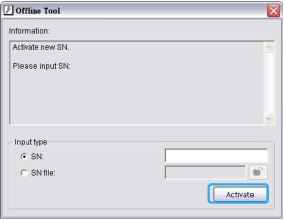 Step 6: Save License file, and then take it to original NVR system. Step 7: Open License Manager Tool again, select Import offline license, then click Import button to activate. 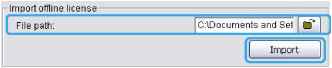 Step 8: Restart Main Console if activation is successful. 1.2.2 Transfer License Transfer Online] Step 1: Open License Manager Tool. Step 2: Select Transfer Tab, and then check Online as Transfer type. Step 3: Select SN and click on Transfer button. License Management Tool Activate Tratisfer I Channel I Product NUUO IP+ Transfer type:-Ortlirte Г Offline Step 4: Restart Main Console if transfer is successful. I status Activated Transfer Transfer Offline] Step 1: Open License Manager Tool. Step 2: Select Transfer Tab, and then check Offline as Transfer type. Step 3: Select SN, and then click Transfer button to transfer SN. 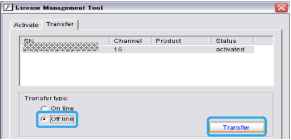 Step 4: Save Request file. Restart Main Console if transfer is successful.. 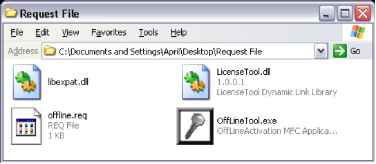 Step 5: Copy request file to another PC connected to internet. Step 6: Execute OffLineTool.exe in another PC, check Transfer SN and click Transfer to send request file to license server. 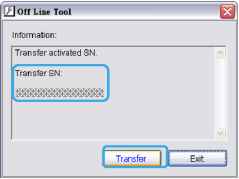 Note: User needs to copy request file to another PC and send it to license server, otherwise the SN cant be re-activated again!! 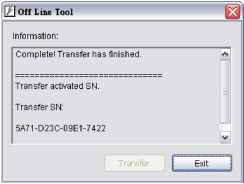 C. Resource Management Tool The Resource Management Tool detects whether the system is operational. Note: For further application of the Resource Management Tool, please refer to page 52 In Guard chapter. 1.1 Execute Resource Management tool Step 1: Open Resource Report from start menu. Step 2: The Resource Management Tool will appear. Step 1 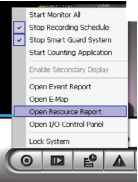 1.2 System Resource Overview System Resource Instant Diagram 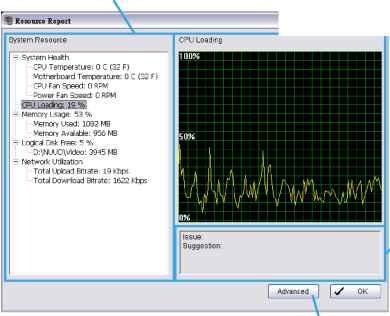 Issues and Suggestion Advanced 1.2.1 System Resource System Health: This item shows the system information, including CPU Temperature , Motherboard Temperature , CPU Fan Speed and Power Fan Speed . Note: User needs to install the SpeedFan first to gather the CPU and Motherboard temperature information. CPU Loading: This item shows the percentage of CPU usage. Memory Usage: This item shows the memory usage of system. Memory Used and Memory Available are included. Logical Disk Free: This item shows the percentage of available disk space for storage. Note: The disk directory will be the same as the one in MainConsole - Config - Setting - Storage - Location. Network Utilization: This item shows the total bit-rate utilization for the upload and download of the computer. 1.2.2 Instant Diagram Click each item in the list to obtain the instant system diagram. The system resource will be displayed as each variable in Vertical Axis; the unit of Horizontal Axis will be displayed as Per Second .  NUUO NVR/DVR/Hybrid NDVR System Vertical Axis Horizontal Axis 1.3 Advanced Resource Report Click the Advanced button to search and export system logs in Search tab and obtain the history diagram of an specified period in Diagram tab. 1.3.1 Search Stepi хИр Step 2 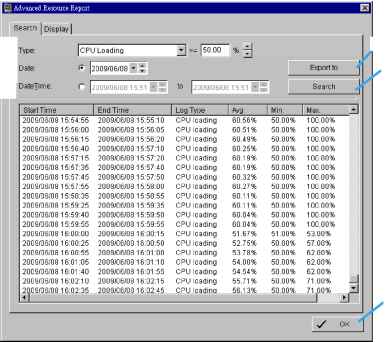 Step 4 Step 3 Step 5 Step 1: Step 2: Step 3: Step 4: Step 5: Choose the system event type, and then select the standard percentage to search system log. Select the Date/Time duration to search system log. Click Search to start searching, the system logs will be listed below. Click Export to to save the system log in (*.xls) or (*.txt) format. Click OK to close the report window. 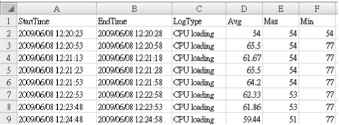 1.3.2 Display Step 1 Step 2 Step 3 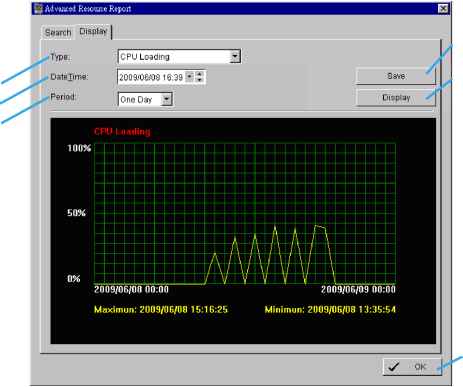 Step 4 Step 5 Step 6 Step 1: Choose the system event type. Step 2: Select the Date/Time to draft history diagram. Step 3: Setup the start time and duration for charting. User can choose One Day , One Hour or One Minute as the duration. Step 4: Click Display to start charting, the diagram will be displayed at below column. Step 5: Click Save to save the diagram in (*.bmp) format. Step 6: Click OK to close the report window.  Step 1: Execute DB Tool from program files. Step 1
Step 2: Enter the password of administrator to log in. Step 2 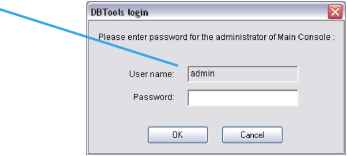 1.1 Repair Database This page has three repair method, Modify Location, Verify Only, and Repair. For modify location: NUUO Playback system can recognize all recording video in the folders listed on MainConsole - Config Setting - General page. For some reason, user needs to use Playback system to open recording video beyond storage location setting. For this propose, user could follow below steps to modify location by DB tool. Note: The default storage location is in the installation directory, (ex: C:\Program Files\NUUO\SCB IP) Step 1: Select Repair database. tJ DBTools (IP vemon 3, Repair datalaase pRepair database- Modif/ locations to store video files. Please confirm locations where video files were stored and press button Modif/ to confirm. Step 2: Select the repair Method as Modify Location. pRepair database- Modify locations to store video files. Please confirm locations where video files were stored and press button Modily to confirm. Install Patti: CAPmgram Flles\NUUmsCB IP Method: Modlf/Location D. DB Tool The DB Tool repairs database files and Export configurations. Warning: improper use of this DB Tool may cause loss of recorded video. 1 ... 9 10 11 12 13 14 |