
8(903)201-21-74
ООО "ЧетыреДатчика"
|
Оператор: 8(903)201-21-74 ООО "ЧетыреДатчика" |
|
Оператор: 8(903)201-21-74 ООО "ЧетыреДатчика" |
Главная страница Nvr/dvr/hybrid ndvr 1 ... 10 11 12 13 14 Step 3: For add database location, please click on NUUO NVR/DVR/Hybrid NDVR System button and use URL to choose location. For remove database location, please choose location form list and click on remove location. button to
Step 4: Click on Modify button to modify location. After modification, the Modify Result will show on the panel. Modiiy Result: 2 locations confirmed. Open Log Modify Example of modify database: In certain cases where video data needs to be transferred from one PC to another PC, user will need to perform the following: 3. 4. Manually copy all recorded video data from the default installation path or other user-defined storage path of the old PC. D C:\PrDgram FileMUUOCBJP Ш & IBM -Jif] Ш & IBM ThinkYsQita Ш InstsJJShield InsteJlatiDn Ini Ш & IntBl IS Intsmet Ехркэгег Ш Й Koei B Lemvo
man ! Recorded video data wave Manually paste all recorded video data to the default installation path or other user-defined storage path of the new PC Follow previous page to add new location on new PC. Old recorded video data can be viewed by NUUO playback system on the new PC. For verify and repair proposes: This tool is used to check and repair your database and recorded video with problems: (1) If there are records in database, but no video file, use this DB Tools to delete records. (2) If there are video files but no record in database, use this DB Tools to rearrange the database and find these records. Step 1: Switch to Repair database windows. Vi DBTools (IP version 3,1,0,0) Repair database pRepair database- Modity locations to store video files. Please confirm locations where video files were stored and press button IHodif/ to confirm. Step 2: Select the repair Method as Verify Onlyd. pRepalr database- Verif/video flies stored by sun/eillance system. Please confirm locations where video files were stored and press button Verily to check all files. Fixing database is only needed when verification is failed. install Path: C:\Program FiieslNUUO\SCB IP Method: Step 3: Check the video location windows. The system will list all video locations in table, but if there are any omit, please use Note: After inserting location, the system will show files count below table. to insert. File Count: Step 4: Choose the method of Verify Only , and click verify . This method will only check the files without modify. Verify result will show how many files broken or missing. Verity Result: 41 files verified, 0 files tiraketi, 0 files missing. Step 5: Choose the method of Repair (Complete) , and click Repair . The Repair Result will show how many files are fixed and inserted. Repair Result 2 flies fixed, 41 flies inserted. Step 6: The repaired new database will replace the old one and the original database will change file names with extended repair date and time as below. ; Address D:\SCB-IP EventLog.mdb FileReccird.mdb FileRecord.rvidb 20080714A121358.mdb PosRecord,mdb ScheduleCcinFig,mdb 5ystemLog,nndb SystemLog.mdb 200S0714A12135S.mdb Note: Open Log is a tool to record the repaired database. It will record repair method, file operation, start time and end time. A dbtool.log - Notepad Operation Verify Only is started at (2003/07/14 12:01:17) Fi1e Broken: D:\Video/200S070S/c00002/c00002s00a200S070S112323437.dat File Broken: D:\Video/200S070S/c00002/c00002sOOA200S070S114304625.dat 41 files verified, 2 files broken, 0 files missing. .Operation Verify Only is finished at (2008/07/14 12:01:19) File Edit Format View Help operation Verify Only is started at (200S/07/14 12:13:19) Fi1e Broken: D:\Video/200S070S/c00002/c00002s00a200S070S112323437.dat Fi1e Broken: D:\Video/200S070S/c00002/c00002s00a200S070S114304625.dat 41 files verified, 2 files broken, 0 files missing. .Operation Verify Only is finished at (200S/07/14 12:15:20) operation Repair (Complete) is started at (200S/07/14 12:13:55) File Repaired: D:\Video/2003070S/c00002/c00002s00A200S070S112323437.dat File Repaired: D:\Video/200S070S/c00002/c00002sOOA200S070S114304625.dat 2 files fixed, 41 files inserted. Operation Repair (Complete) is finished at (200S/07/14 12:14:07) 1.2 Export Configurations This tool is used when user wants to export all system configurations to backup, take to another PC for NUUO technical trouble shooting. Step 1: Press Export . U DBTools (IP version 3.1,0, 0) Repair dataljase Export cnnflajratiop Export Conflguraflons- Export Main Console confiaurations fortrouble shooting. Please provide the exported *.cfa flie to the technical support. Export  Step 2: Select the location you want to Export and type the name of the configurations. Step 3: Press Save to start to import database. 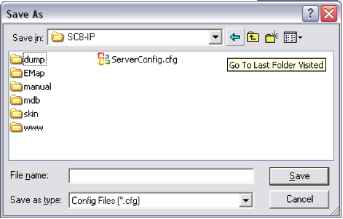 NUUO NVR/DVR/Hybrid NDVR System Appendix A - 3GPP Service How to setup 3GPP streaming connection (using BenQ-Siemens mobile phones) System Configuration
1.1 Configuration from NUUO server Step 1: Go to Config and select Network Service 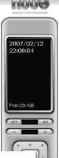 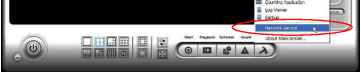 Step 2: Select 3GPP Service, and then click Start Note: In the Option item, the port selected here is the same port from mobile handset  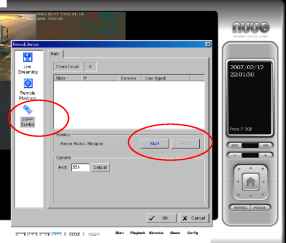 g t ® I и I b I A л } 1.2 Configuration from 3G Mobile Phone 1.2.1 BenQ-Siemens E81 Step 1: Go to Menu, then Internet
step 2: Select Bookmarks 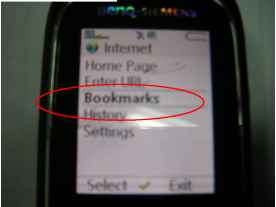 Step 3: Add New Bookmark Step 4: Configure the Adress setting as the following example. Ex: rtsp: 61.216.97.69:554/media00.3gp 61.216.97.69:554 is the IP address of NUUO NVR or DVR system Port: port specified in 3GPP Service from NUUO NVR or DVR system 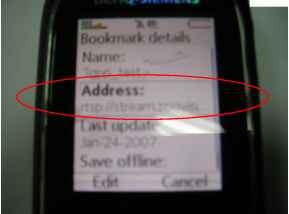 Step 5: Save the settings and start playing 1.2.2 BenQ P50 Step 1: Connect GPRS Step 2: Download and install the [PLATFORM4] software. Step 3: Execute the Main Console. Step 4: Press the [Config] [Network Service] [Start] Step 5: Open [PLATFORM4], press the button framed by red into Option Step 6: [Open URL] enter the RTSP address of the camera EX: rtsp: 61.216.97.69/media00.3gpchannel 1 EX: rtsp: 61.216.97.69/media01.3gpchannel 2 EX: rtsp: 61.216.97.69/media02.3gpchannel 3 Step 7: [Setting I]change the setting and press OK [Protocol] TCP [Buffer Size] 60 [Connection TimeOut] 103 [Data Recept. TimeOut] 100 [Deblocking Filter] check Step 5 Step 6 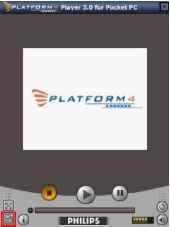 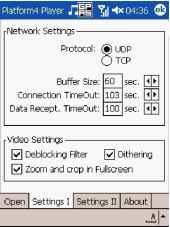 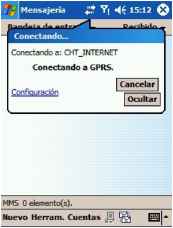 Step 7 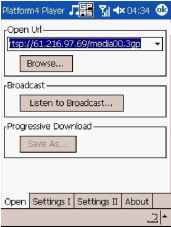 Step 8: Go back to PLATFQRM4, searching and get the video. 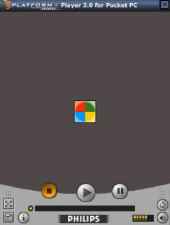 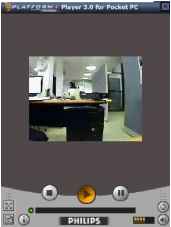 1.2 Execute PDA / Smart Phone Client 1.2.1 Main Console setting Step 1: Go to Config and select Network Service Network Service 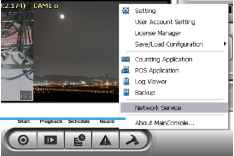 Step 2: Select Live Streaming , and then click Start . Note: The Port selected here will be the same with the one in PDA/Smart Phone. Live Streaming 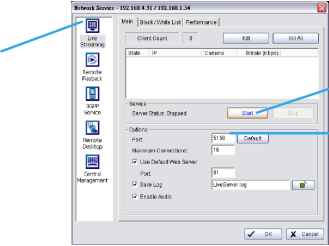 Start Port Appendix B - PDA / Smart Phone Client PDA / SP (Smart Phone) Client are only applied for devices with Windows Mobile 5.0 platform or above. See the sections below to find how to install and execute PDA / SP Client. Note: 1. The different between Smart Phone and PDA Client is navigation of operation, user can only control client with phone buttons. 2. The resolution of PDA / SP Client is limited in 240*320 (QVGA). 1.1 Install PDA / Smart Phone Client Step 1: Connect mobile device to the PC. Step 2: Insert the installation CD and click on PDA Client Installation / Smart Phone Client Installation to install application in device. Note: If you do not have Microsoft ActiveSync installed, a message will appear Cannot find ActiveSync. Please reinstall ActiveSync and then run this installation again. Step 3: Check the client application is installed completely in the mobile device. successfully installed on your device. If you need more storage space, you can rernove installed programs. 1.2.2 Execute and Login Step 1: Make sure your PDA/Smart Phone device is connected to network, and then go to Start - Programs NUUO PDA/Smart Phone Client to execute application. 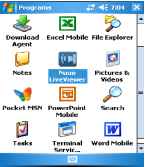 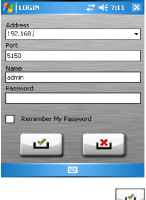 Step 2: Insert Address, Port, Nome and Password of the server and click on LHJ to login. 1.3 PDA/Smart Phone Client Overview There are 3 main pages of Client application: Moniitor Preview, I/O Control and System Info. Switch between these buttons to adjust overall configuration. Log out 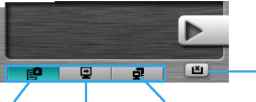 Live View I/O control System Info 1.3.1 Live View Camera List MobJieLJveVJewer . 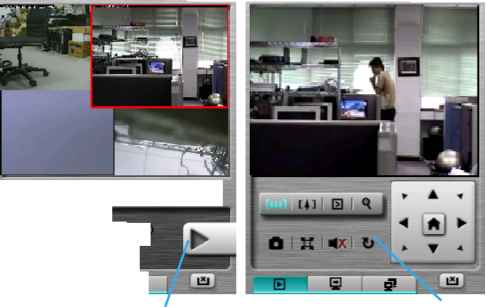 S 214 (192,168,2,24 Camera List: Display Live Video Back to Camera List -to display live video. Note: The Screen Division and Refresh option could help to quick find the channel. Screen Divisions 2ИЩИ I 2/3 I Ф -Refresh Live Video Display: Live View panel could display live video , control PTZ, and snapshot. Click to go back camera list. PTZ Control- Click on PT Control Panel and Zoom Out/In to control physical PTZ camera or adjust digital PTZ under digital PTZ mode. Note: To switch between Digital PTZ and Physical PTZ , simply click on 1 button. Zoom Out/In 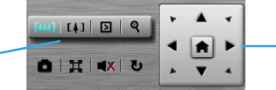 PT Control Preset Go: Clicki to select indicated preset point. 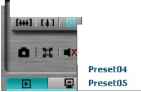 Snapshot: Click to take the snapshot and save it to default folder. Full Screen: Click to toggle to the Full Screen Mode , right click on screen to obtain the PT control panel and disable full screen display. Disable Full Screen  Enable Audio: Click ElL to enable the audio of current channel. 1.3.2 I/O Control Select I/O Control button to monitor status of DI/DO devices, and control DO devi ces. I/O Device list DI/DO Status I/O Control 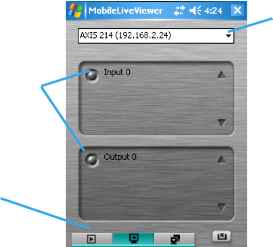 Displays all snapshots of channels connected to server as camera list. Click on indicated snapshot to get the channel information, and then click on 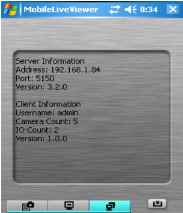 For NUUOs latest release of Android application based client NUUO iViewer, please log on to http: www.nuuo.com/faq.php?node=1315 for more information and product demo videos. I/O Device list: Select and monitor the device connected with Server. DI/DO status: Monitor the DI/DO status synchronized with Server, and then click Output button to trigger the DO action. Gray icon indicates the normal status of DI/DO devices. 9 Red icon indicates the alarm status of DI/DO devices. Green icon indicates the synchronization process. 1.3.3 System Info Display the server and client information. Server information includes address, post, and version. Client information includes login user, count of camera and I/O device with access authority and version. 1 ... 10 11 12 13 14 |
|||||||||||||||||||||||||||||||||||||||||||||