
8(903)201-21-74
ООО "ЧетыреДатчика"
|
Оператор: 8(903)201-21-74 ООО "ЧетыреДатчика" |
|
Оператор: 8(903)201-21-74 ООО "ЧетыреДатчика" |
Главная страница Nvr/dvr/hybrid ndvr 1 2 3 4 5 ... 14  Step 3: Check that the client application is installed completely in PDA device. 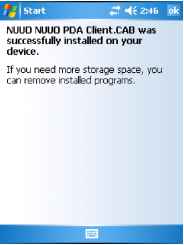 PDA Client Installation Step 1: Connect PDA device to the PC. Step 2: Insert the installation CD, click PDA Client Installation to automatically install the client application in device. Note: If you do not have Microsoft ActiveSync installed, a message will appear Cannot find ActiveSync, install ActiveSync and run installation again . Smart Phone Client Installation Step 1: Connect Smart Phone device to the PC. Step 2: Insert the installation CD, click Smart Phone Client Installation to automatically install the client application in device. Note: If you do not have Microsoft ActiveSync installed, a message will appear Cannot find ActiveSync. Please reinstall ActiveSync and then run this installation again. 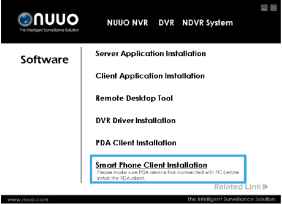 Step 3: Check the client application is installed completely in smart phone device. 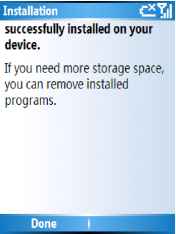 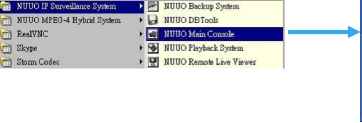 nuuo The Intelligent Surveillance Solution Р1ээЕе enterpassari for afninistrator PaSSWura: I N/ OK X c Activate IP Camera License(s) Step 1: Open License Manager Tool in Config menu. Step 2: Select Activate tab, check the PC in Online network environment. Step 3: Insert the SN, SN file or dongle to activate license. Step 4: After software license is activated successfully, please restart Main Console. Note: Please refer to page 118 for advanced settings. 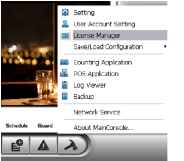 Step2 Step 3 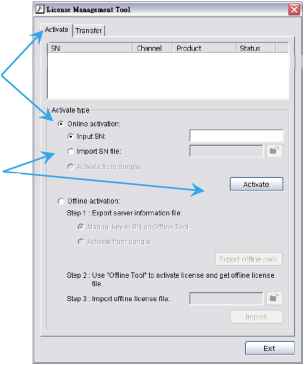 Install IP camera(s) Step 1: Setup the IP camera(s) by referring to the user manual provided by the IP camera manufacturer. Step 2: Make sure you can access this camera through IE browser. Step 3: Add the IP camera(s) to the system by following the steps below. Quick Start Execute Main Console Step 1: Go to Start > All Programs > NUUO Surveillance System > NUUO Main Console to execute Main Console. Step 2: Enter your own password into the edit box, enter it again for double confirm and then click on OK. Add IP camera(s) Step 1: Execute Main Console. Step 2: Type in user name and password and log in to the system. Step 3: In Main Console, go to Config and select Setting to obtain the Setting panel. Step 4: Go to Camera tab. Note: If the IP camera supports UPnP, follow step 5. Otherwise, follow step 8. Step 5: Click on Search to detect IP cameras under this local area network (LAN). Note: The Search function is available only when the IP cameras support UPnP. Step 6: Select one of the IP cameras that are available and enter the username and password. Step 7: Click OK to add the camera. Step 8: Click Insert to insert the IP cameras. Step 9: Enter the IP address or domain name (check the Use DNS option), Http Port, Username, and Password. Step 10: Select Auto Detect. Step IV: Select OK to add the camera. Step 12: Select OK to exit.  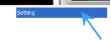 Д User Account Setting a License Manager Step 3 aa Counting Applcation £ POS Application и Log Viewer Ш Backup Network Service ScliEdulE Guard About MdinConsole...  Step 4 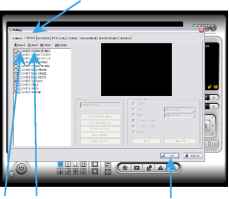 Step 5 Step 8 Step 12 Step 9 Step 10 Step 11 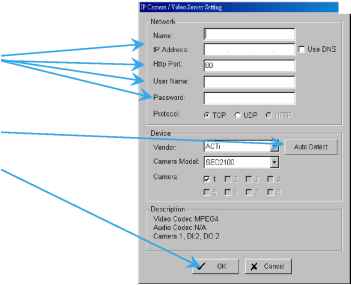 Set Schedule Step 1: Execute Main Console. Step 2: Type in user name and password. Step 3: Select Schedule. Step 4: The default schedule is always record when a camera is newly inserted. Step 5: Choose a camera and then select Configure or just double click on the schedule bar to modify the recording mode. Step 6: Select OK to update the recording schedule. Step 7: Select OK to go back to Main Console. Set Smart Guard Step 1: Execute Main Console. Step 2: Type in user name and password and log in the system. Step 3: Click on Guard. Step 4: Select a camera and then click on Insert Event. Step 5: Take General Motion for example, select General Motion as the event type and then click on OK. Step 6: In Alarm Event Configuration panel, define your own detection zone, sensitivity and interval. After that, click on OK to save the configuration. Step 7: Click OK to go back to Main Console.  Step 3 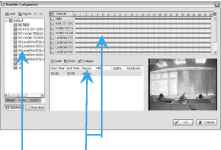 Step 4 Step 5  Step 3 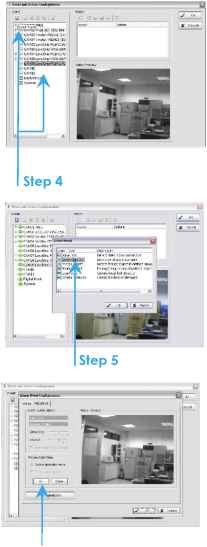 Step 6 Start Recording & Smart Guard Step 1: Execute Main Console. Step 2: Type in user name and password and log in the system. Step 3: Click on Start. Step 4: Click on Start Recoding Schedule and Start Smart Guard System to enable the two functions. 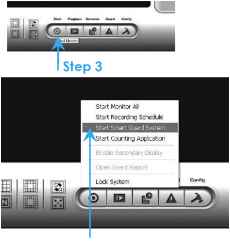 Step 4 Playback Step 1: Execute Main Console. Step 2: Type in user name and password and log in the system. Step 3: Click on Playback. Step 4: In Playback, click on Date Time Search Dialog.  Step 3 Step 5: Select a specific day from the calendar, left click on mouse and drag to select a video clip to replay; user can also select multiple channels to replay at the same time. Step 6: The recorded files are now ready to view. 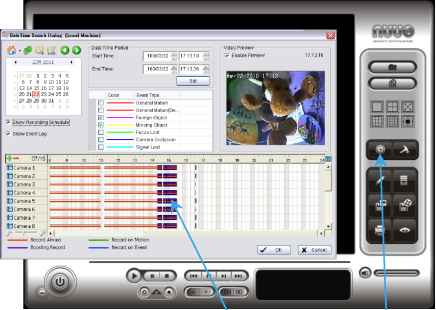 Step 5 Step 4 NUUO NVR/DVR/Hybrid NDVR System 1. Main Console 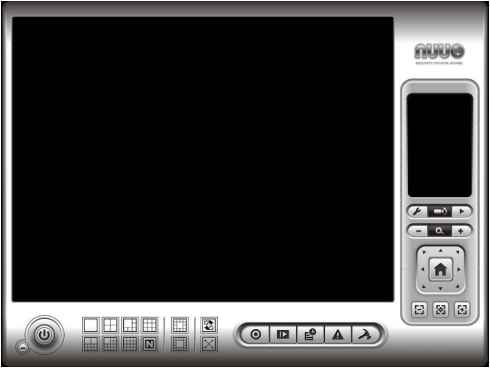 This is the main operating system - to activate schedule recording, setup smart guard and configure system setting. 1.1 User Interface Overview Exit Minimize Crystal Ball Information Window 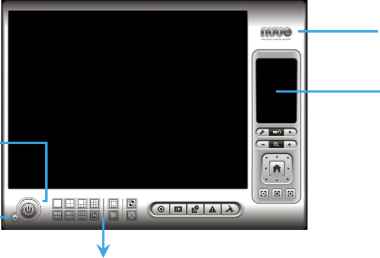 Screen Division Exit: Shut down the Surveillance System or log out current user. Minimize: Minimize the Main Console window. Screen Division: Allocate the sub-screen display by clicking on the desired layout icon. To switch to single camera display, double click on a particular sub-screen. Double click on the screen again to regain previous screen division layout. Divide into Divide into 1 s creen(s ) Divide into 4 screen(s) 6 screen(s)  Divide into 9 screen(s) Divide into 10 screen(s) Divide into 1 3 scree n(s)  Divide into 16 screen(s) Divide into N screen(s) Divide into 13 screen(s) Divide into 1 7 scree n(s) Switch to Full screen Rotate all screens Only available under wide screen resolution(1440x900, 1680x1050, 1920x1080, 1920x1200): Divide into 4 screen (s)  Divide into 6 screen(s)  Divide into 9 scree n(s)  Divide into 12 scre en(s) Crystal Ball Indicate the working status of the system. Gray - at rest, Blue - recording, and Red - events detected. When the crystal ball is red, click it to open the event report then cancel the event(s). Information Window Display date, time, free Disk space, IP Camera Bit rate customized text and Further information like Temperature, Fan speed, System Resource and Network Utilization. 5 network service icons indicate which services are switched on/off.
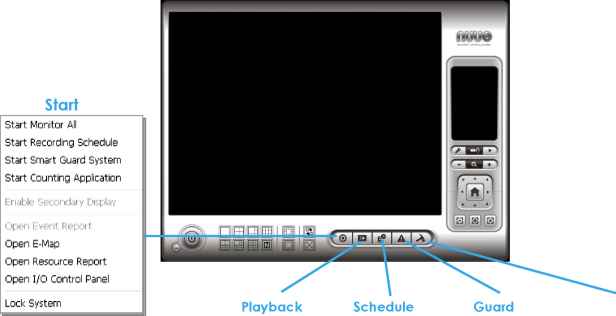 Config Start: Click on the Start icon and select from the drop down menu to activate/ deactivate: (a) Recording Schedule System, (b) Smart Guard System, or (c) Counting Application. Or select Start/Stop Monitor All to activate/ deactivate all the functions at once. The Start menu also include the option to Enable Secondary Display, and open monitor tools, such as open event report to monitor smart guard event; open E-map window to monitor all devices with map indicator; open Resource Report to check system status; open IO Control panel to monitor the DI/DO status and manual triggering the DO devices; or lock the system here. See page 75 for more details about secondary display. Note: 1. When activating any of the monitor functions of Smart Guard, system would consider the current screen status as normal. Therefore, if you want to, for example, detect Missing Object, be sure the object needed to be protected is in its position at the moment you click Start button. 2. To automatically activate the Recording Schedule System, Smart Guard System and Counting Application, at the Main Console go to Config; Setting; General; Startup to setup the auto-startup functions. 3. As for Secondary Display, open event report, open E-map window, open Resource Report and open IO controls panel, Main Console will keep the behaviors as the latest status when exiting the system. Playback: Click on the icon to get Playback Console. You can watch recorded video, search recorded video, adjust image of the stored data, save video/ pictures, print images, check log information and event records, and set up recording function configuration. See Playback on page 30 for detail. Schedule: Organize recording time schedule and setup recorder configuration. See Schedule on page 45 for detail. Guard: Add/edit type(s) of events that you want to detect; setup action(s) responding to events. See Guard on page 52 for detail. Note: To customize Information about windows setting, go to Config - Setting - General - Status Display. Select Advanced Setting for further information like Temperature, Fan speed, System Resource and Network Utilization. 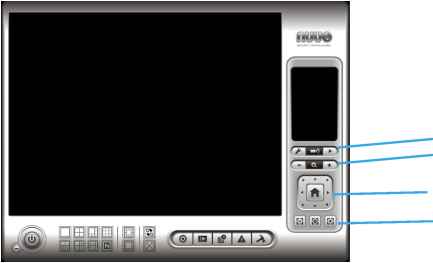 Set Preset Point / Go to Preset Point Zoom Out / Zoom In PTZ Camera Control Focus Far / Auto Focus / Focus Near 1.2 PTZ Camera Control Control the movement of PTZ cameras. With cameras that support PTZ control, you can move, zoom, patrol, adjust the focus, and set preset points of the cameras. 1.2.1 Set Preset Point / Go to Preset Point Adjust the camera view until you are satisfied. Click on the Set icon and set up the view as the preset point 01. Adjust the camera view again and set up the preset point 02. Repeat the process until finish setting up all preset points. You can enter any names you want instead of the preset point 01, preset point 02, preset point 03, click on the Go icon and view the result of your setting. Note: For the speed settings of PTZ camera, go to Config - Setting - PTZ Config to setup the advanced settings. 1.2.2 Zoom Click on the + and - signs to zoom in and zoom out the view. 1.2.3 Focus You con select to hove the camera focused near or far. Click on Focus Near l!i±) to focus on objects closer to the camera. Click on Focus Far Focus you. to focus on objects further away from the camera. Click on Auto if you want the system to decide the focus point for г.,!!, ,. 1.2.4 Patrol Go to Set Preset Point - Set Patrol to obtain the Patrol Setup dialog. From the left window, select the cameras that you would like to have in the patrol group. Align the cameras in order in the right window and adjust the time. Rename the group name if required. After completing the setup, check the Active option, and then click OK. Note: You can define up to four groups of auto patrol. To start or stop, click on Go to Preset Point in the Main Console, and select Start Patrol or Stop Patrol. 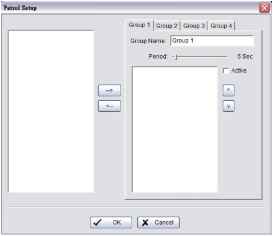 Config: Select from the drop down menu to modify the general settings, user account settings, save/ load configuration settings, open License Manager, edit counting application and metadata application, access log viewer and backup files, or setup network services. See Config on page 65 for detail. Note: User account and License manager could only be enabled for users with administrator privilege. 1 2 3 4 5 ... 14 |
|||||||||||||||||||||||||||||||