
8(903)201-21-74
ООО "ЧетыреДатчика"
|
Оператор: 8(903)201-21-74 ООО "ЧетыреДатчика" |
|
Оператор: 8(903)201-21-74 ООО "ЧетыреДатчика" |
Главная страница Nvr/dvr/hybrid ndvr 1 2 3 4 5 6 ... 14 1.3 On Screen Menu Right click on the camera screen and get the On Screen Menu, from which you can quickly adjust the setting of camera. 1.3.1 Camera Setting Click to go to the camera setting page for configuration. for details. See page 70 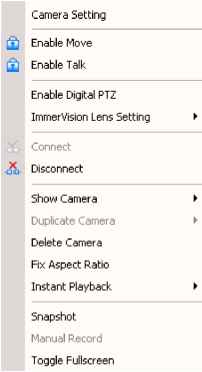 1.3.2 Enable Move/Area Zoom With cameras that support PT function, click the Enable Move function to adjust the current cameras view by clicking on the display screen. To cancel this function, right click on the screen and select Disable Move. With cameras that support Area Zoom function, click the Enable Move/Area Zoom function to adjust the current cameras view by dragging a rectangle on the display screen. To cancel this function, right click on the screen and select Disable Move/Area Zoom. 1.3.3 Enable Talk *This feature is not available under NUUO NVR Lite License. With cameras that support two-way audio, select enable talk to utilize the function. 1.3.4 Enable Digital PTZ To enable the PTZ functions of the camera, select the Enable digital PTZ option. Use mouse wheel or click on the + and - signs to zoom in and zoom out on the camera, or drag a rectangle to enlarge the area. The square flashing on the video grid indicate the correspondent view ratio of the camera. 1.3.5 ImmerVision Lens Setting *This feature is not available under NUUO NVR Lite License. With cameras that support ImmerVision Lens. Right click on the display screen and select the mode of lens, original, PTZ mode, Quad mode and Perimeter mode. If the lens setting set as Quad, PTZ, or Perimeter mode, the Enable Digital PTZ option would become Enable ImmerVision digital PTZ. 1.3.6 Connect/ Disconnect Right click on the display screen and select Connect/ Disconnect to modify the connecting status of the camera. 1.3.7 Show Camera Select the camera from the Show Camera Menu to display video on selected screen. Note: 1. The camera list of show camera menu shows as the one in the right column of monitor display panel. 2. The change of displayed screen is only applied to the current display divisions. 1.3.8 Duplicate Camera Select the camera from the Duplicate Camera Menu to duplicate camera video to selected screen. Note: 1. The duplicated camera would add to the camera list of duplicate camera menu shows as the one in the right column of monitor display panel. 2. The change of display list will apply to all divisions and also the right column of monitor display. 1.3.9 Delete Camera Click on Delete Camera to remove a camera from the display screen of the display screen. Note: 1. The camera list of delete camera menu shows as the one in the right column of monitor display panel. 2. The settings will apply to all divisions and also the right column of monitor display. 1.3.11 Instant Playback *This feature is not available under NUUO NVR Lite License. To open the Instant Playback window of the camera, select the Instant Playback option and choose the period. Refer to 1.5 Instant Playback section for detail. 1.3.12 Snapshot Select the snapshot function to capture a specific video image frame immediately. You have the options to copy the image to clipboard or to save it. For further settings, select OSD option and metadata option to export the image with date/time, camera number/name and metadata text. If the digital PTZ function is enabled in display view, you can also decide Full Size or Selected Region as your snapshot region. 1.3.13 Manual Record Start recording video by selecting manual record. 1.3.14 Toggle Full screen Select to view a specific channel with full screen. Press ESC to go back to original window. ШШяЪ) 19:04:59 Щ!№ЕШШ1С 1  1.3.15 TV-Out Pop-up * Note: This function is not available if there is no SCB-7108/7116 card installed. Enable Digital PTZ Show Camera Duplicate Camera Delete Camera Fix Aspect Ratio Instant Playback Snapsliot Manual Record Toggle Fullscreen TV-Out Pop-up Select to have the pop-up cameras on the screen notify users of the current event. 1.4 Live Display NUUO Live display is flexible; you may change channels and screen divisions. Each screen division shares the same display list but has an independent display sequence. For example, when using Show/Duplicate/Delete Camera functions to edit your camera list, the same list will be available to all different screen divisions. Note: This camera list is also available at the monitor display tab from the Config/Setting window. Two monitors can have two independent lists. 1.3.10 Fix Aspect Ratio For some special camera resolution, user can enable Fix Aspect Ratio to view original ratio video, or disable this option to stretch 3:4 to fit window. Action Show camera (add cam 1) Current division Duplicate camera (duplicate cam 2) .1 2 2 Other division add to first free channel Delete camera (delete cam 2 ) add to first free channel remove cam 2 and keep channel free When using a mouse to drag and drop camera channels, the sequence change will only apply to the current division. Original Action Drag cam 1 to cam 4 Current division Other divisions Note change of sequence Right click on the camera screen for the on screen menu. Here you will be able to quickly adjust settings of your camera. 1.5 Instant Playback * Not available under NUUO NVR Lite License NUUO Instant Playback function allows you to play the last few minutes of any live video channel. Simply right click on Live Channel and select Instant Playback to access the recorded video. 1.5.1 Instant Playback window overview 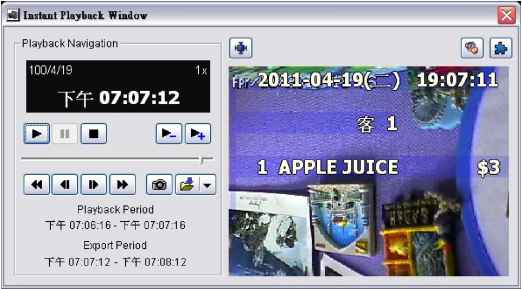 Information Window: will show correct date and time of video. Playback Period: indicates the available play period; three options are available: 1 min, 3 min, or 5 min of video. Export Period: indicates the period of video you desire to export. Default is set as available play period. Tool: Ф Adjust to original video resolution button: Press to adjust the video to original video resolution. Audio button: Press to turn on / off the audio. Metadata button: Press to enable / disable metadata transaction data overlay. 1.5.2 The navigation of Instant Playback The Instant Playback window allows you to browse recorded video, take snapshot images and export video with audio and metadata transaction data. To browse recorded video: Simply click on the timeline to view the video, or use these navigation tools to control the player: Play / Pause / Stop - Slow motion / Speed up control Reverse [frame by frame] / Fast Forward Play Previous / Next minute video To take snapshots of a video clip: Pause the video in image which you want to export and click the snapshot button displayed and can be saved or copied to clipboard. To export recorded video: The snapshot is Select export period, click the export button , and setup the options of exported video. The default export video period is as playback period. To customize period, select start/end time and click on Cue In/Out from the drop-down list of button, the export period will be shown on the lower-left corner of the window. Export Formats include: ASF - Format with best efficiency. [Recommended] AVI (Microsoft Video1) - Supports Windows Media Player with Vista & XP, the quality may be poorer than recorded video by transcode. AVI (Original Format) - faster export process, better quality on the recorded video but the export file uses VLC Player to play. (For Windows Media Player, please install additional FFDShow codec). Note: The restrictions of AVI format. a. The maximum size of an AVI file is limited to 1.8 GB. b. Variation of frame rate will cause the resulting video to play slower or faster. If the selected video sequence uses multiple image resolutions (CIF, 2CIF, 4CIF, etc.) or multiple video format(MPEG-4, M-JPEG, H.264), the exported video sequence will create separate export files every time the resolution changes.       2. Playback 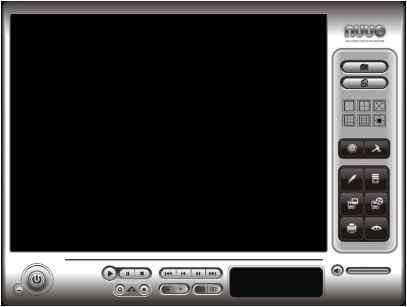 Watch the recorded video, view and/or search for unusual events and recorded system information. 2.1 User Interface overview: 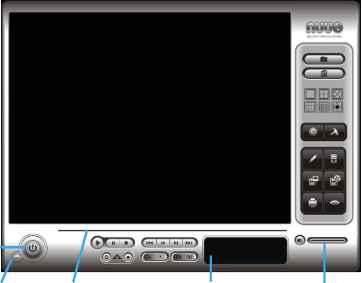 Exit Minimize Scroll Bar Search Mode Screen Divisions Open Record Enhancement /Post Processing Tool Save Information Window Audio Volume Image Control Minimize: Minimize the Playback console. Exit: Shut down the Playback console. □ШИ  i. h ) Ч Jl J General Setting Backup Export Video / Audio Log Viewer Scroll bar: Indicates the status of the playing video; drag it to where you want to review. Information Window: Display time and date, video status, cue in/ out time points and video playback speed. Audio Volume Control: Adjust the audio volume. Screen Division: Allocate the sub-screen display by clicking on the desired layout icon. To switch to single camera display, double click on a particular sub-screen. Double click on the screen again to go to previous screen division layout. To view in the full screen mode, right click on the screen for the Toggle Full Screen function. Control: Play, Pause and Stop the video. FWD/REV: Customize the speed on Settings panel. 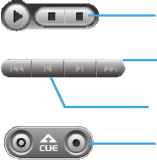 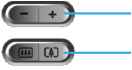 Step FWD/REV: Forward/reverse frame by frame. Cue: When playing video, click on the Cue In/ Cue Out icon at where you want to set as the starting/ ending point of a saved video clip. The Cue In and Cue Out time will be displayed on the Playback Information Window once they are set. Speed: Control the speed of the playing video. Options from 1x, 2x, 4x, 8x, 16x, 32x to 64x. Zoom: Zoom in and zoom out. 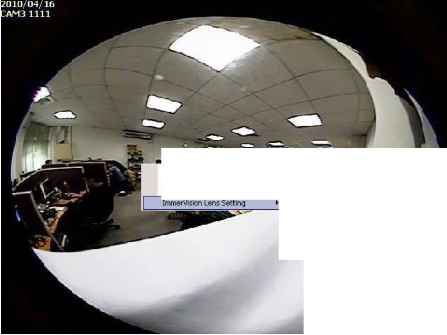 Toggle Fullscreen Enable ImmerVision PTZ  I I Original PTZ Mode Quad Mode Perimeter Mode On Screen Menu: Toggle Fullscreen: Select to view cameras under full screen. Press Esc or right click to go back to original view. Enable ImmerVision PTZ: Adjust PTZ in PTZ mode. (Depend on device) ImmerVision Lens Setting: Select the mode of lens, original, PTZ mode, Quad mode and Perimeter mode. (Depend on device) 2.2 Open Record / Date Time Search Dialog Click on the Open Record / Date Time Search Dialog button withdraw the video record that you want to review. 2.2.1 Date Time Panel to access the Date-Time Panel and 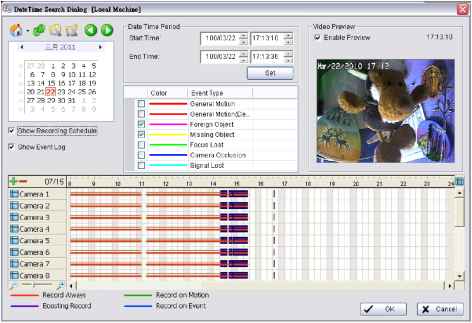 2.2.2 Record Display Window The record display window shows the information of the available video clips. It may show in calendar or list control view. For further details about how to modify the record display window view, see page 43. Local Machine Recent List Select Folder.. Remote Server Site: Open Remote Playback Site Management to access local machine or set up remote playback server. Select Folder option to directly access recorded data folder or use Recent List to access previously recorded folders. Note: tine Select Folder option requires password of Main Console. Ipefresh: refresh display window Log Viewer: Accesses Log )ol Й To access metadata Search Tool Previous Days: Show recording of previous Next Days: To show recorded of next recording date Remote PC 1 (192.168.1.100) Remote PC 2 (192.168.1.101) Remote PC 3 (192.168.1.103) RemctaPC 4 (192.168.1.103) date 2.2.3 Date Time Period Select the start and end time points that indicate the time period you would like to view. 2.2.4 Video Preview Check the enable preview option to view the selected video. 2.2.5 Event Type There are 6 event types; see Chapter 4 - Guard for details. You may set up different colors for different event types to help you select events. * Note: Some event types will not be available under NUUO NVR Lite License.  2.2.6 Time Table Utilize the icon to select all channels: also utilize the the scale bar icon to deselect all channels. Finally, utilize to modify the scale of the time table. Video records are displayed as a thin line on the time table. Check Show Recording Schedule to show the defined period for scheduled recording. It is shown as a thick line in colors according to recording mode. Show Recording Schedule 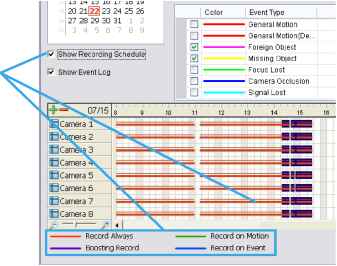 Selecting Show Event Log makes Time Table show the time of event detection like below:  Show Event Log 2.2.7 Withdraw the Record Step 1: From the record display window, top left of the Date Time Panel, select the date you want to withdraw the record from. The red/purple/green/blue lines shown on the time table indicate available recorded video records. Note: The record display window can be shown in (a) calendar view or (b) list control view. To modify the setting of the record display window, click on the Setting button at the right of the Playback Console. See page 43 for more details. Step 2: Use color bars to differentiate event types from each other. This will help you select video clips. Step 3: Highlight the video clip you want to review by left-clicking and dragging the time period. You may also utilize the Start Time and End Time in Date Time Period Section. In addition, modify the scale of the time table with the + and - signs on the bottom left. Step 4: Check the Enable Preview option to get the preview of the video you select. Step 5: Click the camera name to increase or decrease cameras you want to playback. Step 6: Click OK when setting is complete. 2.3 Search Mode Click on the Search Mode icon iato obtain tine Intelligent Search Tool panel. * This feature is not available under NUUO NVR Lite License. Intelligent Search Tool Panel: Click on the Search Mode icon to open the Intelligent Search Tool. Set up unusual events here to detect abnormality that occurred during the recorded period. 5 events: General Motion, Foreign Object, Missing Object, Lose Focus, and Camera Occlusion. 2.3.1 Unusual Event-General Motion General Motion: Detect all movements in the defined area. Define Detection Zone: Left click and drag to draw a detection zone. You may define more than one zone on the screen by repeating the process. Sensitivity: Modify the sensitivity setting with the slider. Sliding rightwards will increase the sensitivity level, meaning the slightest movement will trigger the alarm; in contrast, sliding leftwards will reduce the sensitivity for movement detection. Note: Configuring an appropriate sensitivity level reduces the possibility of a false alarm. For instance, you can lower the sensitivity level to avoid the alarm being triggered by a swinging tree in the breeze. Interval: Move the slider control to the right to increase time interval so that the alarm will only be triggered when the movement lasts longer. Move to the left to reduce the time interval. 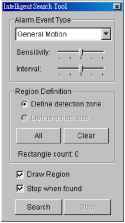 Stop When Found: Check the option to have the video stop where motion was detected. Uncheck to have video continuously run to detect all events available. Results will show in a search result box. Click on the listed event in the box to jump to the point in the video where motion was detected. 2.3.2 Unusual Event-Foreign Object Foreign Object: Detect any additional object appearing in the defined area on the screen. Define detection zone: Left click and drag to draw a detection zone. The search tool will detect additional objects that appear in this zone. Define object size: Click and drag to draw and define the size of a foreign object. Sensitivity: Modify the sensitivity setting with the slider. Sliding rightwards will increase the sensitivity level, while sliding leftwards decreases it. Interval: Click and move the slider control to the right to increase time interval so that the alarm will only be triggered when the object has been removed from the area for longer. Move to the left to reduce the time interval. 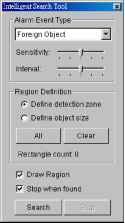 Note: Setting up an appropriate Interval value will reduce the chance of false alarms. For example, you can lower the Interval to avoid the alarm being triggered by a pedestrian. 1 2 3 4 5 6 ... 14 |