
8(903)201-21-74
ООО "ЧетыреДатчика"
|
Оператор: 8(903)201-21-74 ООО "ЧетыреДатчика" |
|
Оператор: 8(903)201-21-74 ООО "ЧетыреДатчика" |
Главная страница Nvr/dvr/hybrid ndvr 1 2 3 4 5 6 7 ... 14 2.3.3 Unusual Event-Missing Object Missing Object: Detection of selected objects removed from the defined area on the screen. Define detection zone: Left click and drag to draw a detection zone. The search tool will detect selected objects removed in this zone. Sensitivity: Modify the sensitivity setting with the slider. Sliding rightwards will increase the sensitivity level, while sliding leftwards decreases it. Interval: Click and move the slider control to the right to increase time interval so that the alarm will only be triggered when the movement lasts longer. Move to the left to reduce the time interval. 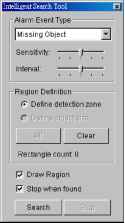 2.3.4 Unusual Event- Focus Lost / Camera Occlusion Focus Lost: Detection of cameras losing focus in recorded video. Camera Occlusion: Detection of cameras being blocked in recorded video. 2.4 Enhancement / Post Processing Tool Click on Enhancement / Post Processing Tool 2.4.1 General Setting  to configure settings. Check the option and chose whether you want to apply the setting to all the channels or only to those currently shown on the screen. 2.4.2 Filter Setting Visibility: adjust the gamma value of the image to enhance the image and make it cleaner. Sharpen: activate the function. Move the slider control to the right to sharpen the image, to the left to soften it. Brightness: activate the function. Move the slider control to the right to make the image brighter. Contrast: activate the function. Move the slider control to the right to increase contrast. Grey Scale: show the record in grey scale mode so the image displays in black and white. 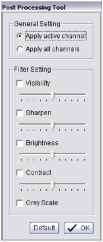 2.5 Save Video Step 1: Click on the display screen to choose the camera display that you want to save as a video clip. Step 2: Set up the cue in and cue out points; the cue in and cue out time will show on the information window. 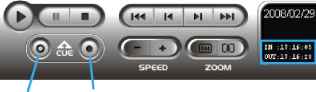 17:16:28 Cue In Cue Out Step 3: Click on the Save Video button file name and click SAVE.  Step 4: Set the Export Format (ASF recommend) and set the Use Profile. ASF - more efficient than AVI format. [Recommended format] AVI (Microsoft Video 1) - Supports Windows Media Player with Vista & XP, quality may be poorer than recorded video by transcode process. AVI (Original Format) - Faster export process with high quality video, but the export files can only be viewed using VLC Player to play. (For Windows Media Player, please install additional FFDShow codec). Note: The restrictions of AVI format: a. The maximum size of an AVI file is limited to 4 GB. b. Variation of frame rate will cause the resulting video to play slower or faster. If the selected video sequence uses multiple image resolutions (CIF, 2CIF, 4CIF, etc.) or multiple video format (MPEG-4, M-JPEG, H.264), the exported video sequence will create separate export files every time the resolution changes. Step 5: Select to export (i.e. save) the recorded video with Audio, OSD and metadata, or export video only. Step 6: Click OK to save the video. 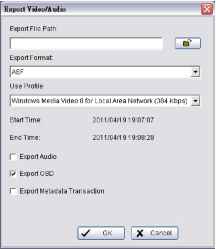 2.6 Save Image Step 1: Click on the display screen to choose the camera display from which you want to save pictures.  Step 2: Click on the Save Image button when the image you want is shown on the screen. You may click Pause to freeze the video, use Step Forward/ Step Backward function to find the picture(s) that you want to save. Step 3: Select OSD option and metadata option to export the image with date/time, camera number/name and metadata text. If the digital PTZ function is enabled in display view, you can also decide either Full size or Selected Region as your image region. Step 4: You have the options to copy the image to clipboard or to save it. To save image just choose the folder and the format of image (BMP or JPEG) you prefer and then click save. Note: You may skip step 3 by pre-setting a folder and format that you want to save the images (refer the section automatically save the image file at page 43.) 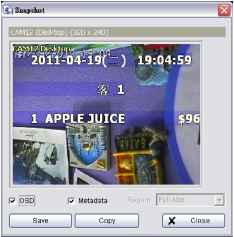 choose the folder where you want to save the file at, enter the 2.7 Print Click on the Print button the video you choose. to print the current image of Print Content: Print the image from the current selected channel or all the channels shown on the screen. Select to print original view or selected region on camera. Page Setting: Set to print the image with original size or fit to page. Set Align image to Top, Center, or Bottom. 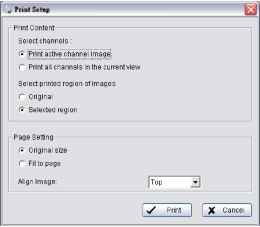 2.8 Backup Compared to the Save Video function, Backup saves everything from the Playback panel, including video and log information. You can start a full function Playback Console and load the backup files into it on any PC with Windows operating system. This means you may monitor the real time video and work on the backup files on separate computers simultaneously. Step 1: Press the Open Record to select data and press Backup Step 2: You can adjust the Start Time and End Time you want to backup. Step 3: You can adjust the Cameras you want to backup. Step 4: You can calculate the size of the backup data. Step 5: Select the directory you want to save the backup data including CDROM, DVD or Hard Disk. Step 6: Check the log you want to backup. Step 7: Press Backup to start. Step 7: After backup is complete, click on playback.bat to play. Step 3 date time period- statltime: \200Ш 4121 Hl7:29:00 endtime: 2009/ 4/21 -e i7:29:dT Step 4 selectcamera(s)- 1-16 l7-32 33-48) 49-64) X1 1Х2хзх4Х5у б|Х7Ц Хэу^10 X111 Xil ><1з| Xil Xiel л backup using cdrom backup using dvd r backup on harddlsk Step 6 Step 7 [7 backup event log 17 backup system log г backup counter log backup pos transaction Step 2 Step 5  2.9 Log Viewer Click on the Log Viewer button 2.9.1 System Log  to activate the Log Viewer dialog. Step 1 Step 2 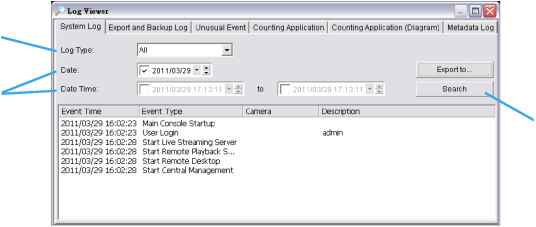 Step 3 Select Log Type from the drop-down menu. There are in total 36 types of log types, including:
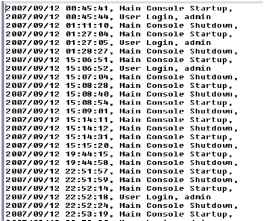
* Note: Some event types will not be available under NUUO NVR Lite License. Step1: Choose the type of event you want to check or select All from the drop-down menu for all types of events. Step 2: View the events that happened on a particular date or during a given time period by selecting search period. For a particular date: check the Date box and indicate the date. For a period: check the DateTime and then enter specific date and time. Step 3: Click Search.  Step 2: View the events that happened on a particular date or during a given time period by selecting search period. For a particular data: check the Date box right and indicate the date. For a period: check the DateTime and then enter the date and time. Step 3: Click Search 2.9.3 Unusual Event View the unusual event history that had been detected by the Smart Guard System. Step1 Step2 Step 3 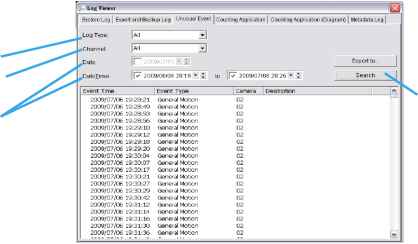 Step 4 Step1: Choose the type of events you wish to view or select All from the drop-down menu to view all types of events. The types of Unusual Event include General Motion, Foreign Object, Missing Object, Focus Lost, Camera Occlusion, Signal Lost, Disk Space Exhausted, System Health Unusual, Digital Input Triggered and General Motion (device). * Note: Some event types will not be available under NUUO NVR Lite License. Step 2: Choose the camera channel you wish to view or select All for all channels available. Step 3: View the events that happened on a particular date or during a given time period by selecting search period. For a particular date: check the Date box right and indicate the date. For a period: check the DateTime and enter the specific date and time. Step 4: Click Search. Note: When working with a video record, 1. Log Viewer will search for Unusual Event in the video record in Date & Time mode, starting from the beginning to tine end of the record, which is the default setting of the system. 2. A link (®®) will appear next to each event time where video is available. By clicking on the link, the video will jump to the point where the unusual event takes place. 2.9.2 Export and Backup Log View the Export and Backup Log hisfory fhaf had been operated by local or remote user. Step1: Choose the type of event you want to check or select All from the drop-down menu for all types of events. 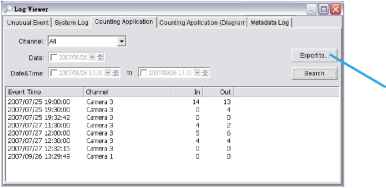 Step 4 Step1: Select the channel you want to check or select All from the drop-down menu for all channels. Step 2: Select search period. View the events that happened on a particular date or during a given time period by selecting search period. For a particular date: check the Date box right and indicate the date. For a period: check the DateTime and then enter the date and time. Step 3: Click Search. Step 4: Press the button Export to. Step 5: Type the file name and choose the file format (.xls or .txt). 2.9.5 Counting Application (Diagram) Display the Counting Application data in diagram format. * not available under NUUO NVR Lite License 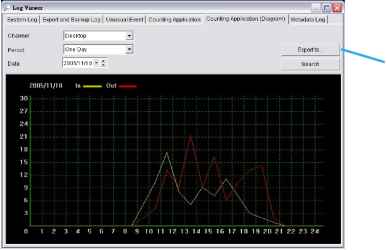 Step 4 Step1: Select the channel you want to check or select All from the drop-down menu for all channels. Step 2: From the drop-down menu, set up how you would like the diagram to be displayed. You have the options of one day, one month, or one year. Step 3: Select a specific date to make it the start point of the diagram. Step 4: Click Search. Step 5: Press the button Export to. Step 6: Type the file name and the file will save as BMP files. 2.9.6 Metadata Log View Mefadafa Log history detected by the Smart Guard System. * not available under NUUO NVR Lite License 2.9.4 Counting Application Display the history of Counting Application during a given time period. * This feature is not available under NUUO NVR Lite License. 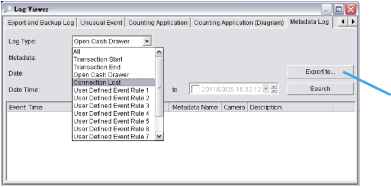 Step 5 Step1: Choose the type of events you wish to view or select All from the drop-down menu to view all types of events. The types of Unusual Event include Transaction Start, Transaction End, Open Cash Register, Connection Lost, and Special User Defined Event. Please refer to the User manual of Metadata Plugins for detail. Step 2: Choose the camera channel you wish to view or select All for all the channels available. Step 3: View the events that happened on a particular date or during a given time period by selecting search period. For a particular date: check the Date box and indicate the date. For a period: check the DateTime and then enter a specific date and time. Step 4: Click Search. A link vvill appear next to each event time where video is available. By clicking on the link, the video will jump to the point where the unusual event takes place. Step 5: Press the button Export to. Step 6: Type the file name and choose the file format (.xls or .txt). 2.9.7 Export You may export the file to .xls or .txt file 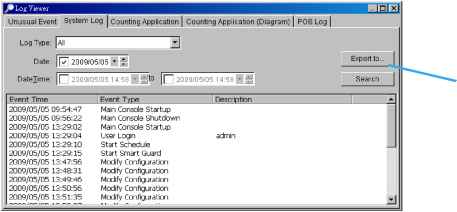 Step 1 Step1: Select Export to. Step2: Type the file name and choose the file format, .xls or .txt.
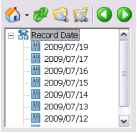
 .xls .txt and go to Setting 2.10 Setting Click on the General Setting button I for system configurations. Record Display setting: Calendar View: Choose to display records under calendar view. List Control: Choose to display records under checklist.
 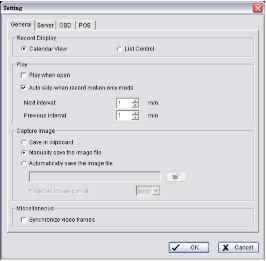 Play setting: Play when open: Check the option and set the system to start playing the video clip every time a record is withdrawn. Auto skip when record motion only mode: Check the option to set up the system to automatically skip to the points where there were motions recorded. Next interval: Set the interval with which the video goes foard when you click on the Next icon on the control panel. Previous interval: Set the interval with which the video goes backward when you click on the Previous icon on the control panel. Capture Image setting: Sets how you want to save the image. Save in clipboard: The image will be saved in the clipboard; image will be available to paste elsewhere. Manually save the image file: You can manually select where you want to save the image. Name the saved file, and choose the file format you want to save as. Automatically save the image file: By pre-setting a path/URL and the image format, the system will automatically save the image accordingly when you click the Save button in the control panel. Miscellaneous Synchronize video frames: Select this option to avoid display problems that may occur under high CPU loading. Server Setting Remote Playback Site Management. Please refer to page 44 for details. OSD Setting Enable Camera OSD to display video information on recorded video. Information includes camera name, camera number, date and time. User can also set up OSD font; include the font, size, font color and any font effects desired. Metadata Overlay Setting * not available under NUUO NVR Lite License Enable metadata overlay to adjust Font, Size, Color, Bold, Edge in Foreground section, color and transparency in Background section, and then adjust display settings in Display on Video Preview . 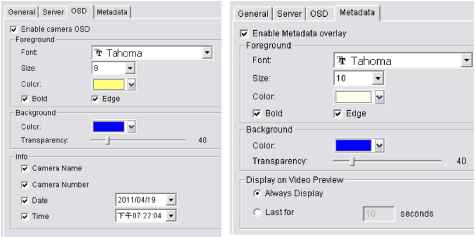 2.11 Remote Server 2.11.1 Add Remote Playback Site Press the Remote Server Icon or go to setting - server to config remote playback site management to add and setup remote playback sites. Step 1: Enter the IP address or DNS, Port, Username, and Password. Step 2: Click Add to add the server. Step 3: Click OK to exit the Settings panel. 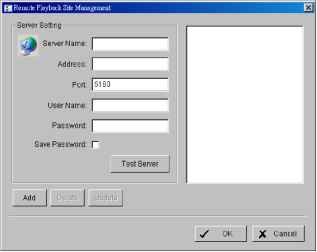 2.11.2 Access Remote Playback Site Go to Date Time Panel and click on the Remote Playback Site icon on the top of the display window to access the 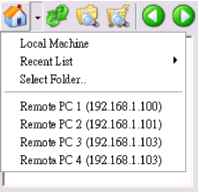 3. Schedule 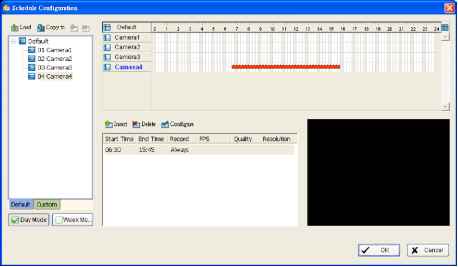 Click on the Schedule icon on the Main Console and set up the time duration for video recording on the schedule configuration panel. 1 2 3 4 5 6 7 ... 14 |
||||||||||||||||||||||||||||||||||||||||||||||||||||||||||||||||||||||||||||||||||||||||||||||||||||||||||||||||||||||||||||||||||||||||||||||||||||||||||||||||||||||||||||||||||||||||||||||||||||||||||||||||||||||||||||||||||||||||||||||||||||||||||||||||||||||||||||||||||||||||||||||