
8(903)201-21-74
ООО "ЧетыреДатчика"
|
Оператор: 8(903)201-21-74 ООО "ЧетыреДатчика" |
|
Оператор: 8(903)201-21-74 ООО "ЧетыреДатчика" |
Главная страница Nvr/dvr/hybrid ndvr 1 2 3 4 5 6 7 8 ... 14 3.1 Day / week Mode Load - Camera / Channel Day /Week Mode 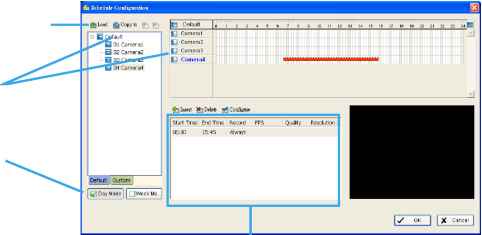 Schedule Details Day Mode: Schedule the cameras to turn the recorder on and off at the same time every day according to your setting. Week Mode: Allows you to schedule each camera for a different day of the week, additionally, you may assign extra holidays in the Week mode Schedule Details: An outline of start time, end time, Record mode, frame rate, quality and resolution. Please note these values refer to configured settings. Actual performance may vary according to camera and hardware settings. To setup the time schedule for each camera, you may 1. Load the preset modes or 2. Insert a new schedule manually or 3. Copy to other cameras after manual setup. 3.1.1 Load Preset Modes The system provides six modes to quickly setup recording schedule. Simply click on the Load for the drop-down menu. Refer to the below tables for the definitions of each mode in each series. IP+ series (IP camera)
The Max indicates settings are same as camera settings in the config>setting>camera>camera parameter panel.
SCB-6000S series (Analog camera)
SCB-8000HD series (HDcctv camera)
3.1.2 Insert a New Schedule Manually Step 1: Left-click and draw the bar you want add to the time table. The scheduled time will show as a grey bar.  Step 1 Step 2 Step 3 Step 4 Step 2: Click the Insert icon and add a new schedule in the Regular Mode, i.e. to record video during the time period you set with 30 FPS, normal video quality, and normal resolution. Step 3: Change the setting by clicking on the Configure icon (See page 50 for detail) or double click the Schedule Information. Step 4: Click OK. 3.1.3 Copy Schedule You may set up the schedule for each channel/camera by repeating the process above, or by simply applying the setting of a single camera to all the others by clicking the Copy To icon at the top of the display window. 3.1.4 Holiday and Custom setting Allows you to schedule each camera for a different day of the week, additionally, you may assign extra holidays in the Week mode jCopylo й Ш Default + Ш 01 Cameral + Ш 02 Camera2 + Ш 03 Cameras B-B 04 Camera4 Ш Sunday -S Monday ж USD Ш lesday Ш T J 3day H Fi 1 f H day Camera* □ Sunday □ Monday П Tuesday П yveflnesflay I] Thursday □ Friday П Saturday Delere Configure Start Time End Time Record FPS Quality Remljtlon I   ✓ OK X Cantel Holiday Custom �99999999999999999999999� Holiday: You may assign holidays where the system will work according to the setting for Sunday. Note: The default Holiday setting will apply Sundays settings. For the Middle East region where Friday is a holiday, please adjust setting by right clicking on From . and select Apply Holiday Schedule Custom: You can assign a particular date(s) on which the system will work according to a special schedule(s) different from the others. 3.2 Adjust the Scheduled Setting: You can manually change the setting at any time after you insert or load a schedule. Option 1: Move the cursor to the Time Bar and change the length or move the bar sideways to change the start and end points. Option 2: Click on the Configure icon or double click on Schedule Information from the list to obtain the Encoding Option panel (next page) and select the desired setting. Time Bar Configure Schedule Information 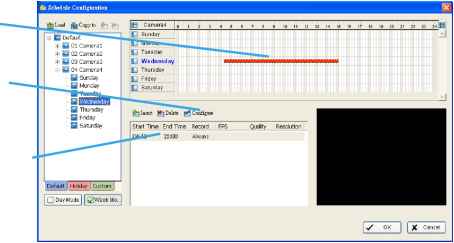 3.3 Encoding Option Original Video 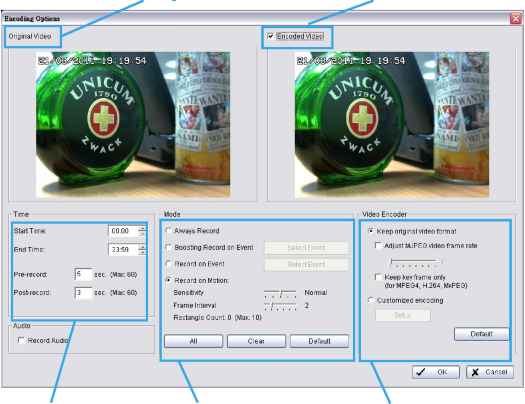 Record Mode Video Encoder Time Option 3.3.1 Pre-record/ Post-record Time The pre-record/ post-record function saves the recording data accordingly. For instance, to set up a 5 second pre-record time means the system will start saving the recording data 5 seconds before the event happens. Note: The maximum of pre-record/post record period is 60 seconds. 3.3.2 Record Mode There are four recording modes to choose from. Choose the one that suits your scenario best. Always Record: Select this option to record the video continuously. Boosting Record on Event: This option enables you to record at lower frame rate at regular times, and at higher frame rate under Smart Guard triggered events. *This feature is not available under NUUO NVR Lite License Select this option to obtain the Select Event panel. Choose from the list any Smart Guard or digital input events or video analytics from the device. The chosen event(s) will trigger the recorded action. Click OK. Configure desired frame rates of normal and boosting recording in the Video Encoder box. Note: Please note it is required to enable Smart Guard from the Main Console panel before configuring boosting record on event to trigger recording. 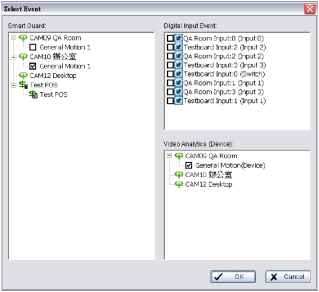 Encoded Video For IP cameras! The Encode Video function will reduce frames or re-encode original streaming from IP cameras. To save Hard Disk usage, adjust frame rate with original video format or re-encode to smaller file size by adjusting frame rate, resolution and Quality/Bit rate. Keep Original Video format: Select this option to reduce frame rate only but not to re-encode video streams to save Hard Disk usage. Adjust MJPEG video frame rate: Move slider to left to reduce frame rate. Note: The maximum FPS will correspond to original video streams set up on camera configuration. Keep key-frame only: System will only record key frames of video streaming. Note: The key frame interval is controlled by each camera manufacturer and cannot be adjusted. Customized encoding: * not available under NUUO NVR Lite License The video stream will be decoded then re-encoded by configuration. Click Setup button to adjust Encoder Parameter . Note: Customized encoding function causes high CPU usage, make sure the PC specification is enough (recommend Core 2 Quad or above) For Analog cameras The Encode Video function sets Frame Rate, Quality, and Resolution that you want to record and provides an approximate recorded time period. For SCB-G3 Series cards you may additionally choose from different video formats, including Mpeg4 and H.264. Note: Capture card devices SCB series are required. 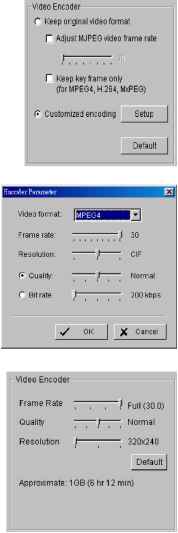 Record on Event: Select this option to start recording at any predefined event, including Smart Guard events, metadata events, digital input events and video analytics from devices. * Some options are not available under NUUO NVR Lite License Select this option to obtain the Select Event panel. From the Smart Guard list, check the camera events or digital inputs to trigger the recorded action. Click OK. Note: Please note it is required to enable Smart Guard from the Main Console panel before configuring record on event to trigger recording. Record on Motion: Select this option to start recording when motion is detected. Adjust sensitivity, the frame interval and zone to setup motion detection. To setup a single detection zone, left-click and drag the mouse to draw a rectangle. To setup more than one detection zone, simply repeat the same process or click All to select the entire screen. Note: The maximum number of rectangle detection zones is 10. 3.3.3 Encoded Options This option sets up the quality of the recorded video. The Original Video window is the original stream from the camera. The Encoded Video is preview of the recorded video corresponding with the encode settings below. 4. Guard 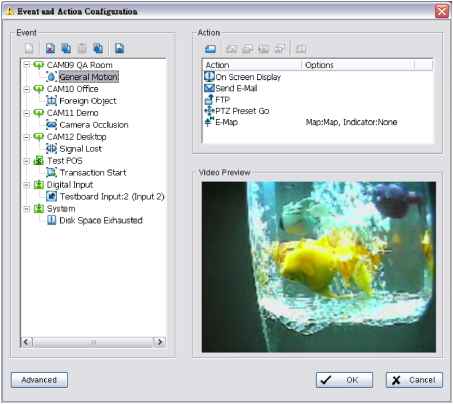 Click on the Guard button on the Main Console to start the Event and Action Configuration panel. You will need to specify an event to be detected as well as set the appropriate action for the system when the event occurs. Note: 1. Crystal Ball: Indicates the working status of the system. A blue crystal ball shows when the system is recording; it will turn red when an event is detected. 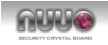 2. Event Report: When the crystal ball is red, you can click it to obtain the Smart Guard Event Report and cancel the event(s). 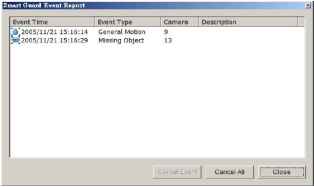 4.1 Event Insert Event 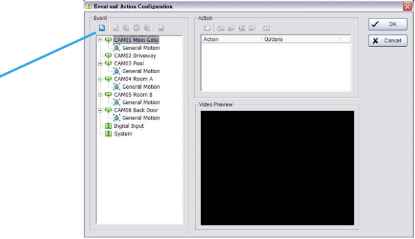 There are 4 sources of events: Camera (video image), metadata, Digital Input (device connected to your PC) and System (condition of your hardware). You can assign multiple events by following the instructions below. * Note: Some event types will not be available under NUUO NVR Lite License. 4.1.1 Camera Event - Assign a Camera Event Step 1: Select a camera and click Insert Event icon. 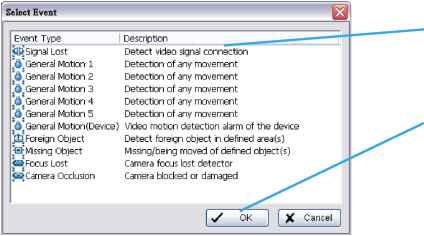 Step 2 Step 3 Step 2: There are six types of events: Signal Lost, General Motion, Foreign Object, Missing Object, Focus Lost, and Camera Occlusion. Select the event you want on the Event Type list, and then click OK. * Note: Only General Motion and Signal Lost are supported under NUUO NVR Lite License. Step 3: Configure the Event Type. See the following instructions. 4.1.2 Camera Event - Basic Setting [Signal Lost, General Motion, Foreign Object, Missing Object, Focus Lost, and Camera Occlusion] Enable Event: Check the box to activate the event. Life Cycle: Automatic cancel event when event disappears: The alarm/action will be cancelled once the event is fixed or ended. Manually cancel event or event last triggered: The alarm/action will remain until being cancelled from Main Console. Choose this option to avoiding missing any alarms. Note: To cancel the event: Method 1: Start > Open Event Report > Cancel All Events Method 2 : Click the red crystal ball to obtain the Smart Guard Event Report. Click to cancel the event(s). 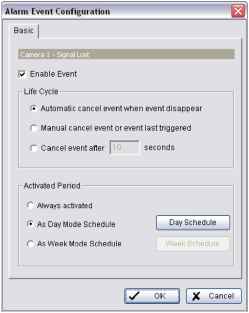  Cancel event after specific time. Activated Period: Always activated: Allow alarm to be activated at all times. As Day Mode Schedule: Customize a specific time range for the alarm to be activated. The alarm will be available daily according to your settings. Click on Day Schedule to configure the schedule. Choose Add Time Period and drag on the coverage bar to define an activated schedule. Choose Remove Time Period and drag on the coverage bar to subtract from existing schedules. Click on Clear All to remove all settings. 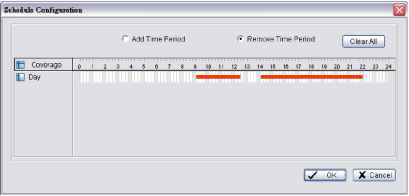 As Week Mode Schedule: Customize a weekly based time range for the alarm to be activated. Click on Week Schedule to configure the schedule. Choose Add Time Period and drag on the coverage bar to define an activated schedule. Choose Remove Time Period and drag on the coverage bar to subtract from existing schedules. Click on Clear All to remove all settings. 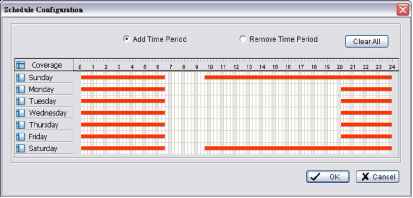 4.1.3 Camera Event - Signal Lost Detect the loss of video signal from camera. seconds: Enable checkbox and set a timer for canceling the event after a Sensitivity Interval Region Definition Start Simulation 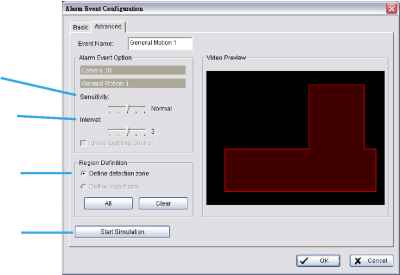 Event Name: Customize your event name here. Alarm Event Option: Sensitivity: Click and move the slider control to the right to increase sensitivity so that minimal movement will trigger the alarm. Move the bar to the left to reduce the sensitivity. Setting up an appropriate sensitivity value will minimize false alarms. For example, you can lower the sensitivity to avoid the alarm being triggered by a swinging tree in the breeze. Interval: Click and move the slider control to the right to increase interval time so that the alarm will only be triggered when the movement lasts longer. Move to the left to reduce the interval Region Definition: Define detection zone: To detect General Motion, you have to define a detection zone. Left-click and drag the mouse to draw a detection zone. You may define more than one zone on the screen by repeating the same process. User can also click on All button to select the entire detection zone. Start Simulation: Click the Start Simulation button and test the function on the preview screen. 4.1.5 Camera Event - General Motion (Device) - Detect movement with motion detectors of devices (IP cameras or video servers). Note: This function is only available on devices with built-in motion detection. Please refer to the user manual of your device to set up motion detection. Start Simulation Click to test if motion detection is set up correctly. Go to Web Interface Click to go directly to device web page for configurations. 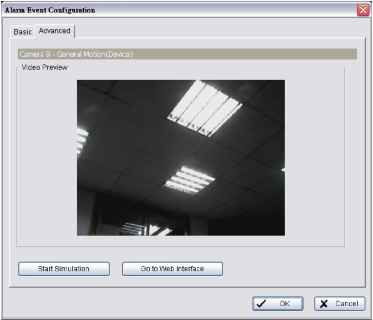 4.1.4 Camera Event - General Motion - Detect any movement in the defined detection zone. For each video channel you may define up to 5 motion detection profiles (General Motion 1 -5). This will allow you to set different sensitivity levels for different regions in the same video. 1 2 3 4 5 6 7 8 ... 14 |