
8(903)201-21-74
ООО "ЧетыреДатчика"
|
Оператор: 8(903)201-21-74 ООО "ЧетыреДатчика" |
|
Оператор: 8(903)201-21-74 ООО "ЧетыреДатчика" |
Главная страница Nvr/dvr/hybrid ndvr 1 ... 3 4 5 6 7 8 9 ... 14 Sensitivity Interval Define object size Region Definition Start Simulation Basic Advanced rfiiaim Event tion Sensitivity: Interval: ~ Ignore Lighting Change г Video Preview- eglon Definition Define detection zonei Г Define objectsize  Start Simulation X Cancel Alarm Event Option: Sensitivity: Click and move the slider control to the right to increase sensitivity so that minimal movement will trigger the alarm. Move the bar to the left to reduce the sensitivity of movement detected. Setting up an appropriate sensitivity value will minimize false alarms. For example, you can lower the sensitivity to avoid the alarm being triggered by a swinging tree in the breeze. Interval: Click and move the slider control to the right to increase interval time so that the alarm will only be triggered when the movement lasts longer. Move to the left to reduce the interval. Region Definition: Define detection zone: To detect Foreign Object, you have to define a detection zone. Left-click and drag the mouse to draw a detection zone. You may define more than one zone on the screen by repeating the same process. User can also click on All button to select the entire detection zone. Define Object size: After defining the detection zone, select Define Object Size and then left-click and drag the mouse to indicate the size of the object you want to detect. Note: For instance, if you want to prevent somebody from leaving a briefcase in a hallway, place a briefcase in the hallway in view of the camera. On the screen, draw an area that fits the size of the briefcase and define it as the object size. Remove the briefcase and then activate the Smart Guard function on the Main Console. The system will consider everything on the screen normal when you click Start to activate the monitor function. Start Simulation: Click the Start Simulation button and test the function on the preview screen. 4.1.7 Camera Event - Missing Object Alarm triggers when an object disappears in the defined area on the screen. f Alann Event ConfigaianBMMJlQij Sensitivity Interval Region Definition -\-г Start Simulation Basic Advanced pAlarm Etfent Option Sensitivity: -- interval: -J-- ~ Ignore Lighting Change Region Definition- P Define detection zone Г Define object size Start Simulation pVideo PrevieviT-  lyfZIZl I X Cancel 4.1.6 Camera Event - Foreign Object Alorm will be set off when on object oppeors in the defined oreo on the screen. fAlarm Event Confinratioi) Region Definition: Define detection zone: To detect Missing Object, you have to define a detection zone. Left-click and drag the mouse to draw a detection zone. You may define more than one zone on the screen by repeating the same process. User can also click on All button to select the entire detection zone. Note: For instance, if you want to prevent somebody from removing the computer monitor on the desk, draw an area that fits the size of the monitor on the screen. Alaim Event CoufigajatiDU 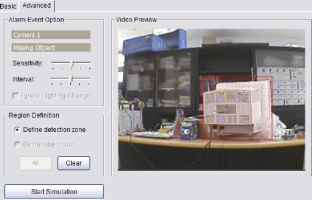 X Cancel Start Simulation: Click the Start Simulation button and test the function on the preview screen. 4.1.8 Camera Event - Lose Focus This function alarms you when any of the cameras is losing focus and has blur image. Sensitivity Interval Ignore Lighting Start Simulation  Alarm Event Option: Sensitivity: Click and move the slider control to the right to increase sensitivity so that a relatively small movement will trigger the alarm. Move the bar to the left to reduce the sensitivity of movement detection. Set up an appropriate Sensitivity value will reduce the chance of false alarm. For example, you can lower the Sensitivity to avoid the alarm being triggered by a swinging tree in the breeze. Interval: Click and move the slider control to the right to increase interval time so that the alarm will only be triggered when the movement lasts longer. Move to the left to reduce the interval time. Ignore Lighting: Check the box to avoid alarm being set off by light changing. Alarm Event Option: Sensitivity: Click and move the slider control to the right to increase sensitivity so that minimal movement will trigger the alarm. Move the bar to the left to reduce the sensitivity of movement. Setting up the appropriate sensitivity value will reduce the chance of false alarms. For example, you can lower the sensitivity to avoid the alarm being triggered by a swinging tree in the breeze. Interval: Click and move the slider control to the right to increase interval time so that the alarm will only be triggered when the movement lasts longer. Move to the left to reduce the interval. Sensitivity Interval Ignore Lighting Start Simulation 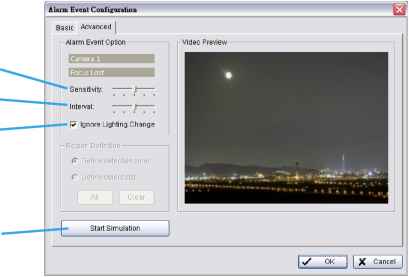 Alarm Event Option: Sensitivity: Click and move the slider control to the right to increase sensitivity so that a relatively small movement will trigger the alarm. Move the bar to the left to reduce the sensitivity of movement detection. Set up an appropriate Sensitivity value will reduce the chance of false alarm. For example, you can lower the Sensitivity to avoid the alarm being triggered by a swinging tree in the breeze. Interval: Click and move the slider control to the right to increase interval time so that the alarm will only be triggered when the movement lasts longer. Move to the left to reduce the interval time. Ignore Lighting: Check the box to avoid alarm being set off by light changing. Start Simulation: Click the Start Simulation button and test the function on the preview screen. 4.1.10 Metadata Event - Assign a Metadata Event Step 1: Select a metadata device from the list and click Q to insert event. Note: Please insert the metadata device in Config - Metadata Application first. Then set the alarm based on it. Step 2: There are five types of events: Transaction Start, Transaction End, Open Cash Register, Connection Lost and User Defined. Select the event you want on the Event Type list, and then click OK. Note that the Open Cash Register event is available on POS metadata devices only. Transaction Start - Detect the beginning of any transaction. Transaction End - Detect the end of any transaction. Open Cash Drawer - Detect the opening of any cash drawer. Connection Lost - Detect the connection problems between metadata devices and Main Console. Region Definition: Define detection zone: To detect Lose Focus, you have to define a detection zone. Left-click and drag the mouse to draw a detection zone. You may define more than one zone on the screen by repeating the same process. User can also click on All button to select the entire detection zone. Start Simulation: Click the Start Simulation button and test the function on the preview screen. 4.1.9 Camera Event - Camera Occlusion This function alarms you when any of the cameras are blocked. User Defined - Detect any condition defined by user. 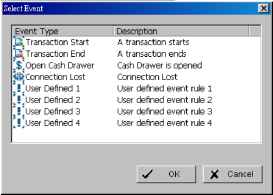 Step 3: Configure the setting of the Event Type. For details please refer to the user manual of metadata plugins. 4.1.11 Digital Input Event - Digital Input Event Step 1 Step 2 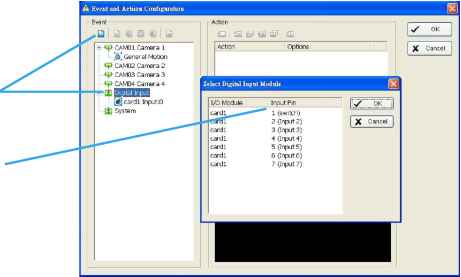 Step 1: Clicl< and -iig-ilig-it Digital Input on the event type list, and then click the И Step 2: Select the device that is connected to your system. Insert Event icon. 4.1.12 System Event - Assign a System Event Step 1 Step 2 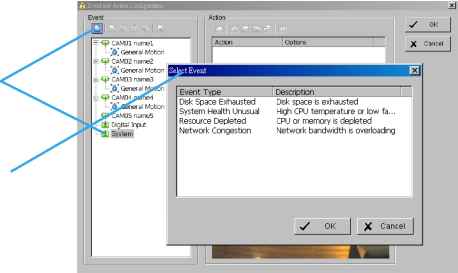 Step 1: Click and highlight System on the event type list, and click the Q Step 2: There are four events, select the event you want to detect. Insert Event icon. 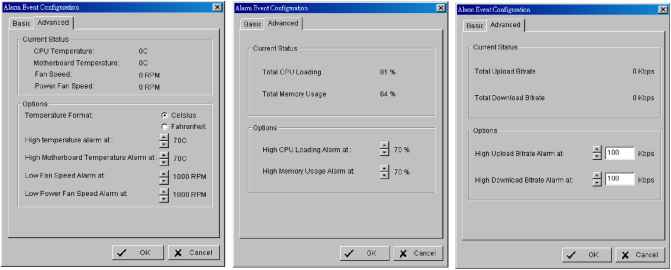 4.2 Action 4.2.1 Action - Assign a action type Step 1 Step 2 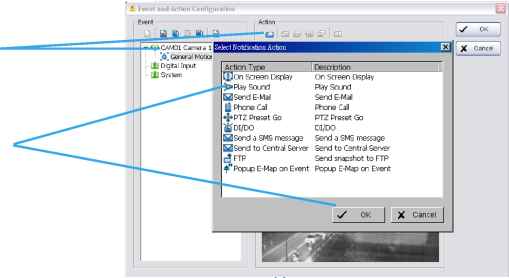 4.1.13 System Event - Disk Space Exhausted This funcfion alarms you when disk space is exhausted. 4.1.14 System Event - System Health Unusual This funcfion alarms you when CPU is under high temperature or fan speeds are running low. Current Status: Displays current CPU temperature, Motherboard Temperature, Fan Speed and Power fan speed. Options: Check the Temperature Format for Celsius or Fahrenheit; fix maximum motherboard temperature for High Temperature Alarm and minimum RPM for Power Fan Speed Alarm. 4.1.15 System Event - Resource Depleted This funcfion alarms you when CPU or memory is depleted. Current Status: Shows you the current Total CPU Loading and Total Memory Usage. Options: Fix maximum percentage for High CPU Loading Alarm and High Memory Usage Alarm. 4.1.16 System Event - Network Congestion This function alarms you when network bandwidth is overloaded. Current Status: Shows you the current Total Upload/Download bit rates. Options: Fix maximum bit rate (Kbps) for High Upload/Download Bit rate Alarms. System Health Unusual Resource Depleted Network Congestion To insert a new action: Step 1: Choose on event and click the insert action iconQ. Step 2: There are 10 types of actions, select the actions you want and then click OK. 1. On Screen Display 2. Play Sound 3. Send E-mail 4. Phone Call 5. PTZ Preset Go 6. DI/DO 7. Send a SMS Message 8. Send to Central Server 9. Send snapshot to FTP 10. Popup E-Map on event. 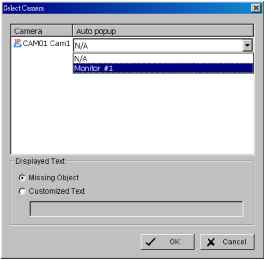 * Note: Some actions will not be available under NUUO NVR Lite License. Step 3: Configure the setting of the Action Type if needed. 4.2.2 Action Type - On Screen display A red warning will be flashing on the screen of Main Console, indicating which type of unusual event is detected. Step 1: Select the On Screen display action and then click OK. Step 2: The responding window will popup to Selected Camera. Click the On Screen display indicator to modify the setting. Camera: Display the camera applied to this action. Auto popup: Click the Auto popup column and select the expected monitor for popping up the event. Displayed text: You can follow the default setting to show the event type, or enable Customized Text to define the text as your preference. 4.2.3 Action Type - Play Sound Sound alarm - the system will play the sound as alarm when an unusual event is detected. Step 1: Select the Play Sound action and then click OK. Step 2: The responding window will popup to choose a Wave file (.wav). Click the Play Sound indicator to modify the setting. 4.2.4 Action Type - Send E-mail The system will send an E-mail immediately to given accounts indicating the type of event, the time, and attaching a picture taken while the event is detected. Step 1: Select the Send E-mail action and then click OK. Step 2: The responding window will popup to Select Contact, type the message to append. (You can choose more than one contact). Edit Address Book: Insert the contact information here. Note: 1. To give the system the E-mail accounts, go to Config > Setup > Hotline. See Configurations on page 74 for details. 2. For Digital Input Events, this warning action will send the snapshot of the associated camera. Please refer to I/O settings for details. 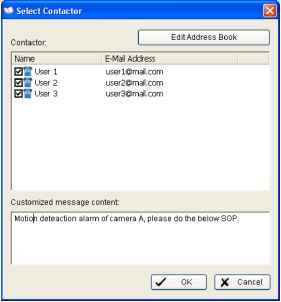 4.2.5 Action Type - Phone Call The system will call a given phone number when an unusual event is detected. * Note: This function is not available under NUUO NVR Lite License. Step 1: Select the Phone Call action and then click OK. Step 2: The responding window will popup to Select Contactor and key-in the message which want to append on SMS content. (You can choose one more contact at once). Note: To setup the phone number and make an audio record for the phone call, go to Config - Setup - Hotline. See Configuration on page 74l. 4.2.6 Action Type - PTZ Preset Go The PTZ (pan/filf/zoom) camera will go to a preset point or detected. * Note: This function is not available under NUUO NVR Lite license. Step 1: Select the PTZ Preset Go action and then click OK. Step 2: The responding window will pop up to PTZ Camera Preset Go modify the setting. Step 3: Set the action of cameras which you want to trigger by even The end preset go will take Update Camera I Start I Lite Cycle I End I End Preset Go For example: Please follow below steps to setup this function. Set the action of camera 1: 1. Choose camera 1. 2. Set the start, end preset points. 3. Select the Life Cycle. 4. Click on Add. Set the action of camera 2: 5. Choose camera 2. 6. Set the start patrol and end patrol. 7. Select the Life cycle 8. Click on Add. 9. Finally click on Ok to save all setting of cameras. Note: Configure your PTZ camera before using this function. See Config on page 72 for PTZ camera configuration. PTZ Camera Preset Go Camera: CAMI 4 (camera 3) IPCarr (Г Preset 3 г pLife Cycle- Stop PTZ action wlien event disappear Г Keep PTZ action ITZ second Preset r Patrol К/ OK X Cancel 4.2.7 Action Type - DI/DO To trigger Digital input/output devices connected fo the system, such as alarm lights and sirens. 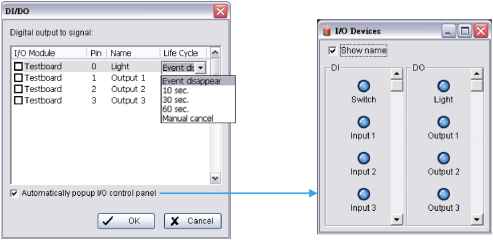 Step 1: Select the DI/DO action and then click OK. Step 2: Select devices to be triggered by event. Step 3: Click on the Life Cycle box of each device to configure the life cycle of each triggered alarm. The alarm may terminate when the event disappears, 10/30/60 seconds after trigger, or require a manual cancel. Note that you may also customize a timer by simply inserting a number in the box. Step 4: You can enable the Automatically Popup I/O Control Panel check box to obtain the correspondent panel to monitor the I/O status. Note: You should adjust the setting of I/O device in Config>Setting>I/O Device first, the I/O control panel will display the device status based on it. You can also adjust the size of the panel by dragging a mouse or click the l-ill on the right top of the display window. 4.2.8 Action Type -Send an SMS message The system will send an SMS message immediately to given accounts indicating the type and time of event. * Note: This function is not available under NUUO NVR Lite License. Step 1: Select the Send a SMS message action and then click Step 2: The responding windows will popup to Select Contactor (You can choose one or more contacts). Click the Send an SMS message indicator to modify the setting. Note: To configure a GSM modem for the system, go to Config - Setup - Hotline. See Configuration at page 74. 4.2.9 Action Type - Send to Central Server This action will send an event and snapshot to NUUOs Central Management Server (separate software package, not included). * Note: This function is not available under NUUO NVR Lite License. 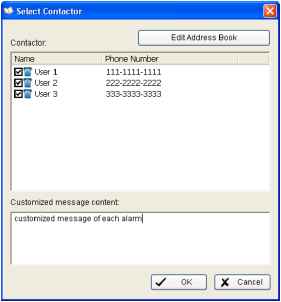 Step 1: Select the Send to Central Server action and then click OK. Note: Please refer to the CMS user manual for details on using the Central Management System. 4.2.10 Action Type - Send snapshot to FTP The system will upload a snapshot immediately to FTP site. * Note: This function is not available under NUUO NVR Lite License. 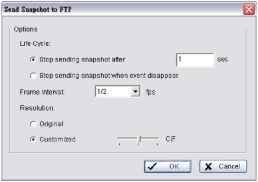 Step 1: Select the Send snapshot to FTP action and then click OK. Step 2: Configure options. Life Cycle: Configure the system to stop sending snapshots after seconds, or when the event is terminated. Frame Interval: Define the frequency of snapshots. - Minimum is 1 /60 fps (1 snapshot per 60 seconds) - Maximum is 30fps (30 snapshots per second). Resolution: Choose to keep snapshot in original resolution or compress to lower resolution. Note: 1. For Digital Input Events, this warning action will send the snapshot of the associated camera. Please refer to I/O settings for details. 2. To define an FTP server, go to Config > Setup > Hotline. See Configuration at page 74 for detail. Step 2: The responding window will popup to Popup e-map on event. Click the Popup E-Map on Event indicator to modify the setting. 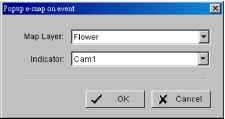 Step 3: Select the Map Layer and Indicator, and then click OK. Note: To edit E-Map, see Configuration at page 92. 4.2.12 Action Type - TV-Out Pop-up video to TV-Out monitor on event. * Note: This function is not available if there is no SCB-7108/7116 card installed.  4.3 Advanced Settings Click on the Advanced button on the bottom of the Event and Action Configuration dialog for advanced settings. Condition of startup - Smart Guard can be started under the follow modes: 1. Manually start/stop from Start menu or as Main Console startup setting (default) 2. Started by defined D/I trigger. Select D/I from dropdown list and click OK. 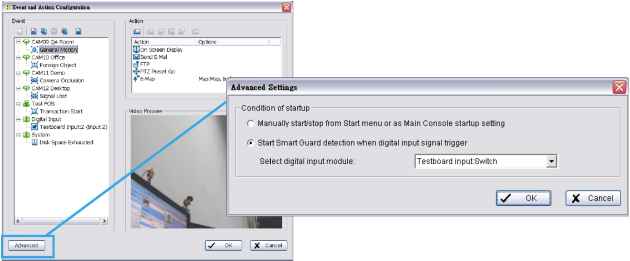 4.2.11 Action Type - Popup E-Map on Event The sysfem will aufo popup E-Map window and show the assigned map and indicator. * Note: This function is not available under NUUO NVR Lite License. Step 1: Select the Popup E-Map on Event action and then click OK. 5. Configuration 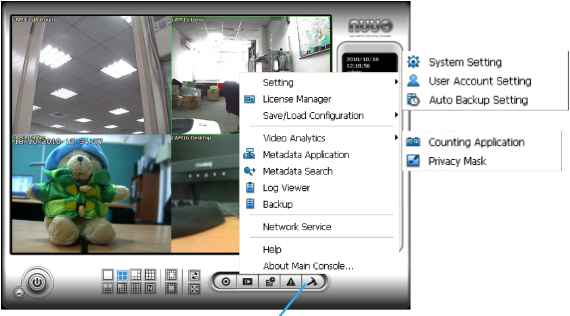 Config Click on the Config icon, select from the drop-down menu and open the Configuration panel. Modify the setting and access License Manager, Video Analytics, Metadata application, Metadata Search, Log viewer, Backup, or Network Services. Select Save/Load Configuration to save/load all the settings. * Video Analytics and Metadata Application not available under NUUO NVR Lite License. * Video Source function available only with MPEG-4 software compression captures devices. 1 ... 3 4 5 6 7 8 9 ... 14 |