
8(903)201-21-74
ООО "ЧетыреДатчика"
|
Оператор: 8(903)201-21-74 ООО "ЧетыреДатчика" |
|
Оператор: 8(903)201-21-74 ООО "ЧетыреДатчика" |
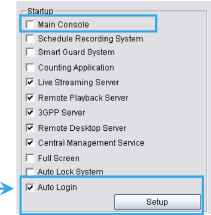
Главная страница Nvr/dvr/hybrid ndvr 1 ... 4 5 6 7 8 9 10 ... 14 5.1 System Setting - General Startup pStartup-П Main Console П Schedule Recording System П Smart Guard System П Counting Application W Live Streaming Server W Remote Playback Server W 30PP Server P Remote Desktop Server W Central Management Service V Full Screen I П Auto Lock System Miscellaneous 1Ю Device I PTZ Config Hotline Address Bookonitor Display Joystick Storage jooniti Storage Status Display Setup Location D:\Video F Enable DiskLoad Balance Automatic Recycle: <* Recycle when diskspace is less than pTo % С Only keep video for 17 days Log Recycling pStatus Dispiay- [7 Current Date p Current Time p Login User p Free Disk Space Г IP Camera Bitrate W User Defined Тей1 I NUUO p User Defined Тей 2 fsurveiiiance Advanced Setting rMiscellaneous V Automaticallv popup event report V tiflinimize to system tray V Synchronize video frames DDNS Service rAudio Preview- Defaullihannel [(Mot Used) I Г Etjtble Audio on Active Channel Volu/ie I Enable Auto Reboot Ever/ fiay 3 atoi:0OA[*l 3 l I X Cancel Audio Preview Auto Reboot 5.1.1 Startup Check the Main Console box to execute Main Console system when windows startup. Check the following 3 main functions and 5 network services to auto activate functions when Main Console system is executing, including Schedule Recording System, Smart Guard System, Counting Application, Live Streaming Server, Remote Desktop Server, 3GPP Server, Remote Desktop Server and Central Management Service. Checking other options can setup the startup status as Full screen, auto lock system by startup or allow system to auto login with the preset account. Setup Auto login: Enable Auto login and click the Setup button to obtain the Auto Login Setup panel, insert the User Account and Password to login automatically when the system starts. Enable the Minimize after login to minimize the Main Console window after login. 5.1.2 Storage 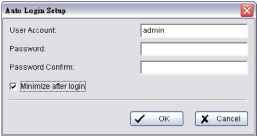 Location: Assign the default folder (you can setup several directories for storage) for the system to store all data files. Recommend not to save in system HD (C :\) to avoid PC efficiency drop when free storage is low. If you have more than one drive available for recording, you may check Enable Disk Load Balance to evenly distribute recording to multiple drives. This will increase efficiency of the system. Automatic Recycle: The system will automatically delete out-dated data to save storage space. Recycle when disk space is: Set the standard limit to let the system recycle automatically. Less than %: The system will start to recycle if the disk space is less than the indicated percentage (default is 10%). Note: 1. The system will detect the storage space of default location firstly, if the default storage space is exhausted, the video will be stored to the next directory. 2. If all the status of locations exceeds the storage rule, the system will start recycling in an hour progress. Only keep video for: Delete the video records that are older than the number of days set. Note: If the default storage spaces exhausted (disc space is less than 3%), the system will start to recycle by hourly period. Log Recycling: Click the button to obtain the Advanced Recycle Setting panel. Set the days that you want to keep the event or Keep all event logs within interval of video files. Event Log: Delete the event log data that is older than the number of days set. System Log: Delete the system log data that is older than the number of days set. Counting: Delete the counting application data that is older than the number of days set. Metadata Transaction: Delete the metadata transaction data that is older than the number of days set. Resource Report: Delete the Resource report data that is older than the number of days set. 5.1.3 Status Display Check the boxes of the information that you wish to see in the information display window in the Main Console. 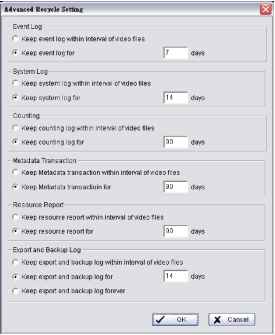 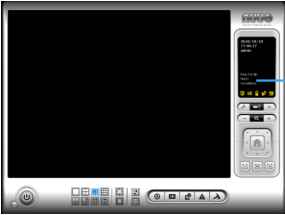 2010/ID/18 17:46:17 admin Uptime: 000,09hr @ IH8 g 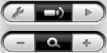 Status Display: Select the information such as Current Date, Current Time, Login User, Free Disk Space, IP Camera Bit rate and User Defined Text. Advanced Setting: Click the button to obtain the Advanced Setting Panel to select Temperature, Fan Speed, System Resource, Network Utilization information and System Uptime info you wish to display. 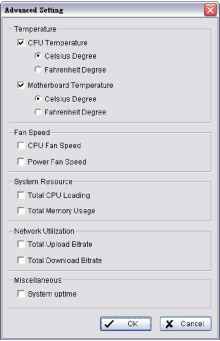 5.1.4 Miscellaneous Automatically Popup Event Report: Event report dialog to automatically popup when events are detected. Make sure to stop Smart Guard System before you modify the setting, otherwise the modification will not take effect. Minimize to system tray: Enable the Option to minimize the Main console to be an icon in notification area of windows task bar when pressing the minimize button.  Minimize Note: Insert the username and password of MainConsole again when clicking the minimized MainConsole icon in notification area of windows task bar to start monitoring. Synchronize video frames: Select to avoid image tearing problems that may occur while CPU loading is increased. DDNS Service: Dynamic Domain Name Server (DDNS) function allows you to use Live View or Web View to connect to the Main Console through Internet event if you have a dynamic IP address. Click on the DDNS button to obtain the Dynamic DNS Setup panel. Set up the DDNS function by selecting the provider type, filling with user name, password and hostname, and adjust the update period. 5.1.5 Audio Preview 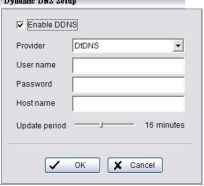 Default Channel: Select the audio channel that you wish to hear from in Default Channel . Enable Audio on Active Channel: Select the Enable Audio on Active Channel option to hear the audio from the selected video channel (selected by mouse) on each video grid of Main Console. The default channel will play if no specific video channel is selected. Volume: Adjust the volume with the volume bar. 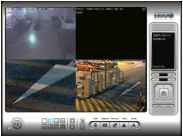 Sysfem plays the audio of default channel 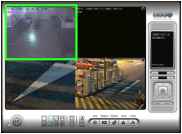 System plays the audio of the upper-leff selected channel 5.1.6 Auto Reboot Check the option of Enable Auto Reboot so that you can reboot the system on the time you select. Step 1: Check the option of Enable Auto Reboot. Step 2: Select the time you want to reboot. Note: Enable Main Console , Auto Login , Setup login account and check other status in Startup section so when PC reboots the system will run normally.
 5.2 Setting Search Insert Delete Camera Config Oeneral Camera Ю Device PTZ ConJjHotline User Account Address Book] Monitor Display Joystick  1 Search Insert Delete Config Jl Caml 5M02 VIVK-FD7131 SCAM03 VITEK-IZ7151 ElECAM04yKIS210A (192.168.2.22; lEECAMQBD-LInk DCS-6100 (192.16E Ie1ECAJ6 VivotEk FD7141 (192,168,: I El ЁОКМО? VivotEk FD7132 (192,168, J □ аГСАМ08 AXIS 210A (192,168,2,22; I g SCAM09 VIVOTEK-IP7135 >E£CAM10 LevelOne WCS-2040 (192 □ £CAM11 LevelOne WCS-2060 (192 ИЁСАМ12 AXIS 214 (192,168,2,24) Е1ЁСАМ13 D-Link DCS-5610 (192,16E 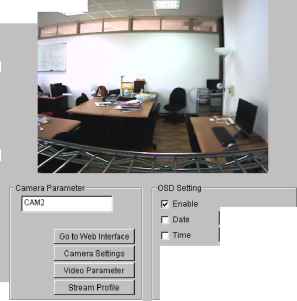 2009/04/30 31 AtMt 1:1 5:00 2] Stream Profile 17 Camera Number 17 Camera Name Г Bitrate Apply All X Cancel 5.2.1 Add Camera Four function buttons will be included in the Setting/Camera panel if you have our Hybrid Surveillance System license for IP camera. Search: Click on the Search icon for the Search IP Camera panel. The system will start scanning automatically; click on the Stop Scan button to stop scanning any time. EenKh IP Cameibs □ 2.168, □ ia2,L □ 19г,1БЕ. □ IH-IBS, □ 192,168, □ 192,168, □ 192,ISB, □ 192,168, □ 192168 □ 192,168, 1.131 1 l.ijO 1.97 1.911 1.60 1.93 1.9S 1.92 1.9+ ; VenctOT Pana5Milc LevelOne LevelOne LevelOne LevelOne LevelOne LevelOne MAC BL-CIO FC5-*000 WC5-21110 FCS-lOlO FCS-SOOO FCS-t04(} WC5-2030 FCS-103O O0-8O-f0-5&JS-ad O0.4O-25-On-CO-l3 O0-n-6SlM4-Fl 0040-80-727-85 OD-]l-5B-ao-3A-(15 O0-n-SB-BQ.47-Ol оо-и-бЕ-вв-зг-гв oo-n-6e-eo-3frfD Camera Name: Lfi elOne FCS-5011 [19216S 1.131] User Name: Password: I \y CK [ Ж canal Fill in the user name and password for each IP camera found and click OK to add it to the camera list. Insert: Click on the Insert icon for the IP/Video Server Setting panel and add IP cameras to the list. See following part (IP Camera/Video Server Setting panel) for detail. Delete: Click on the Delete button to remove the selected IP camera(s) from the system. Click OK to finalize the modification. Config: Click on the Config button for the IP/Video Server Setting panel. You can modify the IP camera settings with the Setting panel. See following part (IP Camera / Video Server Setting panel) for detail. 5.2.2 IP Camera / Video Server Setting panel Network Device Description  Network: Fill in required info of the Network field (including Name, IP Address, Http Port, User Name, Password and Protocol) referring to the instruction provided by the camera manufacturer. Check Use DNS to use domain name instead of IP address. Device: Choose the IP camera manufacturer from the drop-down menu. Alternatively click on Auto Detect and the detected vendor /model name will show in the box. Description: Shows information for the IP camera. 5.2.3 Camera Parameter Camera List 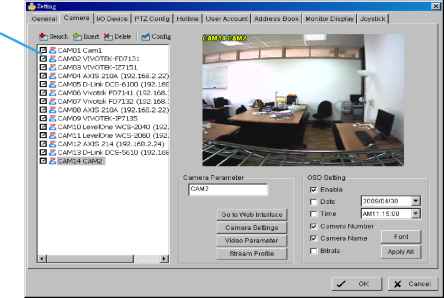 Camera List: The camera(s) connected to the system will show on the panel, click the name of the camera to adjust the setting. Camera Parameter: Camera Name: Name the camera. Go to Web Interface: Go to vendors website interface to configure the camera setting (optional). Camera Settings: Set the camera parameter offered by camera vendor. Video Parameter: Adjusts the videos brightness, contrast, saturation, and color hue values. Lens Setting: ImmerVision Lens is currently supported. Click to enable lens or setup configurations, such as camera position. Stream Profile: Stream profiles are pre-defined to preferred settings which will respond from the query NUUO NVR/DVR/Hybrid NDVR System of the remote live view function. Each profile has different Format, Frame, Resolution, Quality and Bit rate (Kbps) settings. Stream Profile Options 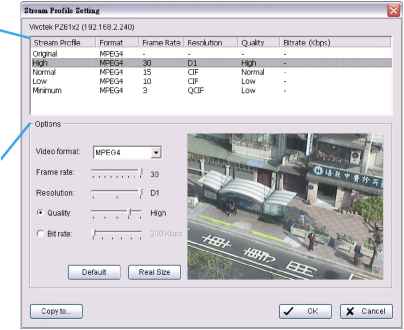 Note: The types of stream profiles and options will differ among stream sources. IP cameras on NVR IP+ License: 5 profiles include Original (not configurable), High, Normal, Low and Minimum (for PDA/Smart Phone Clients). IP cameras on NVR Lite License: 3 fixed, not configurable profiles including Original, Low and Minimum (for PDA/Smart Phone Clients). Analog cameras on SCB series1000-3000 : 4 profiles include High, Normal, Low and Minimum (for PDA/Smart Phone Clients). Analog cameras on SCB series 6000S/7000S/7100 : 4 profiles include H.264 (H.264 format only), High, Normal, Low and Minimum (for PDA/Smart Phone Clients). HDcctv cameras on SCB series 8000HD series: 4 profiles include H.264 (H.264 format only), High, Normal, Low and Minimum (for PDA/Smart Phone Clients). Note: 1. Use Copy to option to apply settings of a single camera to others. 2. To choose stream profile of remote live view, see Live view setting at page 104 for detail. 5.2.4 OSD Setting Select the information that you wish to see in the on-screen display, or the sub-screen of the camera. Click the Font button to setup the font style. 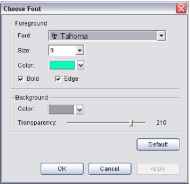 5.3 Setting - I/O Device I/O Device Setting List of devices Input Monitor 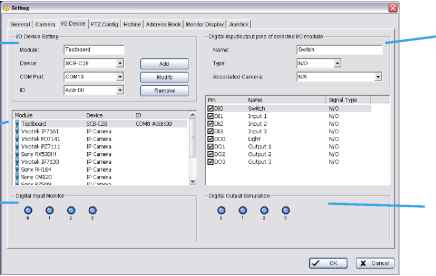 Device Setting Output Monitor I/O Device Setting: Module Setting: Name the module device and ID that has been connected to the digital input/output device(s) to your system. Device: This column displays the device(s) already installed to the system. ID: Select the number of the I/O port to which you plug the ribbon cable. Input Monitor: The device(s) is turned on if the dot is red. By triggering the digital input device, the related icon will light up. This is used to check that the device is correctly connected. Output Monitor: The device(s) is turned on if the dot is red. By clicking on the icon, you may trigger the digital device connected to the system. This can be used to test if the output device is correctly connected. Device Setting Name: Insert the name of the device (input and output). Type: Select the device type from the drop-down menu. 1. N/O: Normal Open. 2. N/C: Normal Close. Associated Camera: You may assign one camera to each digital input device. Smart Guard will collect snapshots from these cameras upon certain triggered events. For details please refer to 4.2 -Action. DIs included with IP cameras will keep its own camera as default associated camera. 5.4 Setting - PTZ Config Basic Setting Advanced Setting Miscellaneous General Camera Ю Device PTZ Config Hotline User Account Address Book Monitor Display Joystick -Basic Setting- □ S CAMOl Camera 1 □ 3 САМОг Camera 2 □ S CAM03 Camera 3 □ i Camera tdodel: pelco D Com Port: jcotl Baud Rate: 2400 Address: Addr:O0 Advanced Setting-Pan Speed: Tilt Speed Zoom Speed Auto Pan Speed rMiscellaneous- - J-- Medium - J-I- Medium -J-I- Medium -J-- Slow User-Define Preset X Cancel Install PTZ cameras and follow the instructions of the camera manufacturer. A PTZ camera is usually connected to the PC with RS-485/RS-422. Check the box on the camera list to activate the PTZ control function of a PTZ camera. Basic Setting: Select the camera model, com port, baud rate, and address according to your PTZ camera. Note: If the camera model is an IP PTZ camera, you can work PTZ function directly without the com port, baud rate, and address settings. Advanced Setting: You may setup the pan speed, tilt speed, zoom speed and auto pan speed. Adjust the settings by dragging the bars. Miscellaneous: Patrol Group: You can setup the Patrol Group, please see page 25 for detail. Default PTZ Preset: By enabling this function, the PTZ camera will automatically go back to a default preset point when no PTZ commands are under action. To enable this option, check Back to PTZ preset after idle and define idle periods and a default preset point. Default PTZ Preset Tool PTZ preset default setting- W iBackto PTZ preset alter Idle: Time intereal of Idle timeout: 30 Sec. Back to preset point after idle: PTZ home \y OK I I X Cancel I User-Defined Preset: User-Defined Preset for the analog speed dome can trigger the extra-function of the speed dome itself, for example auto-tracking, login menu of cameraetc. You can refer to the detailed description of each analog speed dome on its user manual. Step1: Type the Preset Name. Step 2: Type the Preset Number. Step 3: Select the Preset Type. 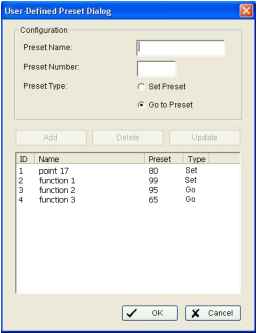 Step 4: Press the buttons to Add, Delete, or Update preset setup. 5.5 Setting - Hotline 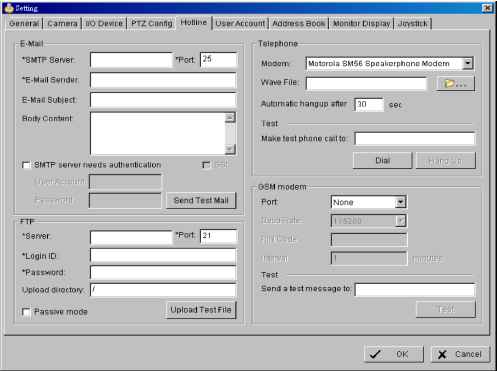 Configure the settings of various contacts or devices, including E-mail, FTP, GSM modem and Telephone calls which will be triggered upon event detection. E-mail: Input the following information: Server, Port, and Senders E-mail address, E-mails subject title, Body content and SSL option for encrypted transmission. Click on the Send Test Mail button to test the settings. Note: * indicates mandatory fields FTP: Input the following information: server, Port, Login ID, Password, and Upload directory, according to your FTP type to enable/disable Passive mode. You may click on the Upload Test File button to test the settings. Note: * indicates mandatory fields Telephone: Select the modem that the system is going to dial the info call with, and then insert the phone number you want to dial to. (A modem is required for voice transition.) Note: 1. You must use a modem with voice capability. 2. You may select a Wave format file; it will be played in the phone to alarm the person who picks up the phone call. GSM modem: Set the Port and Baud Rate of the GSM modem device, and then enter PIN code. You can setup the interval of send SMS message. You may click on Test to send a test SMS message. Note: The interval is set to fix a minimum time period between two SMS messages. If set as 60 min, the SMS between 60 min would be deleted and not sent to user. 5.6 Setting - Address Book Manage the address book from which you may send out a phone call or an E-mail when an unusual event is detected. 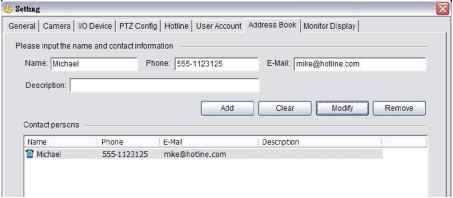 5.7 Setting - Monitor Display Playback Option Cameras List 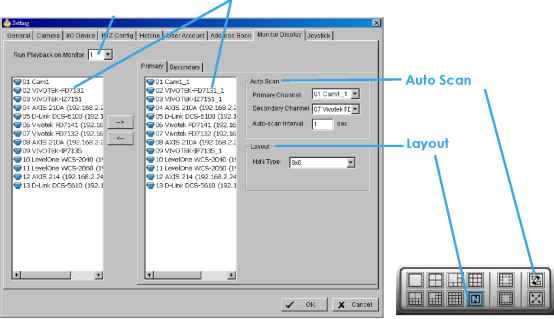 Playback Option: Execute Playback on the secondary monitor by checking the box. Make sure to adjust the display setting of your computer in advance to avoid system error. Cameras List: The left side displays a list of all cameras; modify the cameras shown on primary/ secondary monitor in the right window. Auto Scan: Activate auto scan to rotate the channels/ cameras on the display screen. For instance, you may select to show only 4 sub-screens on the main console while having 16 channels connected to the system. With auto scan function, you will be able to see all 16 channels by turns. You can set up a primary channel that will always be on the screen and a secondary channel that has secondary priority. Layout: Choose the number of divisions for NxN division on the Main Console screen. 1 ... 4 5 6 7 8 9 10 ... 14 |
|||||||