
8(903)201-21-74
ООО "ЧетыреДатчика"
|
Оператор: 8(903)201-21-74 ООО "ЧетыреДатчика" |
|
Оператор: 8(903)201-21-74 ООО "ЧетыреДатчика" |
Главная страница Nvr/dvr/hybrid ndvr 1 ... 5 6 7 8 9 10 11 ... 14 5.8 Setting - Joystick * Note: This function is not available under NUUO NVR Lite license. Function Parameter General Camera 1Ю Device PTfig Hotline User Account Address BoMonilor Display Joystick Active Joystick CH PROMPTS IP DESKTOP CONTROLLER Button I Function I Parameter Button 2 Button 3 Button 4 Button 5 Button 6 Button 7 Button 8 Button 9 Button 10 Button 11 Button 12 Goto Pre5et Point Goto Preset Point Goto Preset Point Goto Previous Camera Goto Next Camera Toggle Single Camera View Toggle Full Screen Switch Screen Layout Switch Active Monitor PTZ Speed Down PTZ Speed Up Import  Export Default X Cancel Function: You con choose the function from the drop-down menu for the button of the joystick. 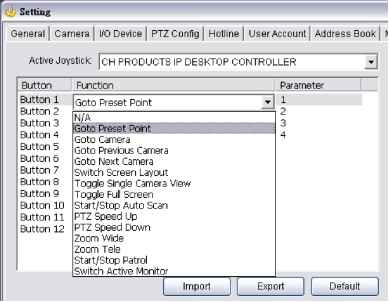 Note: Following is a complete list of all functions: 1. N/A 2. Goto Preset Point (including Home) 3. Goto Camera 4. Goto Previous Camera 5. Goto Next Camera 6. Switch Screen Layout 7. Toggle Single Camera View 8. Toggle Full Screen Parameter: You can choose the parameter of the function from the drop-down menu. Default: You can set the default setting for the joystick. Export: You can export the setting of the joystick. Import: You can import the setting of the joystick. 9. Start/Stop Auto Scan 10. PTZ Speed Up 11. PTZ Speed Down 12. Zoom Wide 13. Zoom Tele 14. Start/Stop Patrol 15. Switch Active Monitor I :. Dsei Accovikt Settmg User I PrivilGge J Groue I Description 9 admin Admin Administrator ft ad User Basic user Delete Basic User nUser Account- User AccountType User Name. Group: Description: Password: Password Confirm: ~ Disable User Account ~ Keep remote login for Automatic Synchronize Windows User Setting I ✓ OK I X Cancel User account Setting Add Basic User Add/Remove/Synchronize Windows User Basic Users Clicl< on to odd о new Basic User. Clicl< on Ж to delete an existing Basic User. Create and modify the content of each user account under User Account Setting: Name: Insert the user name. Group: Assign the group for each user. There are 3 default privilege profiles of account groups: Admin: Have privileges of all system functions and devices, except adding/deleting/modifying privileges of other users. Power User: Have limited privileges of system functions and complete privileges of assigned devices. User: All the privileges of system functions are forbidden. Users can only manage assigned devices. Description: Insert the description related to each user. Password: Insert the password assigned to each user. Password confirm: Insert again to confirm the password. Disable User Account: By checking this option, the accounts access to the system will be blocked. Disabled accounts will be marked with a cross on the icon fi. Note: Only the default admin account cannot be disabled. Keep remote login for minutes: Insert the duration to auto kick out account after logging in from Remote Live Viewer or Remote Playback server. 5.9 User Account Setting Configure all user accounts under this settings page. Note that this page is only accessible by the default admin account. User Add new users and modify or remove existing users. You may choose to add Basic Users directly in the system or import users from MS Active Directory (MSAD) as Windows Users. *Note: Please remember to add your Windows login AD user account to the local PCs administrators user group. Main Console can be launched by administrators only.  Click Select All to check all available users and folders, or click Deselect All to uncheck all users. Group Mapping: Selected Windows users will be grouped according to default mapping:
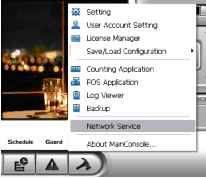
You may modify group setting for each user later under the User Account page. Click OK when you are done adding Windows users. Synchronization results will be displayed for confirmation. 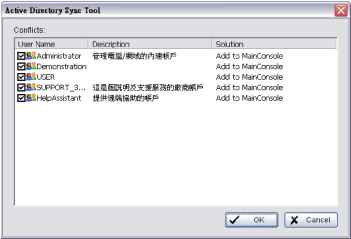 Please refer to the default solution for all conflicts: New accounts added from AD domain: Add to Main Console Accounts from AD domain removed: Delete from Main Console Account description modified: Update description Encountered admin account: Skip admin account Newly added account from AD domain conflicts with existing basic user account: Replace basic user account Uncheck items to skip applying solution to Main Console user account settings. For example, if you uncheck an Add to Main Console solution, the new account will not be added to Main Console s user account list. Windows Users Click on & to add/remove/synchronize Windows Users. Select User Check users or folders under Select Active Directory user(s) and click OK to add Windows Users.  Automatically synchronize Windows users: Check to enable automatic synchronization. Synchronized period: Configure the synchronization to start every Synchronized time: Define at what time the synchronization should start. days. Note: Auto synchronization will apply all default solutions to conflicts. Privilege: Define detailed privilege of functions and devices for each user account. User Privilege :r name Group Description I & admin Admin Administrator Sd User Basic user Copy Privilege to Privilege: и .....0 i.....0 : 0 0 0 0 0 :.....0 В S D Login Main System Exit Main Gystem Configure Main System Start/Stop Operation Start/Stop Network Service Local Backup El Delete Recorded Files Remote Backup Remote Login Browse Log Login Playback System Minimize Main System uamera El Vivotek IP7161 El iiP-.s El Remote Access El PTZ Control El Remote PTZ Cortral El Talk El Remote Talk PI .. Utel FD7141 Privilege к/ OK X Cancel Function: Configure settings, operation related, system configuration, and privilege of remote access.* Device: Configure device privileges of camera, digital output and metadata sources in Main Console and client applications. Copy Privilege to: Click on this button to copy privilege settings of any account to another. Note: The privilege of default admin account is not configurable. Setup TV-Out function is not available if there is no SCB-7108/7116 card installed. Automatic Synchronize Windows User Setting Instead of manually adding and updating Windows users, you may also configure the system to automatically synchronize all Windows users at a specific period. Click on to do this. 5.10 Auto Backup Setting Configure your system to automatically backup video data on a daily or weekly basis. * Note: This function is not available under NUUO NVR Lite license. Auto Backup Config: Configure auto backup settings on this page. Enable Schedule Backup: Check to enable backup process. Select Camera(s) to Backup: Choose all channels to backup. Option Location: Define backup route. Backup Playback System: Check to backup the playback application with each process. Send Mail when Backup Failed: Check to receive an email notification when backup fails. Click Setup for email configuration. Select one or more contacts from the address book and configure customized message content. Recurrence: Choose start time and Recurrence: Daily or Weekly modes. 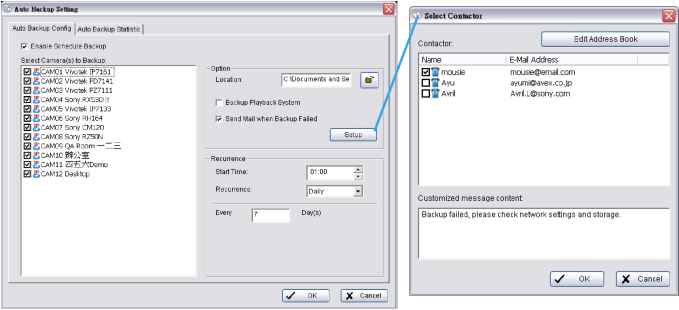 Auto Backup Statistic: Shows statistics on current or latest backup status. Click Refresh to update. Auto Bactjup ConfiB Auto Backup Statistic Current Backup Status: idle Next Backup Start Time: N/A Next Retried Process Time: N/A p Last Backup- Refresh ± Last Backup Start: Last Backup Stop: Backup Video Period: Backup Size: Backup Result: NJA N/A 0 min 0 sec 0.00 GB Complete Current Backup Status: Idle: not active or awaiting next backup process Backup: Backup under process Retry: Previous backup failed, awaiting retry Next Backup Start Time: Scheduled time for next backup process Next Retried Process Time: Scheduled time for next backup retry process. N/A when status is Idle or under Backup. Last Backup Last Backup Start: Time and date last backup started. Last Backup Stop: Time and date last backup was complete or had failed. Backup Video Period: Total time spent on last backup process. Backup Size: Total file size of last backup. Backup Result: Completed: Last backup succeeded. Failed: Last backup failed, under retry process. Timeout: Last backup failed, retry process timed out. 5.11 License Manager The license of the software should be registered first before operating the former version of Intelligent Surveillance System. Execute the License Management Tool in Config >License Manager to activate the license from dongle or serial number allocated with the software package, or de-activate the license then bring it to another PC to activate it again. Note: Please refer to page 118 for the detail setting of License Management tool.  5.12 Save/ Load Configuration The Save/ Load Configuration function allows system users to save any specific setting as a CFG (config) file. You may save several different CFG files at a time. Save Configuration: To save a specific setting, go to Config - Save/Load Configuration - Save. In the popup window, type in the file name and then save it as a CFG file. Load Configuration: To load a specific setting, go to Config - Save/ Load Configuration - Load. In the popup window, go to the directory that you saved the CFG files at, select any one of them and then click OK to load the file. Note: Main Console will be automatically shut down after loading a new configuration. Restart Main Console manually. 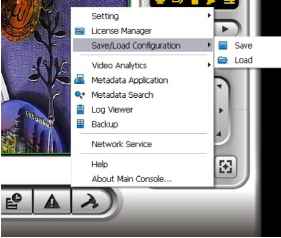 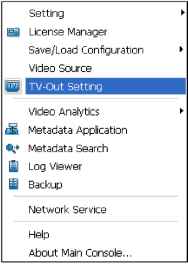 г TV-Out Setting j window appears. TV-Out Monitor \ Camera Monitor Display  Auto Scan TV Adjustment Miscellaneous 5.13 TV-out Setting * Note: This function is not available if there is no SCB-7108/7116 card installed. After installing a SCB-7108/7116 card, a new feature will be added in Main Console automatically, click on General Settingj and select TV-Out Setting j . NUUO NVR/DVR/Hybrid NDVR System TV-Out Monitor: Display all SCB-6000/7000/7100 series cards installed in this computer, choosing SCB-7100 series one to click on for TV-out function then users can start to edit the right parts. Camera: Displays a list of all cameras. Monitor Display: Modify tine cameras slnown on Monitor Display in tine riglnt window. Show tine video cameras wl-iicl-i are playing in sequence. Choose the cameras in Camera (Multiple choice), then clickLJ, the system will have the selected cameras show below Monitor Display. If user wants to remove the cameras, select the cameras then clickH, the system will remove from the list. Auto Scan: Set Layout , Primary channel , the form of Secondary channel and the interval time of Auto-scan interval . TV Adjustment: Users can adjust the position of TV-out screen by this function. Click I the settings back to default value. Miscellaneous: Enable OSD display and Enable manual TV-Out pop-up settings. to apply all 5.14 Video Analytics - Counting Application Count objects, people or vehicles passing through pre-defined detection zones. To access this page, login with admin account or user account with privilege of configuring main system. * Note: This function is not available under NUUO NVR Lite license. Camera List Operation Start Simulation 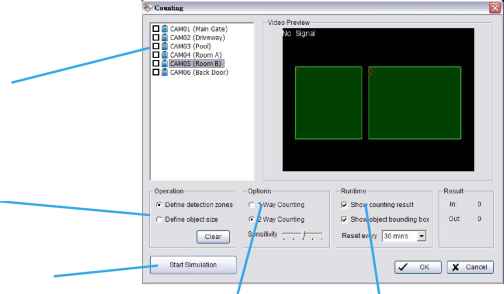 Options Runtime Camera List: Select which camera would enable counting application. Operation: Define detection zones: Defined the detection zona. Define object size: Defined the size of the object to count. Options: 1Way Counting will take objects going from Region 1 to Region 2 as one count. In 2 Way Counting mode, it counts either going from Region 1 to Region 2 or from Region 2 to Region 1. Runtime: Check the boxes to show the counting result on the screen and/ or show object bounding box, which draws the shape of the object that the system detects in red squares. You can choose from the drop-down menu of how long you want to reset the counting number. Start Simulation: Click to test the setting. 5.15 Video Analytics - Privacy Mask Mask your video with dark areas to protect your privacy. To access this page, login with admin account or user account with privilege of configuring main system. * Note: This function is not available under NUUO NVR Lite license. Privacy mask settings will apply to local and remote live view, web live view, local playback, remote playback and web playback. Camera List PI Privacy Mask ConfigniatiDn 01Ё CAMOl 01ЁСАМО2 □1ЁСАМ03 □1ЁСАМ04 □1ЁСАМ05 □£CAM06 □1ЁСАМ07 □1ЁСАМ08 □ ЁСАМ09 □ifiCAMlO □1ЁСАМ11 □IE CAM 12 Rectangle Count rRegional Definition- . Rectangie Count: 5 (Max: 1 0) N/ OK X Cancei Preview Clear All Camera List: Check cameras to enable privacy mask. Regional Definition: Click and drag to define privacy masked areas. Rectangle Count: Maximum 10 rectangles can be drawn to define privacy masked areas. Clear: Click to clear all rectangles. 5.16 Metadata Application * Note: This function is not available under NUUO NVR Lite license. The Metadata application now supports three different data types, including POS, LPR and access control. This tool can be used to configure these devices. Note that you will need additional licenses to use these features. Instructions on license activation can be found on page 118. Refer to the Metadata User Manual for more details.  5.17 Network Service There are 5 types of network services: Live streaming server, Remote playback server, 3GPP service, Remote Desktop, and Central Management Service. From the Main Console, go to Config - Network Service to obtain the Network Service panel. An icon shows for each network service in the information window of Main Console when started. See 1.1 User Interface Overview for details.
 5.17.1 Live Streaming Server When starting the live streaming function of computer, the system allows remote users to log in to the specific computer and view cameras that are connected to it. As system administrator, user could be able to monitor these accounts in order to maintain the system efficiency. Mainl On Live Streaming Server panel, administrator can see all the clients who are currently logging in to the computer and watching the live video from the remote side. 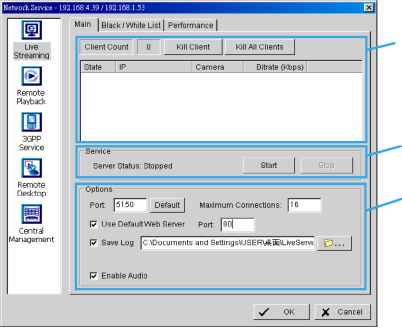 .Client list Service Options Client list: Client Count: Show the amount of channels that are connecting to system. Kill Client: Highlight an IP address and click on the Kill Client button to block the client from your client list. Kill All Clients: Click on this button and all clients are blocked from logging into your system. Service: Server Status: Click on Start/Stop to turn on/off this option. 1 ... 5 6 7 8 9 10 11 ... 14 |
|||||||||||||||||||||||||||||||||||||||