
8(903)201-21-74
ООО "ЧетыреДатчика"
|
Оператор: 8(903)201-21-74 ООО "ЧетыреДатчика" |
|
Оператор: 8(903)201-21-74 ООО "ЧетыреДатчика" |
Главная страница Nvrmini 2 user manual 1 ... 7 8 9 10 11 12 13 ... 16 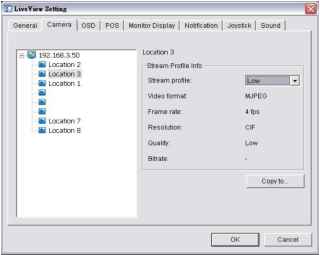 5. Adjust the stream profile of every camera with stream profile enabled in the setting page. 6. Click a camera and select its stream profile, and click the Copy to button to apply this profile to other channels. 7. Click the OK button. 5.1.5 OSD (On-screen display) Setting 1. Open Internet Explorer and log in to the unit. 2. Click the Live View button on the top of the page. 3. Click the General Setting button. 4. Click the OSD tab. 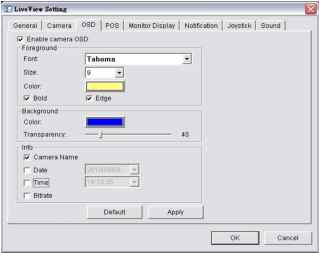 5. Check the Enable camera OSD option. 6. Set the foreground and background settings of the OSD. 7. Select which kinds of information will be displayed on the screen. 8. Click the Apply button to preview the result. 9. Click the Default button to back to the default settings if necessary. 10. Click the OK button. 5.1.6 Monitor Display Setting 1. Open Internet Explorer and log in to the unit. 2. Click the Live View button on the top of the page. 3. Click the General Setting button. 4. Click the Monitor Display tab. 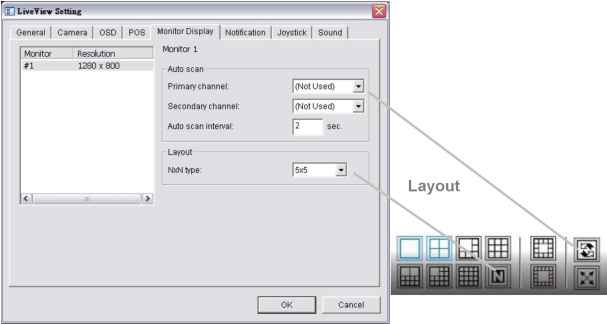 Auto Scan 5. Select Primary channel which will always be on the screen when activating auto scan; while select Secondary channel which has second priority when activating auto scan. Enter the time interval for auto scan. 6. Select the screen division of NxN type. 7. Click the OK button. 5.1.7 Notification 1. Open Internet Explorer and log in to the unit. 2. Click the Live View button on the top of the page. 3. Click the General Setting button. 4. Click the Notification tab. 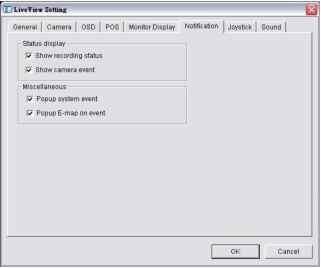 5. Check Show recording status to show the crystal ball with recording status on monitor display. 6. Check Show camera event to display the words of detected camera event on the correspondent screen. 7. Check Popup system event to pop up system event message dialog as a warning when a system event occurred. 8. Check Popup E-map on event to pop up E-map with event indicator when camera or I/O Box event occurred. 9. Click the OK button. Popup E-map on event only activates on event, which means that you should not only edit camera and I/O on E-map but setup camera motion, camera input and I/O Box input as an event. Refer to Event & Action Management to do the settings. 5.1.8 Set up Joystick Control 1. Open Internet Explorer and log in to the unit. 2. Click the Live View button on the top of the page. 3. Click the General Setting button. 4. Click the Joystick tab.  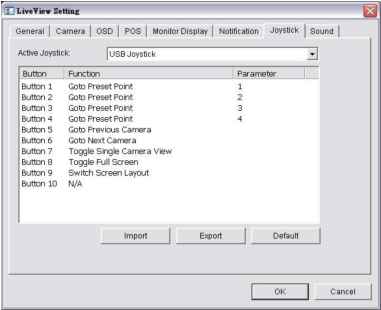 Function: You can choose the function from the drop-down menu for the button of the joystick. 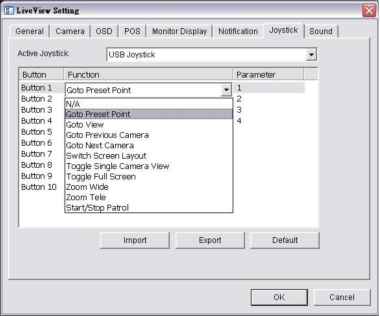 Parameter: Choose the preset point from the drop-down menu. Default: Click to back to default setting. Import: Click to import the settings. Export: Click to export the settings. 5. Click the OK button. 5.1.9 Set up Live View Sound on Event 1. Open Internet Explorer and log in to the unit. 2. Click the Live View button on the top of the page. 3. Click the General Setting button. 4. Click the Sound tab. 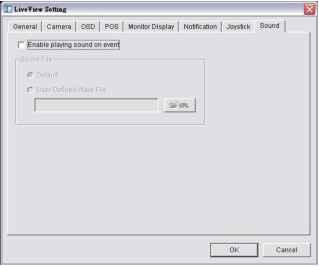 5. Check the Enable playing sound on event option. 6. Select sound file, default sound or user defined sound (.wav). 7. Click the OK button. The function only activates on event, which means you have to setup camera motion, camera I/O and I/O Box I/O as an event. Refer to Event & Action Management to do the setting.  5.2 Remote Live Viewer Application 5.2.1 Remote Live Viewer Application Control Panel Exit Minimize 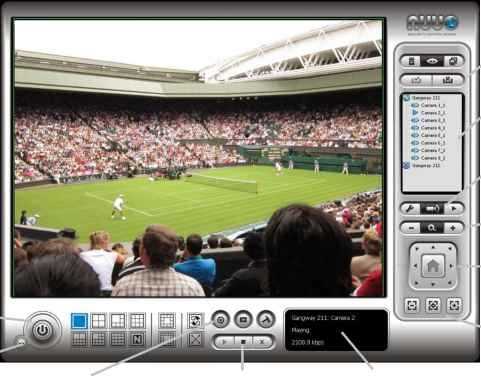 Play / Stop / Drop Start Monitor Playback Live View Setting Information Display Window Log In/ Log Out (Server / Group) Server and Camera List Set Preset Point / Go to Preset Point - Zoom out / Zoom in PTZ Camera Control Focus Far / Auto Focus / Focus Near PTZ Camera Control: You may control the camera view by using the PTZ camera control panel to adjust the cameras view. This is only available with cameras that support the PTZ function. Set Preset Point / Go to Preset Point: Adjust the camera view and click the button to set up this view as preset point. Repeat the process to add more preset points. Click the 1 button to see the preset view. Zoom: Click the + or - button to zoom in or zoom out the view. Minimize: Minimize the Remote Live Viewer window. Exit: Shut down the application. Play / Stop / Drop: Select a camera/ video and click this button to play/stop/disconnect a particular channel. Information Display Window: Display video information including server name, video current status, and bit rate for a selected channel. Start Monitor > E-Map: Upload map and drag camera or I/O on it to track device location and alarm status with instant response when an event occurred. See details in the chapter of E-Map. Start Monitor > Remote I/O: Select Open Monitor to append monitor to view more live videos on multiple monitors. Utilize I/O device function remotely. - User can remotely adjust the Output Pins by turning it on or off. Playback: View playback video remotely. 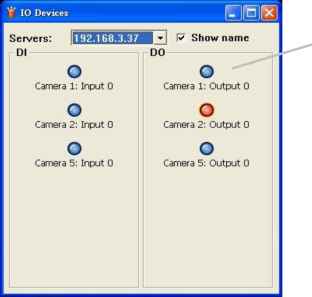 Click to turn on/off the Output pins You can right click on the camera screen to enable the following function. 
Enable Move: Adjust the current view of camera which supports PT function by dragging the button on the display screen. Enable Digital PTZ: Click the + or - button to zoom in or zoom out the view. The lower right square flashing on the video grid indicates the correspondent view of the camera. ImmerVision Lens Setting: Select the mode of lens, original, PTZ mode, Quad mode and Perimeter mode. Vivotek Fish Eye Setting: Select the mode of lens, Original, Rectilinear mode, Full-view panorama mode, Dual-view panorama mode. Type of modes depends on lens location. Stream Profile: Select the stream profiles, original, low, minimum. Enable Audio: Enable audio on active channel(s). Snapshot: Select the snapshot function to capture a specific video image immediately. Toggle Fullscreen: Select it to view cameras with full screen. Press Esc or right click un-select full screen to go back to the original view. Also, right click on camera list to duplicate and connect/disconnect designate cameras, and do other functions. 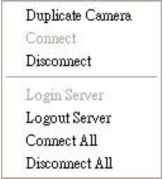 Duplicate Camera: Select the duplicate camera function to create multiple views. The duplicated camera will be shown with green indicator as the right picture. Combine this function with digital PTZ, users are allowed to enlarge different spots and view them in different channels without failing to record the whole view. Connect / Disconnect: Click to connect or disconnect the designate camera. Login / Logout Server: Click to login or logout. Connect All / Disconnect All: Click to connect or disconnect all cameras. 5.2.2 Unit Connection Setting 1. Startup > NUUO NVRmini 2 > Remote Live Viewer. 2. Click the General Setting button. 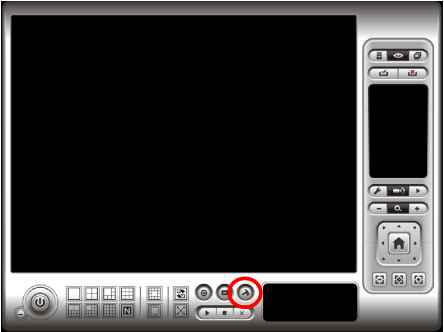 3. Click the Server tab. 4. Insert the unit name. 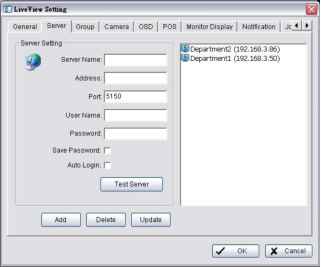 5. Insert the IP address. 6. Modify the port if necessary. 7. Insert the user name. 8. Insert the password. 9. Check the Save Password / Auto login option. 10. Click the Test Server button to test the connection between the local application and the remote unit. 11. Click the Add button to add this unit into your remote server list. 12. Click the OK button. 5.2.3 General Setting 1. Startup > NUUO NVRmini 2 > Remote Live Viewer. 2. Click the General Setting button. 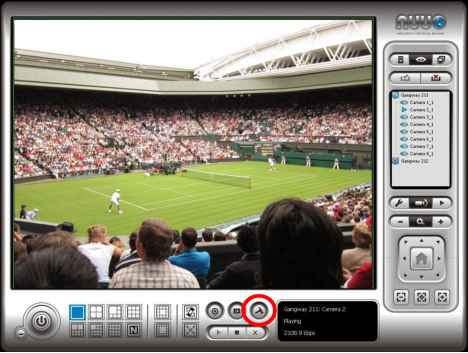 3. Click the General tab. 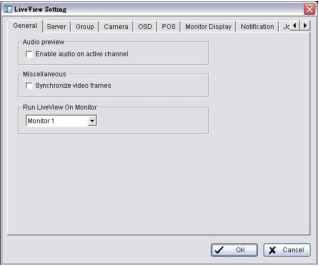 4. Check the Enable audio on active channel option to enable audio streaming on active channel. This function synchronizes with right click on camera to enable audio. 5. Check Synchronize video frames to avoid the tearing problem occurring 1 ... 7 8 9 10 11 12 13 ... 16 |