
8(903)201-21-74
ООО "ЧетыреДатчика"
|
Оператор: 8(903)201-21-74 ООО "ЧетыреДатчика" |
|
Оператор: 8(903)201-21-74 ООО "ЧетыреДатчика" |
Главная страница Nvrmini 2 user manual 1 ... 10 11 12 13 14 15 16 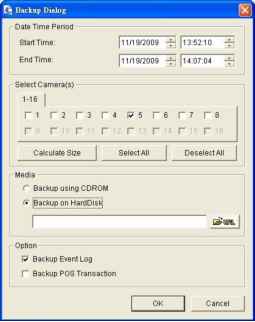 4. Set the Start Time and End Time you want to backup. 5. Select the cameras you want to backup. 6. Select the directory you want to save the backup data. 7. Click the Backup button. 8. The system will then begin backup process automatically. 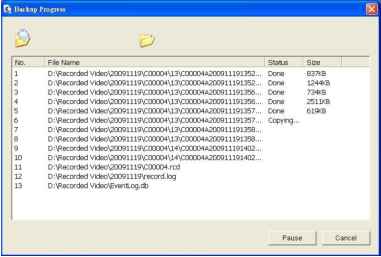 7.2 Remote Playback System Application 7.2.1 Playback System Application Control Panel The Playback System control panel is similar to the playback panel in Internet Explorer. Check Playback Control Panel for more details about those buttons. 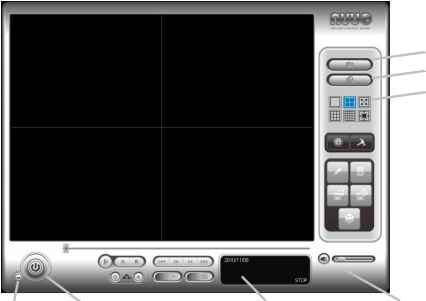 Minimize Exit Browse Mode Search Mode Screen Division Open Record Enhancement / Post Processing Tool Save Image Information Display Window Audio Volume Control 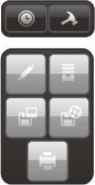 General Setting Backup Export Video / Audio Previous/Next Interval Step Backward/Forward Frame(s) Play / Pause / Stop /  Speed Zoom 7.2.2 Set up Unit Connections Before using the Playback System application, you need to set a connection to your unit first. 1. Startup > NUUO NVRmini 2 > Playback System. 2. Click the General Setting button. 3. Click the Server tab. 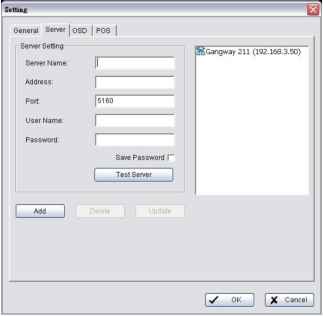 4. Insert the name of your unit. 5. Insert the IP address of that unit. 6. Modify the port if necessary. 7. Insert the user name. 8. Insert the password. 9. Check the Save Password option. 10. Click the Test Server button to test the connection between the local application and the remote unit. 11. Click the Add button to add this unit into the remote server list. 12. Click the OK button. 7.2.3 Search the Recorded Video Remote Playback Site Management % Date Time Search Dialog [HQ]
Is how Records! Г Show Event Log 11/19 0 В Camera 1 В Camera 2 В Camera 3 В Camera 4 В Camera 5 В Camera 6 В Camera 7 В Camera 8 Record Always Record on Event Date Time Period Start Time: End Time: Video Preview- 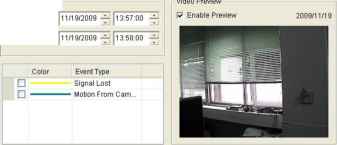 10 11 12 13 14 15 16l L/ OK X Cancel 1. Startup > NUUO NVRmini 2 > Playback System. 2. Click the Open Record button. 3. Click the icon on the top of the Date-Time Panel to obtain the Remote Playback Site Management dialog, and then select the server you want to access. 4. Highlight the records you want to view in the Time Table. 5. Set the Date Time Period. The search process in the Playback System application is similar to that of Internet Explorer. Check Search the Recorded Video for more details about the setting process. 7.2.4 Play the Recorded Video 1. Be sure that you have set up the recording schedule / response first. 2. Startup > NUUO NVRmini 2 > Playback System. 3. Click the General Setting button and the Server tab to set connections to your unit. See Set up Unit Connections for more details. 4. Click the Open Record button. 5. The Record Display Window will show the information of the available video clips. Select the date you want to search the record from. Check Search the Recorded Video for more details. 6. Highlight the video records that you want to review. 7. Select the start and end points in Date Time Period to adjust the time slot. 8. Click the OK button. 7.2.5 Intelligent Search 1. Startup > NUUO NVRmini 2 > Playback System. 2. Click the Open Record button. 3. The Record Display Window will show the information of the available video clips. Select the date you want to search the record from. Check Search the Recorded Video for more details. 4. Highlight the video records that you want to review. 5. Choose the camera display for which you want to implement smart search. 6. Click the Search Mode button to open the Intelligent Search Tool panel. 7. Set up unusual events here to detect abnormalities occurring during the recoding period. Check Intelligent Search for more details. 8. The searched events will be listed. Click to find that event. There are 5 types of unusual events: General Motion, Foreign Object, Missing Object, Focus Lost, and Camera Occlusion. General Motion: Detect all movements in the defined area. Foreign Object: Alarm when any additional object appears in the defined area on the screen. Missing Object: Alarm when the selected object is removed from the defined area on the screen. Focus Lost: System will inform you when the camera(s) lose focus. Camera Occlusion: Alarm when the camera is blocked. The intelligent search in the Playback System application is similar to that of Internet Explorer. 7.2.6 Recorded Video Enhancement 1. Startup > NUUO NVRmini 2 > Playback System. 2. Click the Open Record button. 3. The Record Display Window will show the information of the available video clips. Select the date you want to search the record from. Check Search the Recorded Video for more details. 4. Highlight the video records that you want to review. 5. Choose the camera display that you want to implement video enhancement. 6. Click the Enhancement button. 7. Check the General Setting. Apply active channel: The settings will only be applied to the selected channel. Apply all channels: The settings will be applied to those currently shown on the screen. 8. Set the Filter Setting. Visibility: Check the option and adjust the gamma value of the image to enhance the image and make it cleaner. Sharpen: Check the option to activate the function. Move the slider control to the right to sharpen the image, to the left to soften it. Brightness: Check the option to activate the function. Move the slider control to the right to make the image brighter. Contrast: Check the option to activate the function. Move the slider control to the right to increase contrast. Grey Scale: Check the option to show the record in gray-scale mode so the image displays in black and white. 9. Click the OK button. Stop: Stop the enhancement function and close the enhancement tool. (The system will automatically revert back to the default settings.) Default: Back to the default settings, however, the enhancement tool still works. OK: Apply the modifications of the settings. 7.2.7 Save a Video 1. 2. 3. 4. 5. 6. Startup > NUUO NVRmini 2 > Playback System. Click the Open Record button. The Record Display Window will show the information of the available video clips. Select the date from which you want to search the record. Check Search the Recorded Video for more details. Highlight the video records that you want to review. Choose the camera display that you want to save as a video clip. Set up the cue in and cue out points; the cue in and cue out time will show on the information window. 2010/0Э/27 15:12:02  Cue In Cue Out 7. Click the Save Video button. 8. Choose the folder where you want to save the file. 9. Insert the file name and click the Save button. 10. Choose the export format. 11. Choose the use profile. 12. Check the Export Audio option. 13. Click the OK button. 7.2.8 Save an Image 1. Startup > NUUO NVRmini 2 > Playback System. 2. Click the Open Record button. 3. The Record Display Window will show the information of the available video clips. Select the date from which you want to search the record. Check Search the Recorded Video for more details. 4. Highlight the video records that you want to review. 5. Choose the camera display from which you want to save pictures. 6. Click the Save Image button when the image you want is shown on the screen. 7. Choose the folder where you want to save the file at. 8. Choose the format of image (BMP or JPEG) you prefer. 9. Insert the file name. 10. Click the Save button. You may skip step 7 by presetting a folder where you want to save the images and a format which you want to save the images in. 7.2.9 Print an Image Print the current image of the video you choose. 1. Startup > NUUO NVRmini 2 > Playback System. 2. Click the Open Record button. 3. The Record Display Window will show the information of the available video clips. Select the date you want to search the record from. Check Search the Recorded Video for more details. 4. Highlight the video records that you want to review. 5. Choose the camera display that you want to print pictures. 6. Click the Print button. 7. Set the print settings. Print Content: Print the image from currently selected channel or all the channels shown on the screen. Page Setting > Print in original size: Select to have the image print in original size. > Fit the page: Select to have the image fit the page. > Align Image: Top, center, or bottom  7.2.10 Backup the Recorded Video Different from Save Video, the Backup function will save all the recorded videos which belong to the time slot you set, instead of the clips. 1. Startup > NUUO NVRmini 2 > Playback System. 2. Click the Open Record button to select data. 3. Click the Backup button. 4. Set the Start Time and End Time you want to backup. 5. Select the cameras you want to backup. 6. Select the directory you want to save the backup data. 7. Click the Backup button. 8. Backup and Delete Records 8.1 The Backup System Application In addition to the ways mentioned in the previous chapters, you can apply the application to backup your files. 1. Startup > NUUO NVRmini 2 > Backup System. 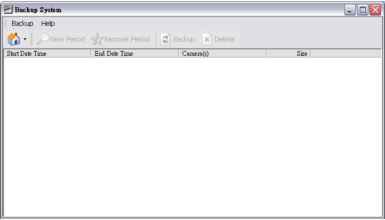 2. Click the Remote Server Site button to set up remote server. 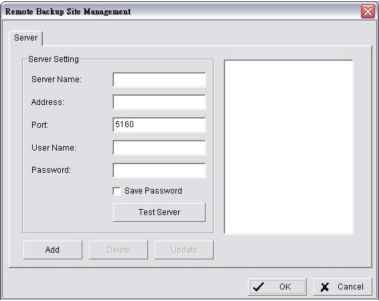 3. Insert the name of your unit. 4. Insert the IP address of that unit. 5. Modify the port if necessary. 6. Insert the user name. 7. Insert the password. 8. Check the Save Password option. 9. Click the Test Server button to test the connection between the local application and the remote unit. 10. Click the Add button to add this unit into the remote server list. 11. Click the OK button. 12. Click the ▼ button next to Remote Server Site button, and select one of servers you added. 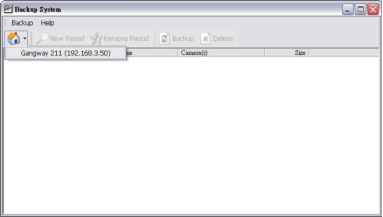 13. Click the New Period button to select the record date. 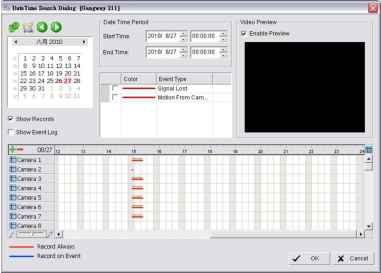 14. Set the Start Time and End Time you want to backup. (or highlight the video records which you want to backup) 15. Select the cameras you want to backup. 16. Click the OK button. 1 ... 10 11 12 13 14 15 16 |
|||||||||||||||||