
8(903)201-21-74
ООО "ЧетыреДатчика"
|
Оператор: 8(903)201-21-74 ООО "ЧетыреДатчика" |
|
Оператор: 8(903)201-21-74 ООО "ЧетыреДатчика" |
Главная страница Nvrmini 2 user manual 1 2 3 4 5 ... 16 4. Click the Search button.  5. The system will list all the currently available cameras. The inserted cameras are shown in blue. Click the ♦ icon to add a camera into your camera list. Camera Setting Camera Settirtgs Camera Search Camera Search Search Search Complete  Model Model Name MAC Address 6. After clicking the ♦ icon, the camera setting page will pop up. Click the item to which you want to add a camera. 7. Insert the camera name, user name, and password. 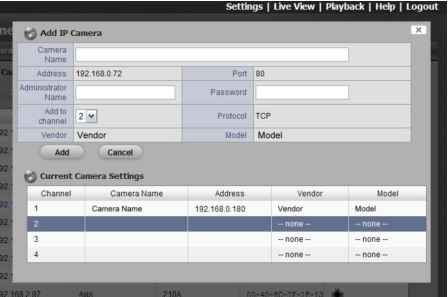 To have better compatibility between camera and system, please make sure the privilege of camera credential is admin-level. 8. Click the Add button to add it.  9. After clicking the Add button, the updated camera list will be displayed in the Camera Setting tab. 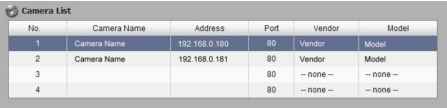 2.1.2 Add Cameras Manually 1. Open Internet Explorer and log in to the unit. 2. Click IP Camera / Camera Settings. 3. Click the Camera Settings tab, and the camera list will be displayed on the bottom of the page. 4. Click on the camera list for the channel you want to add and enter the cameras information. 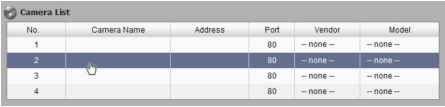 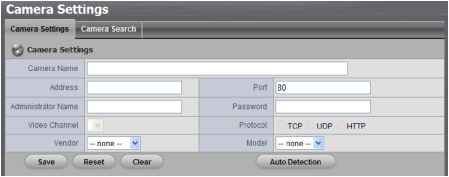 Camera name: The name of the camera. Address: The IP address. Port: The transmission port. Administrator Name: Login username. Password: Login password. Video Channel: Select the number of analog cameras supported by one video server or select the number of IP cameras possessing multiple lens/channels. Protocol: Data transmission protocol. Vendor: Camera vendor name. Model: Camera model name. To have better compatibility between camera and system, please make sure the privilege of camera credential is admin-level. 5. Click the Save button. Save: Save the information of this camera. Reset: Return to the latest saved settings of the selected camera. Clear: Set all the settings to default value. Auto Detection: After inserting IP address, port, username, and password, click this button to automatically detect other camera information, including Channel, Protocol, Vendor, and Model. 2.1.3 Modify Camera Information 1. Open Internet Explorer and log in to the unit. 2. Click IP Camera / Camera Settings. 3. Click the Camera Settings tab. 4. Click the camera which you want to modify. 5. Modify the information of this camera. 6. Click the Save button. 7. Use the same method to replace a camera if needed. 2.1.4 Modify Camera Parameters 1. Open Internet Explorer and log in to the unit. 2. Click IP Camera / Camera Parameters. 3. Click the Camera Parameter tab. 4. Click the camera which you want to modify on the camera list. 5. Modify the information of this camera. 6. Click the Save button.  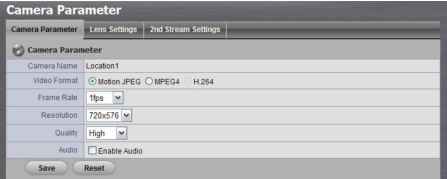 Camera Name: The name of the camera. Video Format: Choose the type of format which this camera supports. Frame rate: Select the frame rate of the camera. Resolution: Select the resolution of the camera. Quality: Select the image quality of the camera. Audio: Check the Enable Audio option to view and enable audio recording. 2.1.5 Set up Lens Settings 1. Open Internet Explorer and log in to the unit. 2. Click IP Camera / Camera Parameters. 3. Click the Lens Settings tab. 4. Click the camera which you want to modify in the camera list. 5. Modify the information of this camera. 6. Click the Save button. 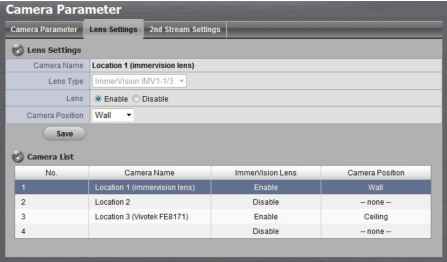 Camera Name: The name of the camera. Lens Type: There are two types of lens currently, ImmerVision and Vivotek (FE8171V). You are not allowed to select type so far, type depends on camera model. Lens: Enable or disable lens function. Camera Position: Select the position of the camera. If users enable the lens while lens is not installed correctly or not even installed, a warning message will pop up as a notification if users are trying to operate lens on liveview page. 2.1.6 Set up 2nd Stream Stream profile is designed for mobile client and lower fps live stream display. Without stream profile integration, users cannot watch live video on mobile client nor select lower fps stream on liveview. Further, for performance consideration, we fix the resolution and framerate for each brand/series. You can refer to appendix for supporting list. 1. Open Internet Explorer and log in to the unit. 2. Click IP Camera / Camera Parameters. 3. Click the 2nd Stream Settings tab. 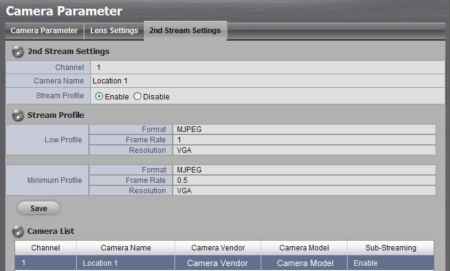 Stream Profile: The default status is Disable. If you want mobile client user to access to this camera, you can select Enable, and click Save button in the middle of the page. Low Profile: The stream profile, under 300kbps, is designed for mobile client single-view. Minimum Profile: The stream profile, under 100 kbps, is designed for  mobile client multi-view. 2.1.7 View Camera Status 1. Open Internet Explorer and log in to the unit. 2. Click IP Camera / Camera Status. 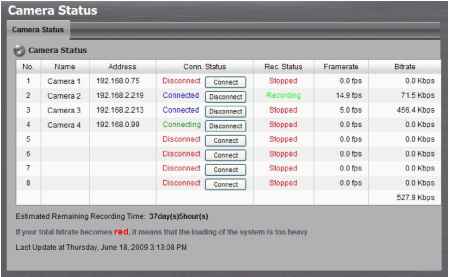 Conn. Status: The status of the connection. Click the Connect or Disconnect button to change the connection status. Rec. Status: The set recording schedule of this camera in this time. Framerate: The frame rate of this camera. Bitrate: The transmission bit rate of this camera. Estimated Remaining Recording Time: Estimated remaining recording time is dividing the current free capacity by dynamic total bitrate. If your total bitrate becomes red, it means that the loading of the system is too heavy. 2.2 Recording & Event Setup 2.2.1 Recording Mode Setup 1. Open Internet Explorer and log in to the unit. 2. Click Recording & Event / Recording settings. 3. Click the Recording Mode tab. 4. If selecting Always Recording, the chosen cameras will begin to record immediately.   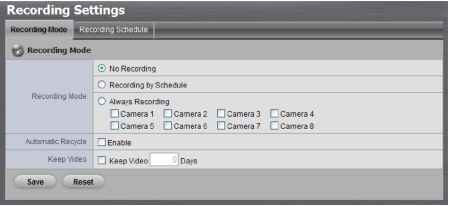 No Recording: Turn off the recording. Recording by Schedule: Recording by schedule. Always Recording: Permanently turn on the chosen cameras. Automatic Recycle: Check the Enable option to recycle disk space automatically when the disk space is full. Keep Video: Set a period during which the recorded video clips will be kept intact. (max: 365) The privilege of automatically recycle is higher than keep video if you select both. 2.2.2 Recording Schedule / Event Setup Instead of Always Recording, you can begin the recording by setting the Recording Schedule. 1. Open Internet Explorer and log in to the unit. 2. Click Recording & Event / Recording Settings. 3. Click the Recording Schedule tab. 4. Check the Day or Week mode. Day: Schedule the recording to turn the recorder on and off at the same time every day according to your setting. Week: Schedule the recording for each day of the week differently. 5. Click the schedule of the camera which needs to be modified. 6. Click the column at the bottom of the page.  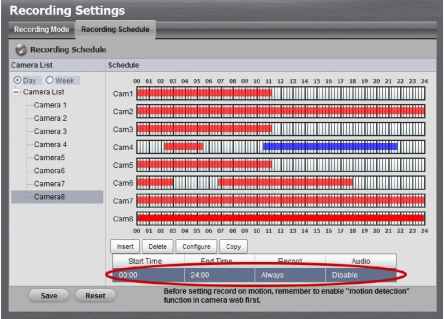 Insert: Insert new schedules. Delete: Delete the selected schedule. Configure: Modify the schedule and recording mode settings. Copy: Copy current Day Schedule to other channel(s); copy current Week Schedule to other day(s) of a week or to other channel(s). 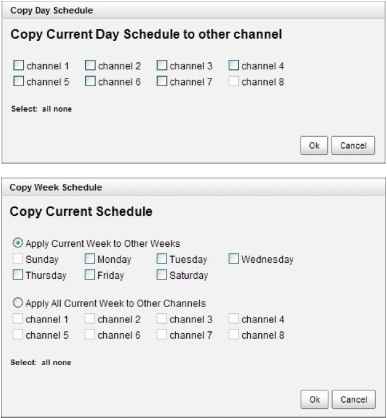 7. The default setting of the cameras recording schedule is from 00:00 to 24:00. If you want to modify the time slot, click the Configure button to modify the default settings first. 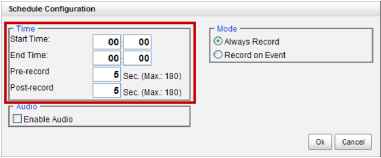 8. Choose the recording mode. 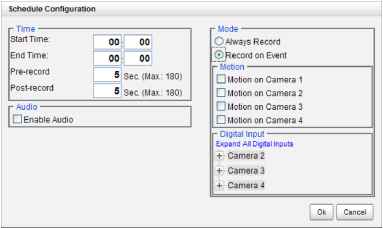 Always Record: Always record. Record on Event: Record when events triggered. The event can be triggered by Motion or Digital input. When setting the event Motion, please first ensure that the motion detection function of the camera has been enabled. 9. If you want to add another new schedule, click the Insert button to add a new one.  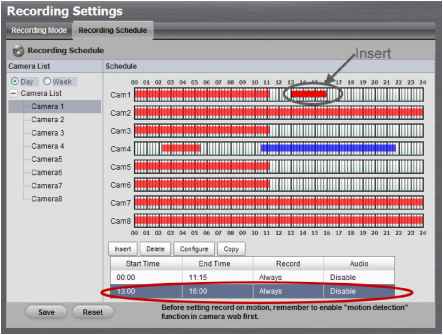 10. Click the Save button. When changing the motion detection settings of a camera, make sure to disconnect your unit and that camera first. Once you have finished, re-connecting them will update the settings in your unit. When setting an event, Motion or Digital input can be triggered from other cameras. This means that if the system detects motion or digital input from other cameras or I/O Box, the camera will begin recording.  There is another way to set the schedule. If you want to change the recording time length, drag the end of the time bar from 24:00 back to the length you wish, and then drag the beginning of the time bar to the point at which you would like it to commence recording. (You may also click the Insert button to add new schedules.)   1 2 3 4 5 ... 16 |