
8(903)201-21-74
ООО "ЧетыреДатчика"
|
Оператор: 8(903)201-21-74 ООО "ЧетыреДатчика" |
|
Оператор: 8(903)201-21-74 ООО "ЧетыреДатчика" |
Главная страница Nvrmini 2 user manual 1 2 3 4 5 6 ... 16 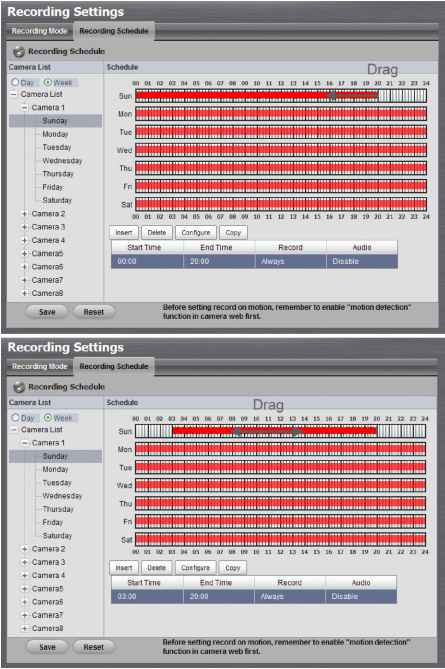 2.2.3 Camera Events and Responding Actions Setup 1. Open Internet Explorer and log in to the unit. 2. Click Recording & Event / Event & Action Management. 3. Choose the camera, and then select one of the events. The event list depends on camera its own ability.  Connect lost: When a connection between the camera and this unit is lost, the system will trigger an action. Motion from Camera: When video motion is detected, the camera triggers an action. Input: Any external input can trigger an action. When setting the event Motion from Camera, make sure to set up the cameras motion detection function first. Besides, event log will be recorded only if event is selected on this page. 4. Click the Configure button to enable the event and select the active period. 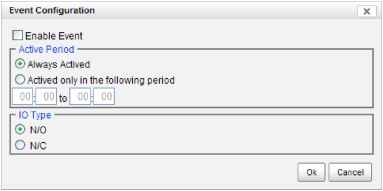 Always Actived: The selected event is always active. Actived only in the following period: The selected event is only active in the designated time, which able to cover two days e.g. from 18:00 to 09:00. I/O Type: Check one of the options of I/O type. N/O means normal open,  while N/C means normal close. 5. Click the Add button to set up the responding actions of this event. 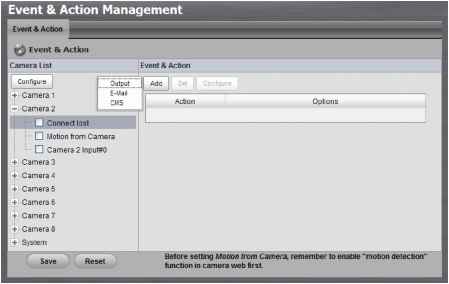 Output: When an event occurs, the system will send an output signal to other connected devices. E-Mail: When an event occurs, the system will send e-mail notifications. Make sure to add an e-mail address first. CMS: When an event occurs, the system will send out a signal to CMS. CMS will highlight this event. 6. Click the action, and then click the Configure button to modify the details of that action if necessary. 7. Click the Save button. After selecting camera events, the event information will display on the screen when its triggered. 2.2.4 I/O Box Input and Responding Action Setup 1. Open Internet Explorer and log in to the unit. 2. Click Recording & Event / Event & Action Management. 3. Click the Event & Action tab. 4. Select an input of I/O Box from list. 5. Click the Add button to set up the responding actions of this event. 6. Click the action, and then click the Configure button to modify the details of that action if necessary.  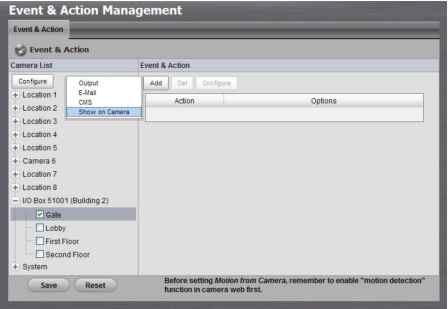 Output: When an input is triggered, the system will send an output signal to other connected devices. E-Mail: When an input is triggered, the system will send e-mail notifications. Make sure to add an e-mail address first. CMS: When an input is triggered, the system will send out a signal to CMS. CMS will highlight this event. Show on Camera: When an input is triggered, the system will show an alert message on selected camera(s) of screen. 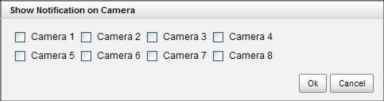 7. Click the Save button. 2.2.5 System Events and Responding Actions Setup 1. Open Internet Explorer and log in to the unit. 2. Click Recording & Event / Event & Action Management. 3. Click the Event & Action tab. 4. Click System to unfold the list of system events, and then select one of the five events. 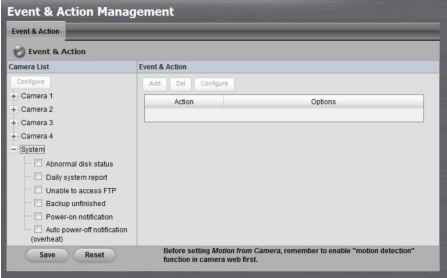 Abnormal disk status: When there is no enough disk space for recording or when disk is abnormal for accessing, the system will trigger an action. Daily system report: Enable users to know the system information, HDD usage, and Disk status everyday through E-mail without accessing to the unit to check. Unable to access FTP: The action will be triggered when the connection between the unit and FTP server is lost. Backup unfinished: If there is any file which the system didnt complete the backup process, the file(s) name will be listed and send out through E-mail after finishing the last file of this backup schedule. Power-on notification: Record the time as power was turning on. Auto power-off notification: If overheat was happened, users will be notified that power is auto off via E-mail. 5. Click the Add button to set up the responding actions of this event. Follow the steps in the previous section. 6. Click the Save button. E-Mail is the only one action to the event Daily system report, Unable to access FTP, Backup unfinished, Power-on notification and Auto power-off notification (overheat). In addition to select a contact, remember to insert the time of sending daily system report.  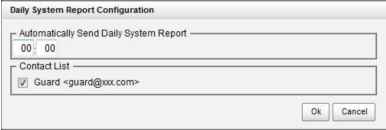 2.2.6 SMTP Server Setup 1. Open Internet Explorer and log in to the unit. 2. Click Recording & Event / E-Mail. 3. Click the SMTP Server tab. 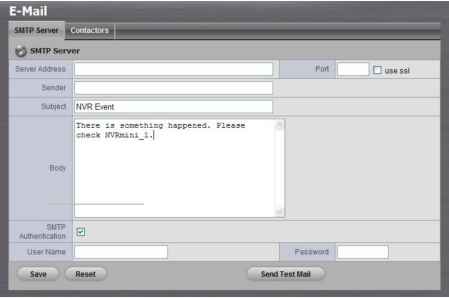 Server Address: SMTP (Simple Mail Transport Protocol) server IP address. Port: SMTP port. Sender: Sender information. Subject: The subject of the mail. Body: E-Mail content. SMTP Authentication: Before sending out an E-Mail, enter the user name and password for SMTP authentication. Username Password 4. Click the Send Test Mail button and the system will send a test mail to the sender. Check it after testing. 5. Click the Save button. 2.2.7 Add Event Contacts 1. Open Internet Explorer and log in to the unit. 2. Click Recording & Event / E-Mail. 3. Click the Contactors tab. 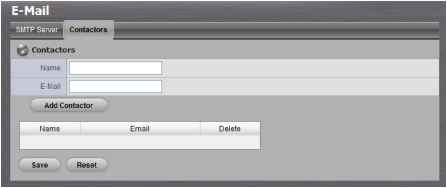 Add Contactor: Add this new contact into the contact list. Reset: Return to the latest saved settings of the contact list. Save: Save this time modification of the contact list. 4. Insert the name of a new contact. 5. Insert the e-mail address of this new contact. 6. Click the Add Contactor button. 7. Click the Save button to save this modification of the contact list. 2.3 RAID & File Settings 2.3.1 Create a RAID Volume In this system, the term RAID volume refers to one or more disk drives working together as a RAID logical drive. You must create a RAID volume before starting to record. 1. Open Internet Explorer and log in to the unit. 2. Click RAID & File System / RAID Management. 3. Click the Create tab. 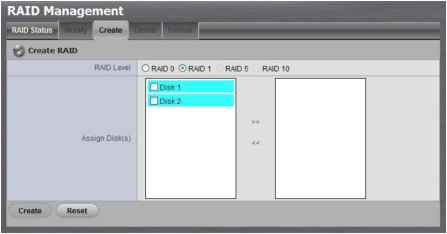 4. Choose the RAID level you prefer for your disk array. 5. Check boxes of disks and click the >> button to assign disk drives for this volume. 6. Click the Create button. 7. A confirmation dialog pops up. Check the Yes, I want to create volume with those disk(s) box, and click the Yes, create it button. 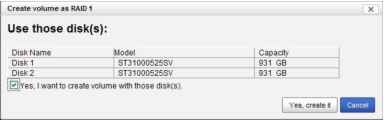 8. Creating RAID volume takes a while, depending on the size of disks and the RAID level you choose. You can start recording during RAID creation. 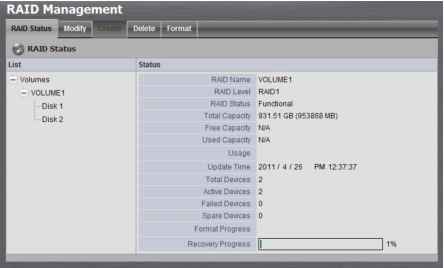
2.3.2 View RAID Volume Status RAID status refers to the disk drives on your unit and how they are arranged into a RAID volume. 1. Open Internet Explorer and log in to the unit. 2. Click RAID & File System / RAID Management. 3. Click the RAID Status tab to view the status of your RAID Volume. 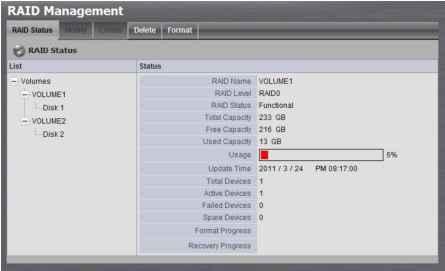 RAID Name: Name of your RAID, automatically assigned when it was created. RAID Level: RAID 0, 1, 5, or 10, specified when it was created. RAID Status: Functional is normal. Critical means there are some problems on RAID volume, but the recording status is normal. Offline means that no volume is found, so recording is stopped and you cannot access your data either. File system error means that RAID volume is existed but unmounted, so recording is stopped and you cannot access your data either. Capacity: Total, free, used data capacity of the RAID volume. Update Time: The time of volume created/updated. Devices: Total number of disks and the number of active, failed, spare disks. Format Progress: The status of RAID format Recovery Progress: The status of RAID recovery 2.3.3 View Disk Drive Information 1. Open Internet Explorer and log in to the unit. 2. Click RAID & File System / RAID Management. 3. Click the RAID Status tab. 4. Click on a disk directly to view the information. 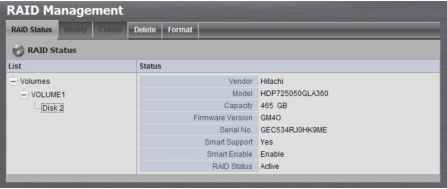 2.3.4 Modify RAID Volume This function is designed for replacing a broken hard drive with a new one, instead of modifying RAID level. In the condition of critical RAID status, its a warning to show that one of disks of this RAID volume may be damaged. Even though its no impact on the recording function, youd better to replace a new disk to make sure the volume with data protection mechanism. This function is not applied to RAID 0, since there is no data protection mechanism by  1 2 3 4 5 6 ... 16 |
|||||||||||||||