
8(903)201-21-74
ООО "ЧетыреДатчика"
|
Оператор: 8(903)201-21-74 ООО "ЧетыреДатчика" |
|
Оператор: 8(903)201-21-74 ООО "ЧетыреДатчика" |
Главная страница Nvrmini 2 user manual 1 2 3 4 5 6 7 ... 16 its nature. In case of any unexpected damage, we recommend users to unplug running HDD by this method, which can be viewed as security hard drive remove. 1. Open Internet Explorer and log in to the unit. 2. Click RAID & File System / RAID Management. 3. Click the Modify tab.  4. Click on the volume you want to modify. The information of this volume will be displayed under the Modify Volume section.   5. After removing the damaged disk. Add a free disk to replace the damaged, and click the Modify button. 6. A confirmation dialog pops up. Check the Yes, I want to modify this volume box, and click the Yes, modify it button.  7. Modifying RAID volume takes a while, depending on the size of disks you choose. Recording wont be stopped during the modification, and the data of this RAID volume is fully accessible.  2.3.5 Delete a RAID Volume 1. Open Internet Explorer and log in to the unit. 2. Click RAID & File System / RAID Management. 3. Click the Delete tab. RAID Management RAID Status МиИу RATOList
4. Click the option button beside the RAID Volume you want to delete. 5. Click the Delete button. 6. A confirmation dialog pops up. Check the Yes, I want to delete this volume box, and click the Yes, delete it button. 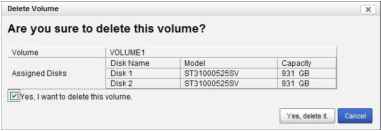 7. System will restart automatically after RAID volume is deleted When you delete a RAID Volume, all the folders in the RAID volume and all the data saved in the folders will be deleted. Backup any important data before deleting a RAID Volume. 2.3.6 Format Neither pressing reset button nor loading default setting, the data of RAID volume wont be deleted, which implies that format is the only way to clean the RAID information from disks. 1. Open Internet Explorer and log in to the unit. 2. Click RAID & File System / RAID Management. 3. Click the Format tab. RAID Management RAID Status I
4. Click the option button beside the RAID Volume you want to format. 5. Click the Format button. 6. A confirmation dialog pops up. Check the Yes, I want to format this volume box, and click the Yes, format it button.  7. System will restart automatically after volume format is complete. 2.3.7 Modify the My Network Places Protocol Settings There are another two ways to access the recorded data in the unit: through Workgroup or through FTP.  1. Open Internet Explorer and log in to the unit. 2. Click RAID & File System / Protocol Control. 3. Click the Windows tab. 4. Check and enter the units information. 5. Click the OK button. 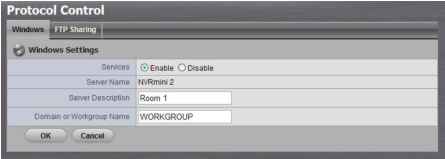 Services: Enable to let users access this unit through Windows Explorer. Server Name: The name of this unit, which is set in the Setup tab of the Network Setup function. Server Description: The name which will be displayed in Windows Explorer. Domain or Workgroup Name: The name of this units workgroup. 2.3.8 Modify the FTP Protocol Settings 1. Open Internet Explorer and log in to the unit. 2. Click RAID & File System / Protocol Control. 3. Click the FTP Sharing tab. 4. Check and enter the settings of this unit. 5. Click the OK button. 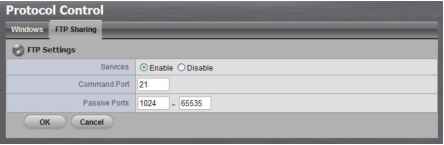 Services: Whether users can access this unit through FTP or not. Command Port: The port for commands between a server and a client. Passive Ports: The data transmission port of passive mode. 2.4 Auto Backup This feature enables you to automatically backup the recorded video of the previous date to FTP site. There are two steps to enable the function, one is Set up Backup Schedule, another is Set up Backup Server. 2.4.1 Set up Backup Schedule 1. Open Internet Explorer and log in to the unit. 2. Click RAID & File System / Auto Backup Management. 3. Click the Backup Schedule tab. 4. Set up backup schedule, select the backup channels, and check the Enable option to enable Auto Backup.
Auto Backup: Check the Enable option to enable this function. Daily Backup Time: The daily scheduled time to start backup process. Start Time: The start time of recorded video of the previous date. End Time: The end time of recorded video of the previous date. Camera: Select the channel(s) to backup. 5. Current Event Settings shows the condition of the events of auto backup - enable or disable. Follow the steps of System Events and Responding Actions Setup to configure the event & action. The system backups recorded video files one by one. If the connection between the unit and FTP server is normal, but some problems of FTP causes the system unable to write files on FTP, the system would try each file three times before starting to backup  the next file. If the connection is lost, the system would wait for the connection, so no file would be skipped. 2.4.2 Set up Backup Server 1. Open Internet Explorer and log in to the unit. 2. Click RAID & File System / Auto Backup Management. 3. Click the Backup Server tab. 4. Set up the FTP server and create a folder for backup files. The folder format is FolderName , FolderName/SubFolderName , and so on. For example: AutoBackup/NVR 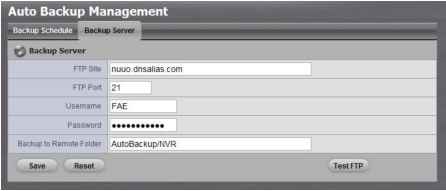 5. After setting up all the information, click the Test FTP button and the system will create a folder to FTP. Check it after testing. In this case, the route of the tested file will be: ftp: nuuo.dnsalias.com/AutoBackup/NVR/NVRmini2 ComputerNa 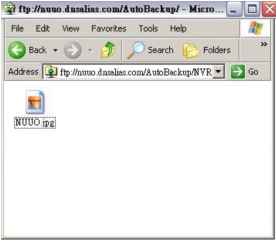 6. Click the Save button. Make sure the FTP account with privileges of administrator who is able to upload, rewrite, delete files, and create new folder. Besides, make sure the FTP server has enough space for auto backup. To avoid the failure of auto backup, please check the normality of FTP server regularly (e.g., enough space for video, system conditions.) 2.5 Network Setup 2.5.1 View Network Status 1. Open Internet Explorer and log in to the unit. 2. Click Network Setup / Network Setup. 3. Click the Information tab to view the units network information. 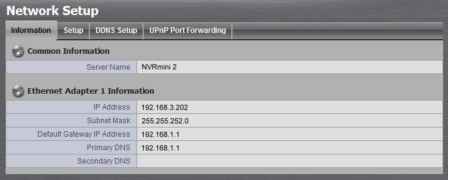 2.5.2 Network Settings 1. Open Internet Explorer and log in to the unit. 2. Click Network Setup / Network Setup. 3. Click the Setup tab to set up the network settings of your unit.  
Server Name: Name your unit. Because of the internal data modifications required, it takes a few seconds to change the name of your unit. Log in again after configuration activated. Internet Protocol: Choose to obtain an IP address from external DHCP server automatically, or configure the IP address manually. IP Address: IP address of this unit. Subnet Mask: Subnet mask address. Default Gateway IP Address: Gateway IP address. Primary DNS: Primary DNS (Domain Name System) address. Secondary DNS: Secondary DNS address. 4. Click the DDNS Setup tab to enable Dynamic Domain Name Server function, allowing you to connect unit with dynamic IP address. 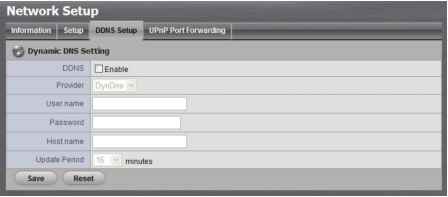 2.5.3 Auto Port-Forwarding   This function is designed for saving time in port configuration on router if users want to access the unit (in LAN) from WAN. Once enabling UPnP Service on router, users can do port-forwarding for setting page (default: 80), liveview (default: 5150), playback (default: 5160), and CMS (default: 5170) automatically. 1. Open Internet Explorer and log in to the unit. 2. Click Network Setup / Network Setup. 3. Click the UPnP Port-Forwarding tab. 4. Click the Search button, and the searched routers will be listed. 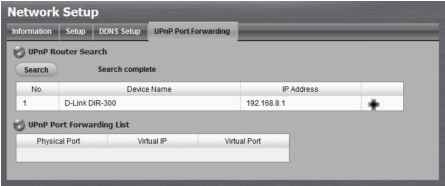 5. Select the searched router, and all UPnP ports configured on this router will show under the UPnP Port Forwarding List. 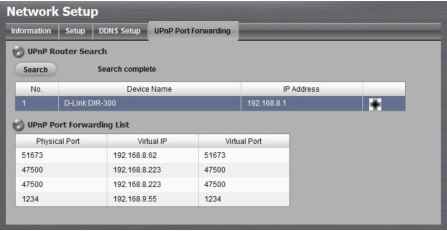 6. After selecting one of searched routers, click the ♦ icon to set up port-forwarding to this router automatically. You will find ports of setting, liveview, playback and CMS are listed. 1 2 3 4 5 6 7 ... 16 |
||||||||||||||||||||||||||||||||||||||||||||||||||||||||||||||||||||||||||||||