
8(903)201-21-74
ООО "ЧетыреДатчика"
|
Оператор: 8(903)201-21-74 ООО "ЧетыреДатчика" |
|
Оператор: 8(903)201-21-74 ООО "ЧетыреДатчика" |
Главная страница Nvrmini 2 user manual 1 ... 4 5 6 7 8 9 10 ... 16 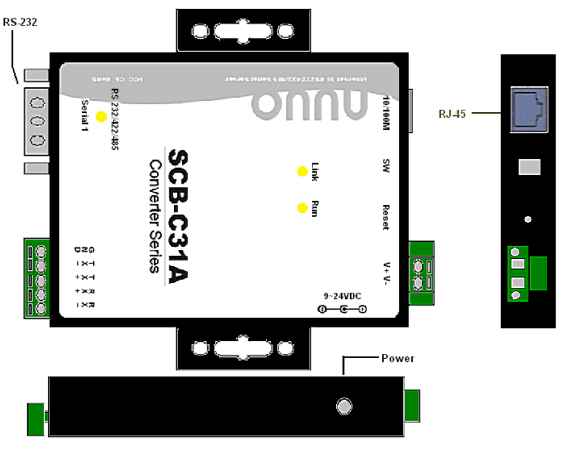 The LED Indicators: LINK LED: Ethernet cable connection and data active. RUN LED: System is ready (Blinking). Serial 1: Transiting/Receiving Indicator. 3.1.3 Software Installation - SCB-C31A Step 1: Use IE-browser to setup SCB-C31A, the default IP address is 192.168.1.1  Step 2: Setup IP address and password in Server page, and click the Save button. Each time you switch the page of the web, please click Save at first. If you leave this page without saving, all changes will be ignored.  Step 3: Setup Password if needed. Password is only using to activate a security feature on the serial server. Once a password is entered it will be required to access the menu and make change of configuration when access. Please write down the Serial number and MAC address, these two parameters are necessary when user forget your password. 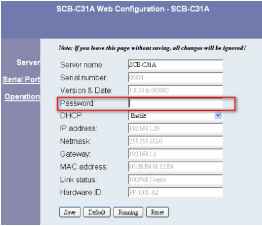 Step 4: Setup according to your POS or Cash Register. Usually all devices are default setting, you can reserve your time to pass this step. Step 5: Please restart/reset the box after changing configurations to active setup. To reset the unit manually apply power, insert a small plastic tool, and press lightly depressing reset located between the switch. Hold for 3 seconds and release. The Link and Run light will go out and turn back on. The SCB-C31A will revert to the last setting. Every time you change the configuration of SCB-C31, please check above setting, especially maximum connection and Remote IP address to avoid connection fail. 3.1.4 Connection via TCP Client If the cash register possess network, please install system according to following diagram and purchase a POS license to activate this function.   Cash register(TCPserver) 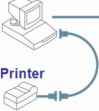 Ethernet NVRmini 2 (TCP client)  3.2 Software Setup 3.2.1 Activate POS License If you are not the SCB-C31 user, you need to activate POS license before starting the following settings, please refer to License Activation for details. 3.2.2 NVR POS Setting 1. Open Internet Explorer and log in to the unit. 2. Click POS & I/O / POS Settings. 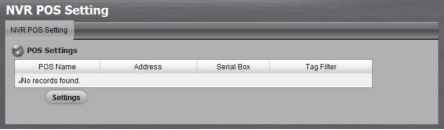 3. Click the Settings tab to set POS application. 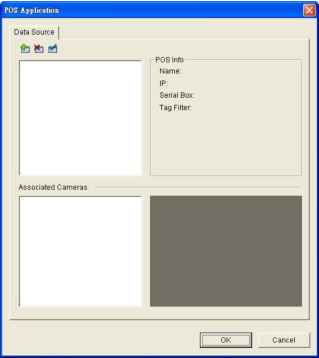 Data Source: List of all the data sources. Й Insert: Click to insert POS and do the POS settings. See Insert POS Setting for details. ft Delete: Click to remove the selected POS from the list. See Delete POS Device for details. Configure: Click to configure the selected POS and modify the POS settings. See Configure POS Setting for details. POS info: The setting information of the selected POS on this window. Name: Name of the POS data source. IP: IP of the POS data source. Serial Box: The serial box data source used. Tag Filter: Tag type to filter the data from POS. See Tag Filter for details. Associated Cameras: List of all the associated cameras of the selected POS. 4. Click the OK button to finalize the modification. 3.2.3 Insert POS Setting 1. Click Й Insert button to open the POS Setting window. 2. Set up basic data source, including Name, Model, IP address, and Port. There are three types of models. SCB-C31: The device possesses one POS license, and should be equipped with the cash register not working as TCP server. SCB-C31A: The difference from SCB-C31 is not possessing one POS license, so user should activate POS license. TCP Client: Cash register possesses with network, so no need to have SCB-C31A as a converter. POS license is needed. 3. After setting, click Test Connection to test POS device connection. 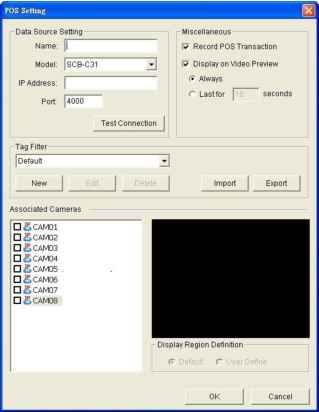 Set up Miscellaneous options, including Record POS Transaction and Display on Video Preview. Record POS Transaction: Select this checkbox to record POS transaction data. Users are allowed to search the POS data. Display on Video Preview: Select this checkbox to display POS transaction overlay on associated camera live video. Two types of transaction data display time: > Name: Name of the POS data source. > Always: Keep transaction data on video until receiving next transaction date. > Last for seconds: Each transaction data only lasts on video for seconds after receiving the last data of transaction. 5. Select Tag Filter. See Tag Filter for details. 6. Select the camera of Associated Cameras to display POS transaction data overlay on live video. 7. Set up display area for each camera video in Display Region Definition. Default: The default display area is in the upper left corner of video image. User Define: Enable User Define, and define display area by dragging rectangle 8. Click the OK button to save. 3.2.4 Delete POS Device 1. Choose POS device. 2. Click Delete button to remove this POS device from the system. 3.2.5 Configure POS Setting 1. Choose POS device. 2. Click 1 Configure button to open the POS Setting window. 3. Refer to Insert POS Setting to modify configuration. 3.3 Tag Filter The original transaction data from POS system is hard to read. Users can define filters to make the POS strings meaningful. The system also provides a simple default tag filter to filter out same common EPSON commands, users can base on this default tag filter to edit their customized filters. 3.3.1 Add New Tag Filter 1. Click Й Insert button or choose a device and click Configure button to open the POS Setting window. 2. Click New to open tag filter window. General: Name of Tag Filter and Connect button. Original Data: Original transaction data from POS device. Filtered Data: Filtered data after definition. Filter Function: Tool used for defining filter type. Filter List: List of all filters. Data Tool: Clear/import/export buttons to clear/import/export the original and filtered data. Filter Tool: Upper/down buttons to arrange the priority of each filter; remove button to remove the filter from list. 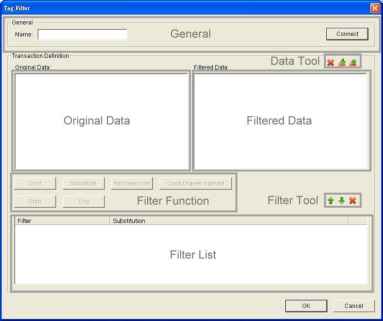 3. Enter name of this tag filter. 4. Click Connect button to capture POS transaction data from POS device. The original transaction data will be shown on the left window. If you dont want the data keep importing when editing filter, click Disconnect button to stop connecting. 5. Data Tools > Clear: Remove data from Original Data window and Filtered Data window. > Import: Reload exported binary data. > Export: Capture and export original binary data. 6. Start to edit tag filters. Click and drag to select text from Original Data window, and then use the below six buttons to define filters. The filtered transaction data will be shown on the right window.  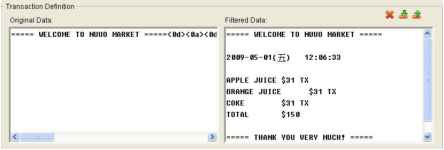 Omit: Neglect the selected text which is meaningless or not important. The text will disappear on the right window. , Transaction Definition-Original Data: WELCOME TO NUOO MORKET =====<ed><ea><ed WELCOHE TO NUOO MORKET Substitute: Use another word(s) to replace the selected text. The system will pop up a substitution panel for replacing word(s) users want. The replaced text will be shown on the right window.  Add New Line: Define the selected text as the symbol for changing to new line. The result will be shown on the right window. 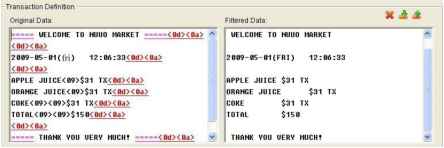 Start: Define the selected text as the symbol for transaction beginning. The filtered data will be separated line as below.  Cash Register Opened: Define the selected text as the symbol for opening cash register. The filtered data will be shown the <Cash Drawer Open> mark as below. 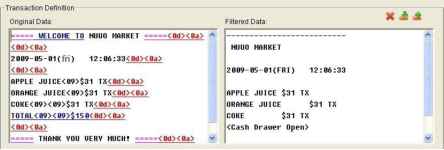 End: Define the selected text as the symbol for transaction ending. The filtered data will be separated line as below. 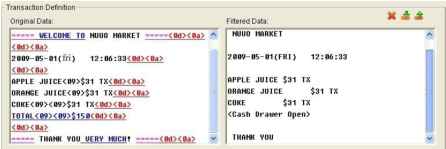 7. Filter Tools Up: Move a tag filter up; the upper filter will be operated earlier. Down: Move a tag filter down; the lower filter will be operated later. Delete: Remove a filter from this tag filter list.  8. Click the OK button to save. 3.3.2 Edit Tag Filter 1. Select Tag Filter name from drop-down menu. 2. Click Edit button. 3. Configure the Tag Filter window. 4. Click the OK button to save. 3.3.3 Delete Tag Filter 1. Select Tag Filter name from drop-down menu. 2. Click Delete button to delete it. 3.3.4 Import/Export Tag Filter 1. Click Import/Export button and select Import/Export URL. 2. Click Open/Save to Import/Export Tag Filter. 3. After importing tag filters, users can simply select tag filter from drop-down menu without editing new tag filter. 3.4 POS Display Font The system allows users to set up the fonts of POS transaction data on live view video and playback video. 3.4.1 Live View 1. Open Internet Explorer and log in to the unit. 2. Click the Live View. 3. Click the General Setting button to open Live View Setting window.  4. Select the font, font size, font color and background for the POS transaction data overlaid the video. 1 ... 4 5 6 7 8 9 10 ... 16 |