
8(903)201-21-74
ООО "ЧетыреДатчика"
|
Оператор: 8(903)201-21-74 ООО "ЧетыреДатчика" |
|
Оператор: 8(903)201-21-74 ООО "ЧетыреДатчика" |
Главная страница Nvrmini 2 user manual 1 ... 5 6 7 8 9 10 11 ... 16 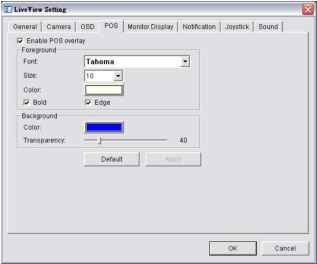 5. Click the OK button to save. 3.4.2 Remote Live Viewer 1. Startup > NUUO NVRmini 2 > Remote Live Viewer 2. Click the General Setting button to open Live View Setting window. 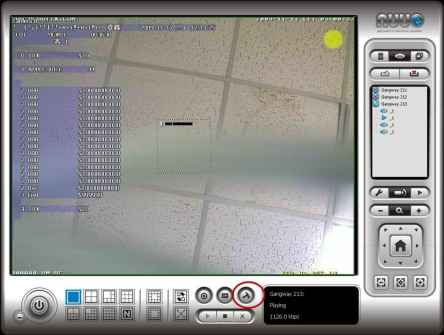 3. Select the font, font size, font color and background for the POS transaction data overlaid the video. 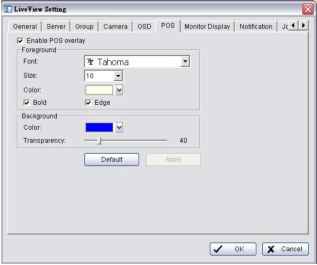 4. Click the OK button to save. 3.4.3 Playback 1. Open Internet Explorer and log in to the unit. 2. Click the Playback button. 3. Click the Setting button to open Setting window. 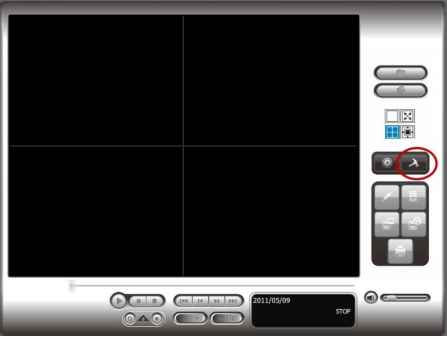 4. Select the font, font size, font color and background for the POS transaction data overlaid the video. Also, select the type of transaction data display time. 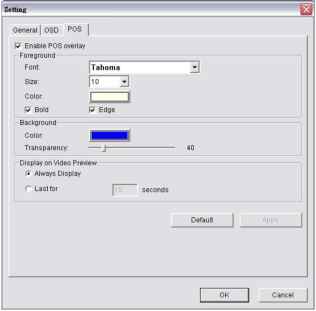 3.4.4 Playback System 1. Startup > NUUO NVRmini 2 > Playback System 2. Click the Setting button to open Setting window. 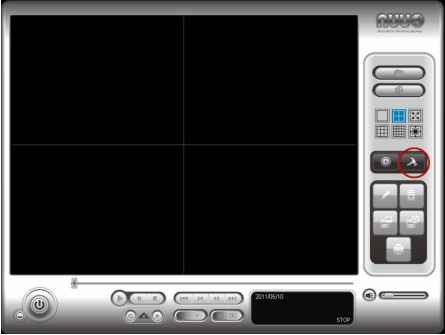 3. Select the font, font size, font color and background for the POS transaction data overlaid the video. Also, select the type of transaction data display time. 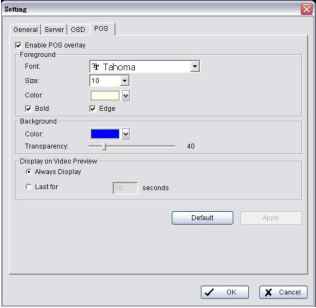 3.5 POS Transaction Data Search POS Search tool is used to search key word of all transaction data. 3.5.1 Search POS Transaction Data through Playback 1. Open Internet Explorer and log in to the unit. 2. Click the Playback button. 3. Click the Open Record button to open Data Time Search Dialog window. 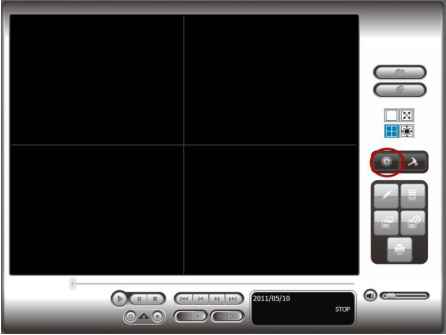 4. Click the POS Search button to open POS Search Dialog window. 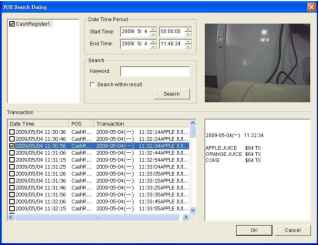 5. Select a POS device(s) from the POS list. 6. Set up Start Time and End Time in Data Time Period section. 7. Enter the keyword you want to search. 8. Click the Search button, the results will be shown in Transaction table. 9. Select an item from Transaction table, the transaction detail will be shown in the table of lower right corner, and the recorded video of associated camera will be shown in the upper right corner. 10. Select the checkbox of Search within result, and enter a keyword, you can search the data within the results. 3.5.2 Search POS Transaction Data through Playback System 1. Startup > NUUO NVRmini 2 > Playback System. 2. Click the Open Record button to open Data Time Search Dialog window. 3. Click the Remote Server Site icon on the top of the window to select the server users want to access. 4. Follow the step 4 through 10 of Search POS Transaction Data by Playback to search the data. 3.6 Playback Video with POS Data Enable POS overlay in Setting window to view recorded video with POS transaction data (Refer to POS Display Font). If the option is enabled, the system will auto display transaction data when playing recorded video. There are two modes to select video period.  3.6.1 Select Period by POS Search 1. Refer to POS Transaction Data Search. 2. Select the transaction data from the result list, and click OK. Date Time POS 11:30:36 CashR. 11:30:46 CashR. Og/OSM 11:30:56 CashR. □ 2009/05/04 □ 2009/05/04 □ 2009/05/04 □ 2009/05/04 □ 2009/05/04 □ 2009/05/04 □ 2009/05/04 □ 2009/05/04 □ 2009/05/04 □ 2009/05/04 □ 2009/05/04 31:06 31:15 31:25 31:26 31:36 31:46 31:56 32:06 32:15 CashR. CashR. CashR. CashR. CashR. CashR. CashR. CashR. CashR. Transaction 2009-05-04(-) 11:32:14APPLE JUL. 2009-05-04(-) ll:32:24APPLE JUL. 2009-05-04) 11:32:34APPLEJUI. 2009-05-04(-2009-G5-04(-2009-05-04(-2009-G5-04(-2009-05-04(-2009-G5-04(-2009-05-04(-2009-05-04(-2009-05-04(- 44APPLE JUL. 54APPLEJUL. :04APPLEJUL. 05APPLEJUL. 15APPLEJUL. 25APPLEJUL. 35APPLE JUL. :45APPLEJUL. 55APPLEJUI.. i > 3. The period you select from POS search results will be selected automatically. 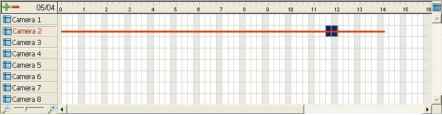 4. Click OK to playback videos. 3.6.2 Select Period by Data & Time through Playback 1. Open Internet Explorer and log in to the unit. 2. Click the Playback button. 3. Click the Open Record button to open Data Time Search Dialog window. 4. Highlight the video clip you want to review by left-clicking and dragging the time period. You may also utilize the Start Time and End Time in Date Time Period section after choosing cameras. 5. Click OK to playback videos. 3.6.3 Select Period by Data & Time through Playback System 1. Startup > NUUO NVRmini 2 > Playback System. 2. Click the Open Record button to open Data Time Search Dialog window. 3. Click the Remote Server Site icon on the top of the window to select the server users want to access. 4. Highlight the video clip you want to review by left-clicking and dragging the time period. You may also utilize the Start Time and End Time in Date Time Period section after choosing cameras. 5. Click OK to playback videos. 3.7 Backup Video with POS Data There are three ways to backup video with POS transaction data. 3.7.1 Backup through Internet Explorer 1. Open Internet Explorer and log in to the unit. 2. Click the Open Record button to select data. 3. Click the Backup button. 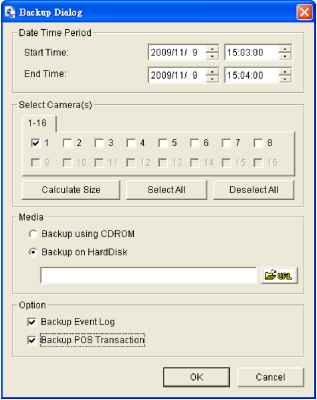 4. Check the Backup POS Transaction option. 5. Set the Start Time and End Time you want to backup. 6. Select the cameras you want to backup. 7. Select the directory you want to save the backup data. 8. Click the Backup button. 9. The system will then begin backup process automatically. 3.7.2 Backup through Playback System 1. Startup > NUUO NVRmini 2 > Playback System. 2. Click the Open Record button to select data. 3. Click the Backup button. 4. Check the Backup POS Transaction option. 5. Set the Start Time and End Time you want to backup. 6. Select the cameras you want to backup. 7. Select the directory you want to save the backup data. 8. Click the Backup button. 3.7.3 Backup through Backup System Please refer to step 1 to 14 of the content of Backup and Delete Records, and check the Backup POS Transaction option. 4. I/O 4.1 Introduction 4.1.1 System Introduction NUUO provides remote I/O solution for NVRmini/NVRmini 2 by connecting SCB-C31 with NUUO I/O Box SCB-C24/26/28. Refer to the below architecture, I/O device is connected directly with I/O Box, and input/output signal delivered in RS485 format are converted to Ethernet through SCB-C31. NVRmini/NVRmini 2 can use the signals to do more sophisticated setup, such as starting recording when input triggered, triggering output as an event happened, and much more. 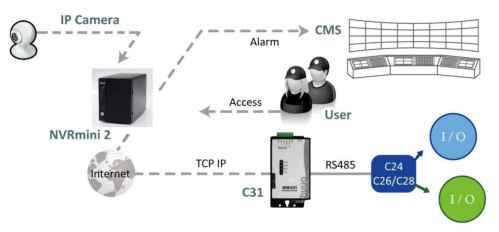 4.1.2 HW Installation SCB-C24/26/28 must work with SCB-C31 (Ethernet-RS485 converter). Further, the C31 Box cannot be used for POS and converter at the same time, and one C31 Box can be paired with one NVR unit only. Please follow the steps below to configure the devices. Step 1: Check the system switch of SCB-C31 is switched to OFF-OFF position. Step 2: Connect SCB-C31 with power source. Step 3: Connect SCB-C31 with internet by RJ45 LAN cable. Step 4: Connect I/O Box with power source. Step 5: Connect SCB-C31 and I/O Box with cable, positive connection (TX+/D+ and DATA+) and negative connection (TX-/D- and DATA-). Take SCB-C31 with I/O Box SCB-C24 for example as below. 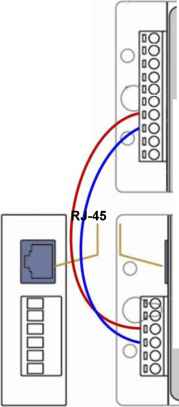 DATA+ DATRS485 SCB-C24  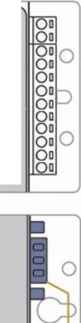 SCB-C31 Reset Switch Power Multiple I/O Boxes can be connected to a single SCB-C31. However, series connection of I/O boxes is forbidden. Furthermore, the default ID for each I/O Box is the same. Please follow the direction to setup I/O Box one by one. 4.1.3 Software Installation - SCB-C31 Step 1: Open Internet Explorer to setup SCB-C31. The default IP address is 192.168.1.1.  Step 2: Setup IP address and port. 1. Static IP Address  1 ... 5 6 7 8 9 10 11 ... 16 |