
8(903)201-21-74
ООО "ЧетыреДатчика"
|
Оператор: 8(903)201-21-74 ООО "ЧетыреДатчика" |
|
Оператор: 8(903)201-21-74 ООО "ЧетыреДатчика" |
Главная страница Nvrmini 2 user manual 1 ... 6 7 8 9 10 11 12 ... 16 2. Server Listening Port: The default port is 4000, which is not the port for setting page, but for signal transmission. 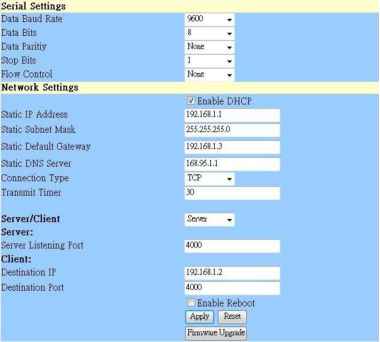 Step 3: Click the Apply button to activate configuration. Due to the stability of data transmission, one SCB-C31 can be paired with one NVR unit only. 4.1.4 Software Installation - SCB-C24/26/28 The default ID of I/O Box is identical. To avoid the conflict between Boxes, please connect only one Box with SCB-C31 and execute the setup application to change the ID from the default value (1). 1. Execute IOConfig.exe, type in the IP address and port of SCB-C31, and click the Scan button.  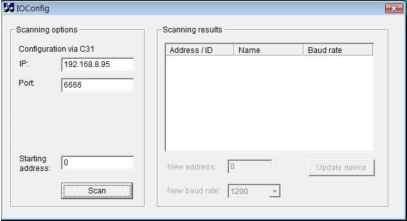 IOConfig.exe starts scanning the ID from 0 to 255, and it may take around a minute to finish scan. 2. When the I/O Box is discovered, click on the item and change the ID from the New Address field. Click the Update device button to activate the settings. 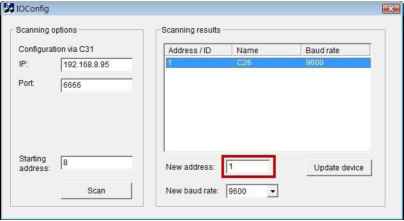 3. Scan again to make sure the configuration is validated. In this case, we changed the ID to 10, so we can modify the number of Starting address to 10 to save the searching time.  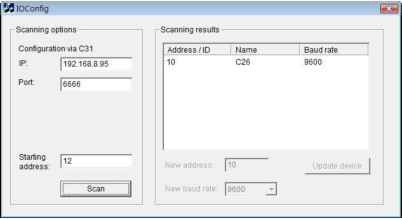 4. Refer to the HW Installation section to connect other I/O Box and repeat the steps 1 through 3 above to configure more I/O Boxes. 4.2 Software Setup 4.2.1 Add I/O Box 1. Open Internet Explorer and log in to the unit. 2. Click POS & I/O / I/O Settings / I/O Box Settings. 3. Enter the information of I/O box. 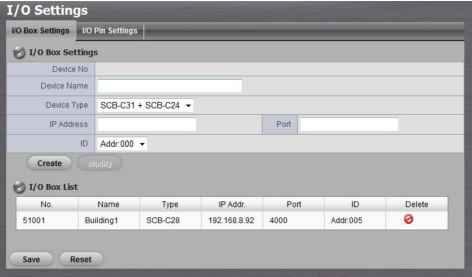 Device No: The unique ID system distributes in sequence automatically. Device Name: The name of the I/O box. Device Type: The types of I/O box, including SCB-C24, SCB-C26, and SCB-C28. IP Address: The IP Address of SCB-C31. Port: The transmission port of SCB-C31. ID: The ID of the I/O box. 4. Click the Create button, and the information will be updated in I/O Box List. 5. Repeat steps 3 and 4 to add more I/O boxes in the list. 6. Click the Save button to activate the settings. Meanwhile, system will distribute an unique ID to each device. 4.2.2 Modify I/O Box Information 1. Open Internet Explorer and log in to the unit. 2. Click POS & I/O / I/O Settings / I/O Box Settings. 3. Click the I/O box which you want to modify from the list. 4. Modify the information of this I/O box, and click the Modify button. 5. Click the Save button to activate the settings. 4.2.3 I/O Pin Setting 1. Open Internet Explorer and log in to the unit. 2. Click POS & I/O / I/O Settings / I/O Pin Settings. 3. All input and output pins are shown in this page, including the ones from cameras and I/O boxes. Check the box to enable a pin (defaulted), and type a name in the field for each I/O pin. 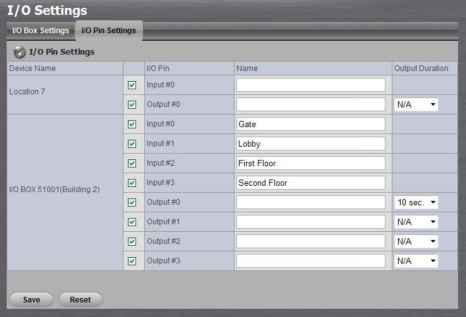 4. For output pin, you can configure its duration time to control how long output acts after its triggered. The duration range is 3 sec~60 sec. N/A stands for unlimited. 5. Click the Save button. If the box of I/O pin is unchecked, this pin wont be shown on relative application pages. In other words, you cannot do any setting/operation with this pin. See details in next section. 4.3 Relative Configuration and Application 4.3.1 Record on Input Trigger Refer to Recording Schedule / Event Setup. 4.3.2 Input and Responding Actions Refer to I/O Box Input and Responding Action Setup. 4.3.3 I/O Control Panel in Live View Refer to Live View Control Panel.  5. Live view There are two ways to execute the live view function: with Internet Explorer or with the Remote Live Viewer application. 5.1 Internet Explorer 5.1.1 Live View Control Panel 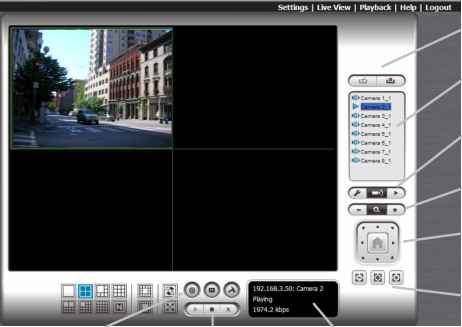 Play / Stop / Drop Start Menu Playback Live View Setting Information Display Window Log In/ Log Out (Live view service) Camera List Set Preset Point / Go to Preset Point Zoom out / Zoom in PTZ Camera Control Focus Far / Auto Focus / Focus Near PTZ Camera Control: You may control the camera view by using the PTZ camera control panel to adjust the cameras view. This is only available with cameras that support the PTZ function. Set Preset Point / Go to Preset Point: Adjust the camera view and click the button to set up this view as preset point. Repeat the process to add more preset points. Click the 1 button to see the preset view. Zoom: Click the + or - button to zoom in or zoom out the view. Play / Stop / Drop: Select a camera / video and click this button to play/stop/disconnect a particular channel. Information Display Window: Display video information including server name, video current status, and bit rate for a selected channel. Start Menu > E-Map: Upload map and drag camera or I/O on it to track device location and alarm status with instant response when an event occurred. See details in the chapter of E-Map. Start Menu > I/O Control Panel: Utilize I/O device function remotely. User can remotely adjust the Output Pins by turning it on or off. 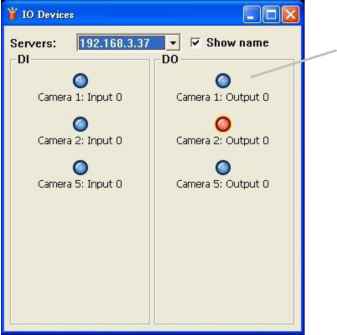 Click to turn on/off the Output pins Auto Scan: Activate auto scan to rotate the channels on the display screen. For instance, you may select to show only 4-split screen on the liveview, while connecting 16 channels to the system. With auto scan function, you are able to see all 16 channels by turns. Layout: Click to change the multiple-split layout. Auto Scan Full Screen 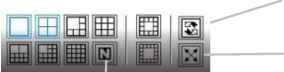 Layout: NxN You can right click on the camera screen to enable the following function. 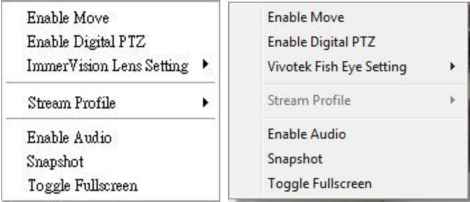 Enable Move: Adjust the current view of camera which supports PT function by dragging the button on the display screen. Enable Digital PTZ: Click the + or - button to zoom in or zoom out the view. The lower right square flashing on the video grid indicates the correspondent view of the camera. ImmerVision Lens Setting: Select the mode of lens, original, PTZ mode, Quad mode and Perimeter mode. Vivotek Fish Eye Setting: Select the mode of lens, Original, Rectilinear mode, Full-view panorama mode, Dual-view panorama mode. Type of modes depends on lens location. Stream Profile: Select the stream profiles, original, low, minimum. Enable Audio: Enable audio on active channel(s). Snapshot: Select the snapshot function to capture a specific video image immediately. Toggle Fullscreen: Select it to view cameras with full screen. Press Esc or right click un-select full screen to go back to the original view. Also, right click on camera list to duplicate and connect/disconnect designate cameras, and do other functions. Duplicate Ceonera Connect Disconnect Login Server Logout Server Connect All Disconnect All Duplicate Camera: Select the duplicate camera function to create multiple views. The duplicated camera will be shown with green indicator as the right picture. Combine this function with digital PTZ, users are allowed to enlarge different spots and view them in different channels without failing to record the whole view. Connect / Disconnect: Click to connect or disconnect the designate camera. Login / Logout Server: Click to login or logout. Connect All / Disconnect All: Click to connect or disconnect all cameras. 5.1.2 Live View Setting 1. Open Internet Explorer and log in to the unit. 2. Set the cameras. 3. Click the Live View button on the top of the page. 4. Select a camera(s) from the camera list on the right and then drag it to where you wish the image to be displayed. 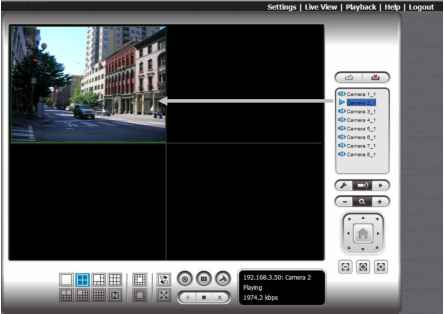 When running Internet Explorer, do not use the function Open in New Window . Using this function may cause Internet Explorer to become unstable. 5.1.3 General Setting 1. Open Internet Explorer and log in to the unit. 2. Click the Live View button on the top of the page.  3. Click the General Setting button. 4. Click the General tab. 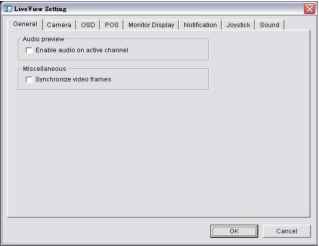 5. Check the Enable audio on active channel option to enable audio streaming on active channel. This function synchronizes with right click on camera to enable audio. 6. Check Synchronize video frames to avoid the tearing problem occurring in video display while increasing the CPU loading. 7. Click the OK button. 5.1.4 Stream Profile Setting Select the preferred stream type of each camera as default live view profile. 1. Open Internet Explorer and log in to the unit. 2. Click the Live View button on the top of the page. 3. Click the General Setting button. 4. Click the Camera tab. 1 ... 6 7 8 9 10 11 12 ... 16 |