
8(903)201-21-74
ООО "ЧетыреДатчика"
|
Оператор: 8(903)201-21-74 ООО "ЧетыреДатчика" |
|
Оператор: 8(903)201-21-74 ООО "ЧетыреДатчика" |
Главная страница Titan-nvr manual 1 2 3 4 5 6 7 8 9 For security reason, the privilege of UPnP port-forwarding is LOWER than port-forwarding configured on router. Therefore, if the ports have been used on router, we are unable to know before finding out access failure. UPnP port-forwarding is for temporarily use only. Most of UPnP router will clean up all UPnP ports after router reboots. Furthermore, for some routers, if the port you want to add has already been used for other devices in the same way (UPnP port forwarding), this enable action will cover over the settings. 2.5.4 Network Service Setup 1. Log in to the unit. 2. Click Network Setup / Network Service. 3. Click the Network Service tab. 4. Set up port and maximum connections of client and click the Save button. 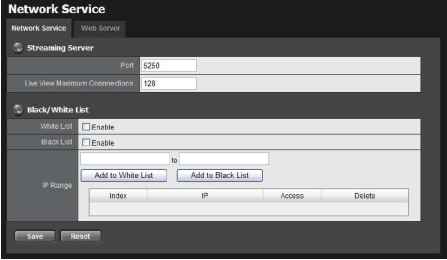 Streaming Server > Port: Live/playback streaming transmission port. (default: 5250) > Live View Maximum Connections: Maximum connections from remote access. (max: 256 connections; default: 64) Black/White List > White List: Only IP addresses from the allowed list are allowed to log in. > Black List: IP addresses from the blocked list will be unable to log in. One connection means that one user connects to one camera. 4 users connect to a server with 16 Live View Maximum Connections, and the average connection for each user is 4, rather than 16.    5. Click the Web Server tab. Network Service 6. Set up a port for this unit and click the Save button 2.5.5 Master/Slave Configuration This is a basic structure of management server and client. By adding slave servers in one master server, and configure same user account to master/slave server, user can get the camera list of slave servers when accessing master server with NuClient. Follow the steps to build up the connection between master and slaves. 1. Log in to the unit. 2. Click Network Setup / Master / Slave. 3. Click the Master/Slave tab. 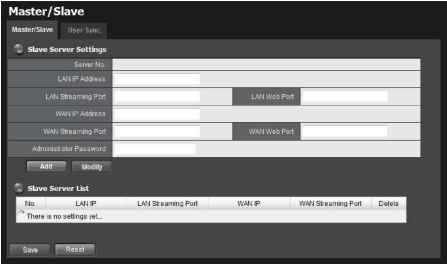 4. Type the LAN/WAN IP and port, administrator password and click the Add button. 5. Repeat the previous step to add more slave servers. 6. Click the Save button to apply the settings. 7. Click the User Sync. tab. 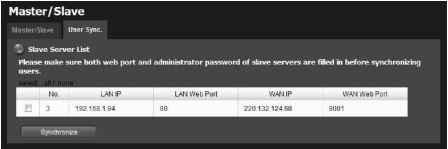 8. Select the slave servers with their web port and administrator password being filled in correctly on the page of master/slave, and click the Synchronize button to sync the user accounts of master server to slave servers. The action is synchronizing user accounts . If the user accounts are existed on slave servers, which privilege settings will be kept; if the user accounts are new to slaves, which privileges are as default.  2.6 Management 2.6.1 View the List of Users 1. Open Internet Explorer and login the unit. 2. Click Management/ User Management. 3. Click the Create New Users tab. 4. The list will be displayed on the bottom of the page.  2.6.2 Create New Users 1. Open Internet Explorer and login the unit. 2. Click Management/ User Management. 3. Click the Create New Users tab.  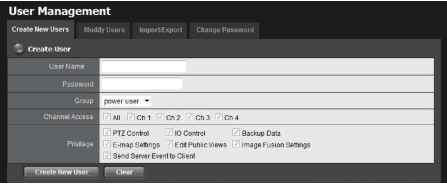 4. Insert the username of this new user. 5. Insert the password of this new user. 6. Choose the group of this user. Power user: Power user can do all the settings and operation except the Network Settings, RAID Settings, and Management function. User: User just can change his/her password and operate client functions. Guest user: User can operation client function only. 7. Select the cameras which this user can access. 8. Manage the privilege for this user. 9. Click the Create New User button to finish it. The Administrator will be the only user who can use all of the functions. There is a default administrator account in the system, and you cannot create neither another Administrator account, nor another username named admin . 2.6.3 Modify User Information 1. Log in to the unit. 2. Click Management / User Management. 3. Click the Modify Users tab. 4. Click one of the users in the User List on the bottom of this page.  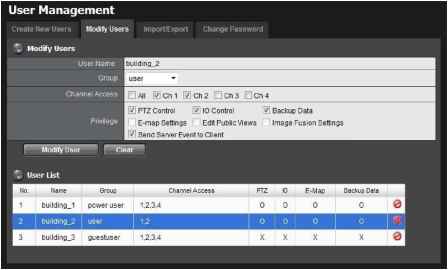 5. Change the group of this user. 6. Select the cameras which this user can access. 7. Manage the privilege for this user. 8. Click the Modify User button to finish it. 2.6.4 Change a Users Password 1. Log in to the unit. 2. Click Management / User Management. 3. Click the Change Password tab. 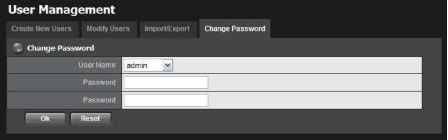 4. Choose the user. 5. Enter a new password. 6. Enter this new password again. 7. Click the OK button. 2.6.5 Delete Users Except for the administrator, you can delete any users with the following steps. 1. Log in to the unit. 2. Click Management / User Management. 3. Click the Modify Users tab. 4. Click the Delete icon of the user you want to delete. 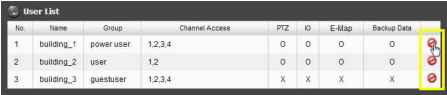 5. In the confirmation box, click the OK button. 2.6.6 Import/Export User Account For large-scale projects, the locations are equipped with a lot of cameras and are under surveillance by many users. Since its possible for users being assigned to check videos from multiple servers, adding same user accounts in multiple servers is unavoidable, which takes time definitely. In this case, we design an easier way to manage user accounts. Please refer to Master/Slave Configuration, or follow the steps below. 1. Log in to the unit. 2. Click Management / User Management. 3. Click the Import / Export tab. User Management Import Users  4. For exporting user account, click the Export button to export current user account and privilege. 5. For importing user account, browse an user.cfg file and click the Import button to load user account and privilege.  When importing an user.cfg exported from a less-channel server to a more-channel server, 16ch and 32ch for example, which total numbers of channel access are different, in this case, only 16ch will be checked after importing .cfg. However, if the user account belongs to power user , all privileges are defaulted checked even the number of channel access of original server is less than this server. 2.6.7 Online License Activation Activate a camera license to have more camera capacity. There are two ways to activate license, online and offline. 1. Log in to the unit. 2. Click Management / License Management. License Management Actvate OrJneAcHvati * Offlne Activation Step 1: Export sen№r infonnatian fie Step 2: Copy exported offline.reg to PC connected tn the Internet and execute OflUneTooLexe to activate Hcense and get the offline Rcense fie Step 3: Import offlinE license Hie  Import , License List Th&re are no licenses yet. 3. Select Online as the Activation Type, input serial number, and click the Activate button. 4. The license will be updated in License List if activated successfully. System will reboot automatically.   2.6.8 Offline License Activation If the device is set up in Intranet (Local LAN) without Internet connection, there is another way to activate license. 1. Log in to the unit. 2. Click Management / License Management. License Management  * Offlne Activation Step 1: Export server infonnatian fie Step 2: Copy exported offiine.reg to PC connected tn the Internet and execute OfUJneToaLexe to activate Hcense and get the offline Rcense fie Step 3: Import оИТпе lic&nse Hie  Import , License List Th&re are no licenses yet. 3. Click the Export button under the section of Offline Activation to export the information of this unit. 4. Download dialog pops up. Save the request file and take it to other PC which is connected to the Internet. Furthermore, the PC should be installed OffLineTool.exe which can be found from Titan NVR toolkit. 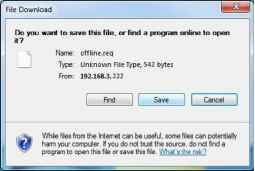 5. Execute the OffLineTool.exe in that PC with Internet connection, and select the request file offline.req. 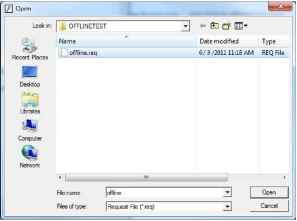 6. Input the serial number, click the Activate button, and save the .dll file offline license.dll. 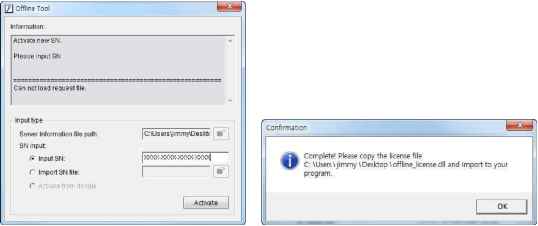 7. Import the license file to the unit. omr>e AcdwatJon Step 1: Export server informatioii fie Eiqjmt Step 2: Copy €афоЛе|1 offliite.reg to PC с license and get the offTme license file Step 3: Import offline Ticense file ?cted to EhelnterneL and t  0ImportbreneEk C:\Document5 and S&tt [ 8. The license will be updated in License List if activated successfully. System will reboot automatically.  2.6.9 View the Event Log 1. Log in to the unit. 2. Click Management / Log System to find the event list of your unit.  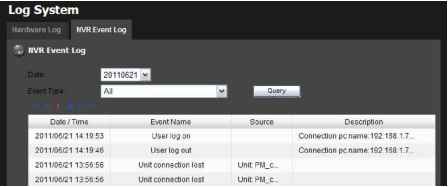 There are two kinds of event which will be listed on this page. Hardware Log: The log information of the operations to your unit, such as reboot or shutdown. NVR Event Log: The log information of event, recording, backup, export, I/O, etc. Refer to the figure below for details. 1 2 3 4 5 6 7 8 9 |