
8(903)201-21-74
ООО "ЧетыреДатчика"
|
Оператор: 8(903)201-21-74 ООО "ЧетыреДатчика" |
|
Оператор: 8(903)201-21-74 ООО "ЧетыреДатчика" |
Главная страница Titan-nvr manual 1 ... 4 5 6 7 8 9
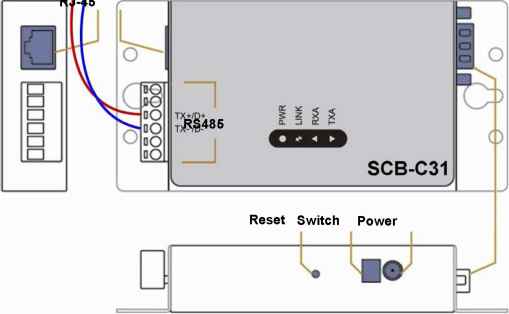 Multiple I/O Boxes can be connected to a single SCB-C31. However, series connection of I/O boxes is forbidden. Furthermore, the default ID for each I/O Box is the same. Please follow the direction to setup I/O Box one by one. 3.1.3 Software Installation - SCB-C31 Step 1: Open Internet Explorer to setup SCB-C31. The default IP address is 192.168.1.1.
Step 2: Setup IP address and port. 1. Static IP Address  2. Server Listening Port: The default port is 4000, which is not the port for setting page, but for signal transmission. 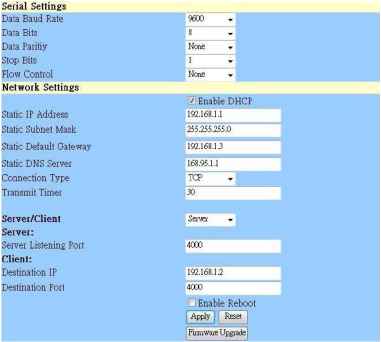 Step 3: Click the Apply button to activate configuration. Due to the stability of data transmission, one SCB-C31 can be paired with one NVR unit only. 3.1.4 Software Installation - SCB-C24/26/28 The default ID of I/O Box is identical. To avoid the conflict between Boxes, please connect only one Box with SCB-C31 and execute the setup application to change the ID from the default value (1). 1. Execute IOConfig.exe, type in the IP address and port of SCB-C31, and click the Scan button.  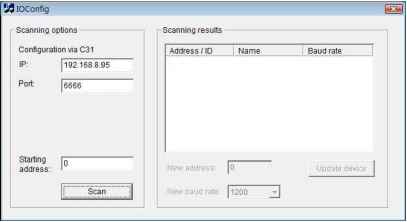 IOConfig.exe starts scanning the ID from 0 to 255, and it may take around a minute to finish scan. 2. When the I/O Box is discovered, click on the item and change the ID from the New Address field. Click the Update device button to activate the settings. 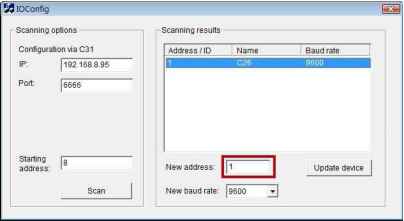 3. Scan again to make sure the configuration is validated. In this case, we changed the ID to 10, so we can modify the number of Starting address to 10 to save the searching time.  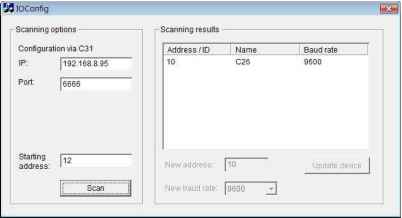 4. Refer to the HW Installation section to connect other I/O Box and repeat the steps 1 through 3 above to configure more I/O Boxes. 3.2 Software Setup 3.2.1 Add I/O Box 1. Log in to the unit. 2. Click POS & I/O / I/O Settings / I/O Box Settings. 3. Enter the information of I/O box. I/O Settings BO Bon Settings UDPin , I/O Box Settings  SCB-C31 + SCB-C24v Device No: The unique ID system distributes in sequence automatically. Device Name: The name of the I/O box. Device Type: The types of I/O box, including SCB-C24, SCB-C26, and SCB-C28. IP Address: The IP Address of SCB-C31. Port: The transmission port of SCB-C31. ID: The ID of the I/O box. 4. Click the Create button, and the information will be updated in I/O Box List. 5. Repeat steps 3 and 4 to add more I/O boxes in the list. 6. Click the Save button to activate the settings. Meanwhile, system will distribute an unique ID to each device. 3.2.2 Modify I/O Box Information 1. Log in to the unit. 2. Click POS & I/O / I/O Settings / I/O Box Settings. 3. Click the I/O box which you want to modify from the list. 4. Modify the information of this I/O box, and click the Modify button. 5. Click the Save button to activate the settings. 3.2.3 I/O Pin Setting 1. Log in to the unit. 2. Click POS & I/O / I/O Settings / I/O Pin Settings. 3. All input and output pins are shown in this page, including the ones from cameras and I/O boxes. 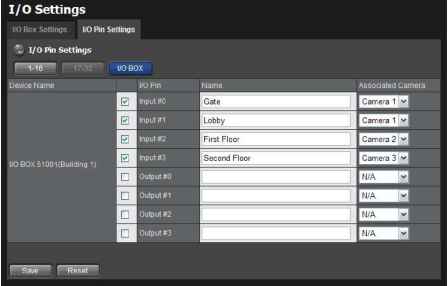 Device Name: The name of the I/O box. I/O Pin: Check the box to enable a pin. (default: checked) Name: The name of the I/O pin. Associated Camera: You may assign one camera to each digital input device. DIs included with IP cameras will keep its own camera as default associated camera. 4. Click the Save button. If the box of I/O pin is unchecked, this pin wont be shown on relative application pages. In other words, you cannot do any setting/operation with this pin. See details in next section. 3.3 Relative Configuration and Application 3.3.1 Record on Input Trigger Refer to Recording Schedule / Event Setup. 3.3.2 Input and Responding Actions Refer to I/O Box Input and Responding Action Setup. 3.3.3 I/O Control Panel in Live View Refer to NuClient user manual for details.  4. External Storage 4.1 Create a Volume on DAS The current compatible DAS is AXUS FiT Series. We dont guarantee the quality of other DAS models. Please refer to the manual of AXUS FiT Series to create a single volume on DAS. We are unable to create a volume on external storage in Titan NVR setting page, so do NOT skip this step before connecting to Titan NVR. The maximum volume size to create RAID on Titan NVR is 16T. Please make sure every volume you are going to add as a external storage is under 16T. 4.2 Create an External Storage 1. Log in to the unit. 2. Click RAID & File System / RAID Management. 3. You will find External SATA Disk displayed in Disk List. RAID Management RAID Status laotsiy с . iUUD status -Volumes Disks .....nism - -Free DiskE DlsK6(sSAIAJ  V0LUME1 RAim Functional 931.51 GB (953S68MB) 893.г2 0В(914еб4МВ) 23.Ве GB (24232 MB} II 2011fB/2+ 04:33:01 PH 4. Click on the eSATA disk directly to check the disk drive information.    5. Refer to the section of Create a RAID Volume to create a volume for it. You can either create a volume with eSATA and embedded disk(s), or create an isolate volume with eSATA disk only. 4.3 Create an External Storage on iSCSI 1. Log in to the unit. 2. Click RAID & File System / iSCSI initiator 3. Fill in the IP address and port (default 3260) for iSCSI, and click Discover 4. You will see the iSCSI you discovered. 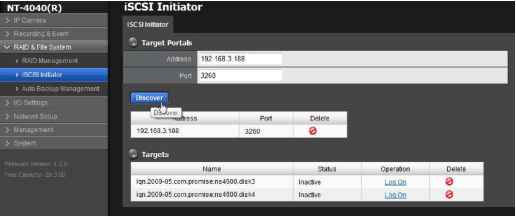 5. Log on each disk on Target. If you have set password on iSCSI, choose CHAP to log on. If not, choose None .  6. After log on the disk, choose RAID Management, you will see the iSCSI disk on Free disks. 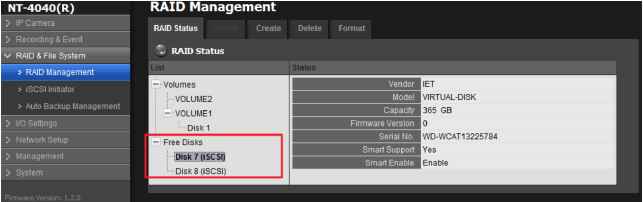 7. Refer to the section of Create a RAID Volume to create a volume for it. You can only create a volume with purely iSCSI disk. We suggest user use more HD to create one volume. Not use one HD to divide to more than 2 volume. If you log off the disk which has been created as a RAID, it may destroy the current recording file.   5. Log out Click the Logout button on the top of the page to log out of the system. If there is no action in 10 minutes, the system will log out automatically to avoid unauthorized access. 1 ... 4 5 6 7 8 9 |